Blog Archives
Recipe 1: Writing Extended Events to a CSV file
Welcome to the first recipe of this Extended Events cookbook! You will find the first blog post of the series here and you can browse all recipes with the xesmarttarget tag on this blog.
Recipes: what are the ingredients?
Every recipe starts with a problem to solve and has three ingredients:
- A session to capture the events
- A JSON configuration file for XESmartTarget to process the events
- A client application to read the data produced by XESmartTarget
The problem
In this case, imagine that you wanted to observe the commands executed on a SQL Server instance and save them to a file to process them later. Of course, Extended Events can do that with the built-in targets. However, when you write to a file target, the file has to reside on the disks of the SQL Server machine (well, actually, the file could be sitting on a file share writable by SQL Server or even on BLOB storage on Azure, but let’s keep it simple). How do you use the storage of the client machine instead of using the precious filesystem of the server machine?
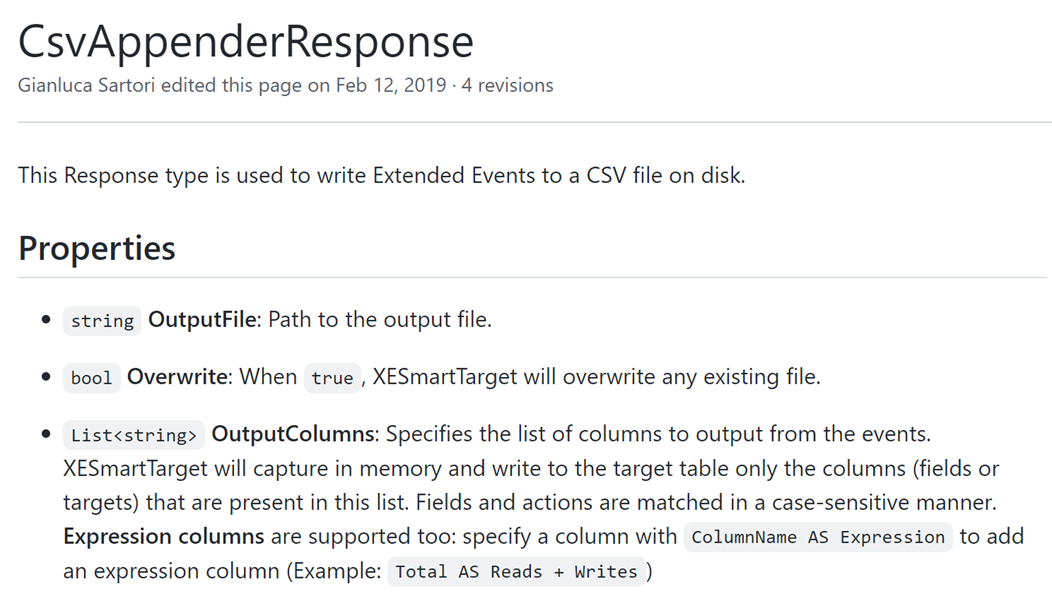
Here is where XESmartTarget can help you with a CsvAppenderResponse. This Response type writes all the events it receives to a CSV file, that can be saved on the client machine, without wasting disk space on the server. You can decide which events to process and which columns to include in the CSV file, but more on that later.
The session
First of all, you need a session: how do you create it? I know what you’re thinking: “if this was a trace, I would know how to get it”. Right. Many DBAs are still using Traces, because Extended Events have not been very friendly to them. Profiler was super easy to use: start the program, connect, select a template, choose events and columns, start the trace and you see the data right away in the GUI. Extended Events can be a bit overwhelming because there are multiple concepts to get hold of: sessions, events, targets, fields, actions… Yeah, it’s the same old story: more power, more responsibility.
It was not just you: everyone was confused by Extended Events when it first shipped with SQL Server 2012 (well, we had something in 2008, but it wasn’t really a replacement for traces until 2012).
Chrissy LeMaire was just as confused as you, so she did what the giants do: she studied the topic in depth and not only she made it easier for herself, but she made it easier for everyone using dbatools. If you don’t know what dbatools is, you really need to check it out: it’s a Powershell module that allows DBAs to perform all their day-to-day tasks on SQL Servers using powershell. Everything you can do with SSMS (and much more!) can be done with dbatools. Chrissy created a lot of dbatools commands to work with Extended Events and now everything is much easier!
But is it really as easy as working with traces? With Profiler, you would have the Standard template and you would only need to click start. Can it be that simple with dbatools? Let’s find out.
One of the great features that Chrissy added to dbatools is the ability to create a session from a template. She gathered a lot of useful session definitions from community blog posts, scripts, and templates from Microsoft tools, then she included those definitions in dbatools. It’s the same as in Profiler: all you have to do is select the appropriate template:
Get-DbaXESessionTemplate | Out-GridView

In this case you can use the “Profiler Standard” template and of course it’s there and you can do it with just a couple of lines of PowerShell:
Import-DbaXESessionTemplate -SqlInstance "localhost\SQLEXPRESS" -Name "Recipe01" -Template "Profiler Standard"Start-DbaXESession -Session "Recipe01" -SqlInstance " localhost\SQLEXPRESS"That couldn’t be easier! Notice that the commands above did not add any targets to the session: the streaming API will take care of processing the data.
If you don’t like dbatools or don’t want to use powershell, the script for the session is this:
IF NOT EXISTS ( SELECT * FROM sys.server_event_sessions WHERE name = 'Recipe01')

CREATE EVENT SESSION [Recipe01] ON SERVER
ADD EVENT sqlserver.attention(
    ACTION(
		 package0.event_sequence
		,sqlserver.client_app_name
		,sqlserver.client_pid
		,sqlserver.database_id
		,sqlserver.nt_username
		,sqlserver.query_hash
		,sqlserver.server_principal_name
		,sqlserver.session_id
	)
    WHERE ([package0].[equal_boolean]([sqlserver].[is_system],(0)))
),
ADD EVENT sqlserver.existing_connection(
	SET collect_options_text=(1)
    ACTION(
		 package0.event_sequence
		,sqlserver.client_app_name
		,sqlserver.client_pid
		,sqlserver.nt_username
		,sqlserver.server_principal_name
		,sqlserver.session_id
	)
),
ADD EVENT sqlserver.login(
	SET collect_options_text=(1)
    ACTION(
		 package0.event_sequence
		,sqlserver.client_app_name
		,sqlserver.client_pid
		,sqlserver.nt_username
		,sqlserver.server_principal_name
		,sqlserver.session_id
	)
),
ADD EVENT sqlserver.logout(
    ACTION(
		 package0.event_sequence
		,sqlserver.client_app_name
		,sqlserver.client_pid
		,sqlserver.nt_username
		,sqlserver.server_principal_name
		,sqlserver.session_id
	)
),
ADD EVENT sqlserver.rpc_completed(
    ACTION(
		 package0.event_sequence
		,sqlserver.client_app_name
		,sqlserver.client_pid
		,sqlserver.database_id
		,sqlserver.nt_username
		,sqlserver.query_hash
		,sqlserver.server_principal_name
		,sqlserver.session_id
	)
    WHERE ([package0].[equal_boolean]([sqlserver].[is_system],(0)))
),
ADD EVENT sqlserver.sql_batch_completed(
    ACTION(
		 package0.event_sequence
		,sqlserver.client_app_name
		,sqlserver.client_pid
		,sqlserver.database_id
		,sqlserver.nt_username
		,sqlserver.query_hash
		,sqlserver.server_principal_name
		,sqlserver.session_id
	)
    WHERE ([package0].[equal_boolean]([sqlserver].[is_system],(0)))
),
ADD EVENT sqlserver.sql_batch_starting(
    ACTION(
		 package0.event_sequence
		,sqlserver.client_app_name
		,sqlserver.client_pid
		,sqlserver.database_id
		,sqlserver.nt_username
		,sqlserver.query_hash
		,sqlserver.server_principal_name
		,sqlserver.session_id
	)
    WHERE ([package0].[equal_boolean]([sqlserver].[is_system],(0)))
);

IF NOT EXISTS ( SELECT * FROM sys.dm_xe_sessions WHERE name = 'Recipe01')
    ALTER EVENT SESSION Recipe01 ON SERVER STATE = START;
Now that you have a session running you can work with the events it captures, using XESmartTarget.
XESmartTarget
The tool already ships with multiple Response types: all you have to do is prepare a configuration file. In this case you will use a CsvAppenderResponse. If you go to the documentation page, you will see what properties are exposed by this Response type, which can be set in a JSON configuration file.
OK, let’s do it! Following the example on the documentation, you can craft your own JSON file to configure XESmartTarget:
{
    "Target": {
        "ServerName": "(local)\\SQLEXPRESS",
        "SessionName": "Recipe01",
        "Responses": [
            {
                "__type": "CsvAppenderResponse",
                "OutputFile": "c:\\temp\\output.csv",
                "OverWrite": "true",
                "OutputColumns": [
                    "name",
                    "collection_time",
                    "client_app_name",
                    "server_principal_name",
                    "database_name",
                    "batch_text",
                    "statement"
                ],
                "Events": [
                    "rpc_completed",
                    "sql_batch_completed"
                ]
            }
        ]
    }
}
There are a couple of things to note on this file. First, it’s a JSON file, so it has to comply with the syntax of Javascript: backslash in strings has to be escaped with “\”, so it becomes “\\”. For each object in the “Responses” array, the property “__type” controls which Response type is used, then you can use its properties inside that block. For CsvAppenderResponse, the property “OutputColumns” controls which columns will be written to the CSV file. These columns are fields or actions from the events.
The property “Events” controls which events are processed by the current Response.
If your session captures multiple event types, you can choose which ones are processed by each Response, using the “Events” property. In this case, the profiler default template capture events that you don’t want to process, like existing connections, so you can filter for “rpc_completed” and “sql_batch_completed” events only.
Now, save the file as c:\temp\Recipe_01_Output_CSV.json and you can use it with XESmartTarget, by running this:
"%ProgramFiles%\XESmartTarget\xesmarttarget.exe" --File c:\temp\Recipe_01_Output_CSV.json

The output on the cmd window won’t tell you much, except that XESmartTarget is running, it’s connected to the appropriate session and the it’s writing to the CSV file.
Let’s check what happens if you run some commands from Azure Data Studio:

The cmd window doesn’t say anything new, but if you open the CSV file with VSCode you will see that some data has been saved:

Code is great for inspecting CSV files, because it has the ability to reload the file when new rows are added and also has nice plugins like Rainbow CSV to help you interpret the contents correctly.
When you are finished with your capture, you can press CTRL+C on the cmd window where XESmartTarget is running and it will shut down.
Recap
You wanted to save all the commands executed on your SQL Server to a CSV file on your computer. You had to set up a session for that, which was super easy, thanks to dbatools. Then you configured XESmartTarget to process all the events and save them to the CSV file of your choice. You could also watch the events flowing to the file in real-time, thanks to Code and its plugins.
In this recipe you familiarized with XESmartTarget and had a glimpse of its capabilities. The next recipe will introduce more capabilities and showcase more features of the JSON configuration format. Stay tuned!
10 DBA recipes with XESmartTarget
Some time ago, I started a project called XESmartTarget. I find it super useful and you should probably know about it. It’s totally my fault if you’re not using it and I apologize for all the pain that it could have saved you, but it didn’t because I did not promote it enough.
Now I want to remedy my mistake with a 10 days series of blog posts on XESmartTarget, which will show you how useful it can be and how it can be used to accomplish your daily DBA tasks using Extended Events.
In this first post of the series, I will introduce XESmartTarget, show how it works and how to configure it. For the next 10 days I will publish a post to show you how to solve a specific problem using XESmartTarget. Let’s go!
What is XESmartTarget?
XESmartTarget is a small command line utility that can connect to an Extended Events session using the streaming API and can perform actions in response to the events captured by the session. The actions can vary from saving to a table in a database, writing to a CSV file, sending alerts and many more.
You can think of XESmartTarget as a processing engine for Extended Events, that you can run from the command line, without having to write a single line of code.
Where does it run?
XESmartTarget does not need to run on the server, it can run on any Windows machine that can connect to the target SQL Server instance. You can certainly run it on the server, but you don’t need to. XESmartTarget depends on Microsoft Visual C++ 2013 Redistributable: if you have the client utilities (SSMS) on your computer then you’re good to go, otherwise you can always download from Microsoft. It doesn’t run on Linux, I’m sorry.
How do I get it?
It’s open-source software: you can download it from GitHub and install it. You have a x64 setup kit and a x86 setup kit: make sure to pick the correct version for your operating system. Your browser may complain about it being unsafe, despite being signed with a code signing cert (sigh…). Don’t worry, go ahead and download it. Windows may also complain when running the .msi, so you will have to bypass SmartScreen as well. By default, the software gets installed to c:\Program Files\XESmartTarget
Why do I need it?
The built-in targets for Extended Events are great, but they don’t cover 100% of the spectrum. Some targets, like writing to a database table, would be extremely useful but are not there. There are multiple reasons, but mainly this is because of performance concerns: Extended Events have been designed to be fast and have a low performance impact on the server being monitored. Writing to a file or to a memory buffer is a fast operation, writing to a table or applying additional logic can end up slowing down the collection process and the SQL Server instance. However, Microsoft decided to give us the ability to post-process the events in the .xel files or process the events in near real-time using the streaming API for Extended Events. XESmartTarget uses the streaming API to receive the events from the server and the API itself has a built-in protection mechanism that prevents the server from being chocked by the client: if the client can’t keep up with the data rate from the server, it gets disconnected.
Having an API to process events means that we can write code to perform common actions on the events. I created 7 types of Response classes, that can receive data from the events and process them to let you perform actions that you can’t perform using the built-in targets:
- CsvAppenderReponse – writes event data to a CSV file
- EmailResponse – sends alerts via email based on event data
- ExecuteTSQLResponse – runs T-SQL commands for each event captured
- TableAppenderReponse – writes event data to a table in a SQL Server database
- GroupedTableAppenderReponse – aggregates event data in memory and then merges with existing data in the target table
- ReplayResponse – replays sql_batch_completed and rpc_completed events
- GelfTcpResponse – writes events to a GrayLog server
- TelegrafAppenderReponse – writes to an InfluxDB database using Telegraf
Will I have to write code?
If you really, really want to write code, you can do it: XESmartTarget is a .dll library that you can incorporate in your project. That’s what we did with dbatools. The license is super permissive, so go ahead and do it!
However, one of the strengths of XESmartTarget is that it requires absolutely no coding: all you have to do is configure XESmartTarget to do what you want. It is a command line tool and it accepts some parameters:
-F|--File <path to the .JSON configuration file>
        Uses the supplied .json file to configure the source of the events and the list of responses
-N|--NoLogo
        Hides copyright banner at startup
-Q|--Quiet
        Suppresses output to console
-G|--GlobalVariables <variable1=value1 variableN=valueN>
        Replaces $variableN with valueN in configuration files
-L|--LogFile <path to log file>
        Writes the log to the file specified
As you can see, you can use a .json file to provide the configuration. Not everyone likes JSON for configuration files, but I find it easy to use and good enough for the purpose. A nice addition to the standard JSON format is the ability to add comments using the javascript notation.
A typical .json configuration file looks like this:
{
    "Target": {
        "ServerName": "server to monitor, where the session is running",
        "SessionName": "name of the session",
        "Responses": [
            {
                // Properties for Response1
            },
            {
                // Properties for ResponseN
            }
        ]
    }
}
Each Response subclass has a set of public properties that can be set in the configuration file. You can visit the documentation page for each Response type to discover what are the properties available to you and see an example json file.
For instance, TableAppenderResponse has some properties to set the target server/database/table for the events and you can set them like this:
{
    "Target": {
        "ServerName": "(local)\\SQLEXPRESS",
        "SessionName": "commands",
        "Responses": [
            {
                "__type": "TableAppenderResponse",
                "ServerName": "(local)\\SQLEXPRESS",
                "DatabaseName": "DBAStuff",
                "TableName": "queries",
                "AutoCreateTargetTable": true,
                "UploadIntervalSeconds": 10,
                "OutputColumns": [
                    "name",
                    "collection_time",
                    "client_app_name",
                    "server_principal_name",
                    "database_name",
                    "batch_text",
                    "statement"
                ],
                "Events": [
                    "rpc_completed",
                    "sql_batch_completed"
                ]
            }
        ]
    }
}
Once you have your .json configuration file ready and your Extended Events session running, you can start XESmartTarget. It’s a command like tool, so it won’t show any GUI, but it will print messages to the console or to the log file to indicate that it’s doing some work.
As an example, you can save the above as c:\temp\capture_commands.json and run it with this command line:
“C:\program files\xesmarttarget\xesmarttarget.exe” --File c:\temp\capture_commands.jsonYou will see something similar to this:

If you look in your database, you will see some rows in the target table:

If you want to stop XESmartTarget, you can press CTRL+C.
What else can it do?
The sky is the limit. In the next posts of this series, I will demonstrate how to accomplish typical DBA tasks using XESmartTarget and you will learn how to use the appropriate Response type for every need. You will also see how to unleash the most advanced features of the configuration files, to filter events, group and summarize data, use fields and actions as parameters and more.
Keep an eye on the xesmarttarget tag on this blog!
Where are my recipes?
There you go:
https://spaghettidba.com/2022/02/22/recipe-1-writing-extended-events-to-a-csv-file/
https://spaghettidba.com/2022/02/23/recipe-2-writing-extended-events-to-a-table/
https://spaghettidba.com/2022/02/24/recipe-3-merging-and-manipulating-events/
https://spaghettidba.com/2022/02/25/recipe-4-sending-alerts-via-email/
https://spaghettidba.com/2022/02/28/recipe-5-killing-blocking-spids/
https://spaghettidba.com/2022/02/28/recipe-6-auditing-successful-logins/
https://spaghettidba.com/2022/03/01/recipe-7-finding-unused-tables/
https://spaghettidba.com/2022/03/02/recipe-8-analyzing-a-workload/
https://spaghettidba.com/2022/03/03/recipe-9-capturing-queries-and-plans/
https://spaghettidba.com/2022/03/04/recipe-10-writing-events-to-influxdb/
