Monthly Archives: February 2022
Recipe 6: Auditing Successful Logins
Welcome to a new recipe of this Extended Events cookbook! You will find the first blog post of the series here and you can browse all recipes with the xesmarttarget tag on this blog.
The problem
Sometimes you are not interested in the individual events captured by a session, but you want to extract some information from a series of events, by grouping and aggregating them. This is the case of events that happen very often, like, logon events, that can help you validate your story.
Imagine that you inherited a big, busy and chaotic SQL Server instance, with lots of databases and logins. One of the things that you probably want to do is track which logins are active and which ones are not and can be safely disabled.
One of the possible ways of doing this is to enable successful and failed login auditing in ERRORLOG, but this creates a lot of noise. No thanks, I don’t want a messy ERRORLOG.
Another possibility is to capture login events with an Extended Events session and write them to a file target. However, with this approach you capture the individual events, which you don’t need. What you really want is a very simple information: when has each login accessed the server the last time? Writing session data to a file target does not answer that question directly, but forces you to read and aggregate all the data in the file at a later time.
XESmartTarget can help with this, using the GroupedTableAppenderResponse. This Response type aggregates the data in memory before writing it to a target table, where it is merged with the existing data.
The session
Let’s set up a session for this. You need to capture the “login” event, which contains all the data that you need.
IF NOT EXISTS ( SELECT * FROM sys.server_event_sessions WHERE name = 'Recipe06')

CREATE EVENT SESSION [Recipe06] ON SERVER
ADD EVENT sqlserver.login(
    SET collect_database_name=(1)
    ACTION(
        sqlserver.client_app_name,
        sqlserver.server_principal_name
    )
)
GO


IF NOT EXISTS ( SELECT * FROM sys.dm_xe_sessions WHERE name = 'Recipe06')
    ALTER EVENT SESSION Recipe06 ON SERVER STATE = START;
XESmartTarget
This is what the configuration looks like:
{
    "Target": {
        "ServerName": "$ServerName",
        "SessionName": "Recipe06",
        "FailOnProcessingError": false,
        "Responses": [
            {
                "__type": "GroupedTableAppenderResponse",
                "ServerName": "$ServerName",
                "DatabaseName": "XERecipes",
                "TableName": "Recipe_06_LoginAudit",
                "AutoCreateTargetTable": false,
                "OutputColumns": [
                    "server_principal_name",
                    "database_name",
                    "client_app_name",
                    "MIN(collection_time) AS first_seen",
                    "MAX(collection_time) AS last_seen",
                    "COUNT(collection_time) AS logon_count"
                ],
                "Events": [
                    "login"
                ]
            }
        ]
    }
}
It’s very similar to the TableAppenderResponse, with one main difference: you can have aggregated columns, using the usual aggregation functions and aliases to assign a name to the columns. All the columns included in the output and not aggregated are used to create the groups. The data is aggregated first in memory and then it is merged with the data already in the table, using the group by columns as the join key.
There is one important rule to respect though: the name of the aggregated column cannot be the same as any other column from the events, so make sure to assign a new name.
Let’s save the file as c:\temp\Recipe_06_Login_Audit.json and run XESmartTarget:
"%ProgramFiles%\XESmartTarget\xesmarttarget.exe" --File c:\temp\Recipe_06_Login_Audit.json --GlobalVariables ServerName=(local)\SQLEXPRESSThe console window informs us that the rows are not being written directly to the target table, but they are grouped and aggregated according to the configuration.

Inspecting the data in the target table confirms that we have indeed 7 rows:

If you let XESmartTarget run for a while, it will keep writing more data to the target tables and it will update the counts, merging the data from memory with the data already in the table:

If you want to identify unused logins, all you have to do is run XESmartTarget for a meaningful amount of time (let’s say one month) and it will fill the data in the target table. Easy peasy.
Recap
GroupedTableAppenderResponse is a powerful tool to perform aggregations on the events captured by Extended Events sessions. It can be used to accomplish a lot of tasks.
In the next recipe you will learn how to use the GroupedTableAppenderResponse to identify unused tabled in the database. Keep watching the XESmartTarget tag!
Recipe 5: Killing blocking SPIDs
Welcome to the latest recipe of this Extended Events cookbook! You will find the first blog post of the series here and you can browse all recipes with the xesmarttarget tag on this blog.
The problem
In the previous recipe, you learned how to notify when specific events occur, using the EmailResponse. Notifications are appropriate when user intervention is required, but when the system can resolve the issue automatically it’s better to avoid notifying users of the issue altogether. Resolving the issue often means performing some action in the database, using T-SQL.
Of course, XESmartTarget has got you covered, with the ExecuteTSQLResponse.
For this post, the problem to solve is this: a session has an open transaction, is blocking other sessions, it’s been sleeping for a long time and it’s probably a good idea to kill it. This usually happens when there’s a problem in the application, that doesn’t handle transactions properly and leaves open transactions for a long time, maybe because it displays an error dialog, waiting for user input. There is very little that you can do in these cases: the blocked processes continue to pile up and the only thing left to do is kill the offending session.
Let’s see how to do that with XESmartTarget.
The session
Of course, there’s a session for that. The event to capture is the blocked_process_report. This event is connected to a server wide setting that controls the number of seconds after which a blocked process event is raised. That configuration option is “blocked process threshold”. If it is set to zero (default), the event is never raised. When it is set to a positive number N, the blocked_process_report event is raised every N seconds. Before you can use this event, you need to set “blocked process threshold” to, let’s say, 10 seconds:
EXEC sp_configure 'advanced', 1;
RECONFIGURE
EXEC sp_configure 'blocked process threshold', 10;
RECONFIGURE
GO
Then, you can set up the session to capture the blocked_process_report event. Since the event is fired every time a process is blocked for 10 seconds or multiples of 10 seconds, you probably want to capture only one instance of the event. You could filter the session, using the filters available for Extended Event sessions, but, in this case, I will show you how to filter events on XESmartTarget instead.
IF NOT EXISTS (SELECT * FROM sys.server_event_sessions WHERE name = 'Recipe05')

CREATE EVENT SESSION [Recipe05] ON SERVER
ADD EVENT sqlserver.blocked_process_report(
    ACTION(
        sqlserver.client_app_name,
        sqlserver.client_hostname,
        sqlserver.database_name,
        sqlserver.server_instance_name,
        sqlserver.server_principal_name,
        sqlserver.session_id,
        sqlserver.sql_text
    )
)
GO


IF NOT EXISTS (SELECT * FROM sys.dm_xe_sessions WHERE name = 'Recipe05')
    ALTER EVENT SESSION Recipe05 ON SERVER STATE = START;
XESmartTarget
The configuration for XESmartTarget uses the ExecuteTSQLResponse object, which has to be set up to execute commands on a target server. ServerName, DatabaseName, UserName, Password are used to establish the connection to the target server. TSQL is the command to execute.
{
    "Target": {
        "ServerName": "$ServerName",
        "SessionName": "Recipe05",
        "FailOnProcessingError": false,
        "Responses": [
            {
                "__type": "ExecuteTSQLResponse",
                "ServerName": "$ServerName",
                "DatabaseName": "master",
                "TSQL": "EXEC killBlocker {transaction_id}",  // the notation {propertyname} is used to
                                                              // include fields and action from the events
                "Events": [
                    "blocked_process_report"
                ],
                "Filter": "duration > 20000000 " // 20 seconds
            }
        ]
    }
}
The Filter property controls which events are processed by the Response and it is available for all Response types. In this case, we want to process only the events that have been blocked for more than 20 seconds. Ideally, XESmartTarget will kill their blocker, so that the event is not processed again.
The property TSQL can reference fields and actions from the source events using the notation {propertyname}. In this example, {transaction_id} is a parameter passed to the stored procedure killblocker and it is taken right from the blocked_process_report event.
The killblocker stored procedure has to be created in the master database and it looks like this:
USE master;
GO

IF OBJECT_ID('killBlocker') IS NULL EXEC('CREATE PROCEDURE killBlocker AS BEGIN RETURN END');
GO

--
-- Kills the session that is blocking the specified
-- transaction, when the blocking session is sleeping
-- and has not issued any command in the last 30 seconds
--
ALTER PROCEDURE killBlocker @transaction_id int
AS
BEGIN
    SET NOCOUNT ON;

    DECLARE @spid int;

    SELECT @spid = blocking_session_id
    FROM sys.dm_exec_sessions AS blocked_session
    INNER JOIN sys.dm_exec_requests AS blocked_request
        ON blocked_session.session_id = blocked_request.session_id
    INNER JOIN sys.dm_exec_sessions AS blocking_session
        ON blocked_request.blocking_session_id = blocking_session.session_id
    WHERE blocked_session.session_id = (
            SELECT DISTINCT request_session_id
            FROM sys.dm_tran_locks
            WHERE request_owner_id = @transaction_id
        )
        AND blocking_session.status = 'sleeping'
        AND blocking_session.last_request_start_time < DATEADD(second,-30,GETDATE());

    DECLARE @sql nvarchar(100) = 'KILL ' + CAST(@spid AS nvarchar(10));
    EXEC(@sql);
END
Save this JSON as c:\temp\Recipe_05_Kill_Blocking.json and, now that everything is in place, let’s run XESmartTarget:
"%ProgramFiles%\XESmartTarget\xesmarttarget.exe" --File c:\temp\Recipe_05_Kill_Blocking.json --GlobalVariables ServerName=(local)\SQLEXPRESSThere is not much to see on the console window. Let’s generate some blocking instead:

The command on the left leaves an open transaction, while the command on the right tries to access a resource held by the open transaction, so it gets blocked. Since the session on the left is sleeping, I expect it to be killed by XESmartTarget.
After 20 seconds of blocking, the session on the left gets killed and the blocked processes are free to continue. Yay!
Recap
The ExecuteTSQLResponse object allows you to execute custom T-SQL commands in response to Extended Events. The possibilities are unlimited: executing stored procedures, running updates on the database… the sky is the limit.
In the next recipe you will learn how to use the GroupedTableAppenderResponse to group and summarize events before writing the to a target table. There are countless applications for this technique, so make sure to Keep watching the XESmartTarget tag for the next recipes!
Recipe 4: Sending Alerts via Email
Welcome to the latest recipe of this Extended Events cookbook! You will find the first blog post of the series here and you can browse all recipes with the xesmarttarget tag on this blog.
The problem
In the previous recipe, you learned how to combine multiple Responses together and how to control their output, using filters and Expression Columns. Armed with this knowledge, you can now tackle the most complex problems, using all the available Response types. In this post you learn how to notify when specific events occur, using the EmailResponse.
One of the things that are missing from Extended Events is a mechanism for alerting. SQLTrace had Event Notifications (which is Service Broker on top of a trace), but Extended Events has nothing that comes close to it. No problem: XESmartTarget has your back again! You can use an EmailResponse to send alerts whenever an interesting event is captured.
Of course, not all events need to be notified via email. Probably you shouldn’t be using email at all for notifications, but I digress…
One type of event that you may want to be notified of is the deadlock event. Deadlocks are bad and getting an email when one deadlock is captured is pretty reasonable. Let’s see how to do that with XESmartTarget.
The session
Again, we need a session. This time the xml_deadlock_report event is the one that holds the information we are looking for. The script for the session is the following:
IF NOT EXISTS ( SELECT * FROM sys.server_event_sessions WHERE name = 'Recipe04')

CREATE EVENT SESSION [Recipe04] ON SERVER
ADD EVENT sqlserver.xml_deadlock_report(
    ACTION(
        sqlserver.client_app_name,
        sqlserver.client_hostname,
        sqlserver.database_name,
        sqlserver.server_instance_name,
        sqlserver.server_principal_name,
        sqlserver.session_id
    )
)
GO


IF NOT EXISTS ( SELECT * FROM sys.dm_xe_sessions WHERE name = 'Recipe04')
    ALTER EVENT SESSION Recipe04 ON SERVER STATE = START;
XESmartTarget
The EmailResponse sends an email for each event it processes. In this example, the properties “Attachment” and “AttachmentFileName” can indicate which field or action from the event contains the data to attach and the name of the attached file. In this case, we are using the xml_report field and we are attaching it to the email message as “deadlock.xdl”, so that it can be associated with SSMS.
{
    "Target": {
        "ServerName": "$ServerName",
        "SessionName": "Recipe04",
        "FailOnProcessingError": false,
        "Responses": [
            {
                "__type": "EmailResponse",
                "SMTPServer": "localhost",
                "Sender": "demo@localhost",
                "To": "dba@localhost",
                "Subject": "Deadlock occurred",
                "Body": "Oh no! We got a deadlock!",
                "Attachment": "xml_report",
                "AttachmentFileName": "deadlock.xdl",
                "HTMLFormat": true,
                "Events": [
                    "xml_deadlock_report"
                ]
            },
            {
                "__type": "TableAppenderResponse",
                "ServerName": "$ServerName",
                "DatabaseName": "XERecipes",
                "TableName": "Recipe_04_Deadlocking",
                "AutoCreateTargetTable": false,
                "OutputColumns": [
                    "name",
                    "collection_time",
                    "client_app_name",
                    "server_principal_name",
                    "database_name",
                    "xml_report"
                ],
                "Events": [
                    "xml_deadlock_report"
                ]
            }
        ]
    }
}
At the same time, a Response of the type TableAppenderResponse takes care of saving the event to a table in the database, in order to obtain a log of the events and process them later.
Let’s save the file as c:\temp\Recipe_04_Alert_Email.json and run XESmartTarget:
"%ProgramFiles%\XESmartTarget\xesmarttarget.exe" --File c:\temp\Recipe_04_Alert_Email.json --GlobalVariables ServerName=(local)\SQLEXPRESSAgain, XESmartTarget initializes two independent Response objects, this time of two different types: one TableAppenderResponse and one EmailResponse.

The EmailResponse has been configured to use “localhost” as SMTP server, so I downloaded and installed a little nifty application that helps you test and troubleshoot email delivery: it’s called PaperCut SMTP and it’s an absolute life saver! It incorporates the features of a SMTP server and an email client: it allows you to process email delivery as if it was a real SMTP server, but instead it saves the messages locally and displays them in a GUI similar to Outlook or a typical email client.

PaperCut displays all the emails generated by XESmartTarget, which also have an attachment named “deadlock.xdl”. If you download and open the file in SSMS, you will see a typical deadlock graph:
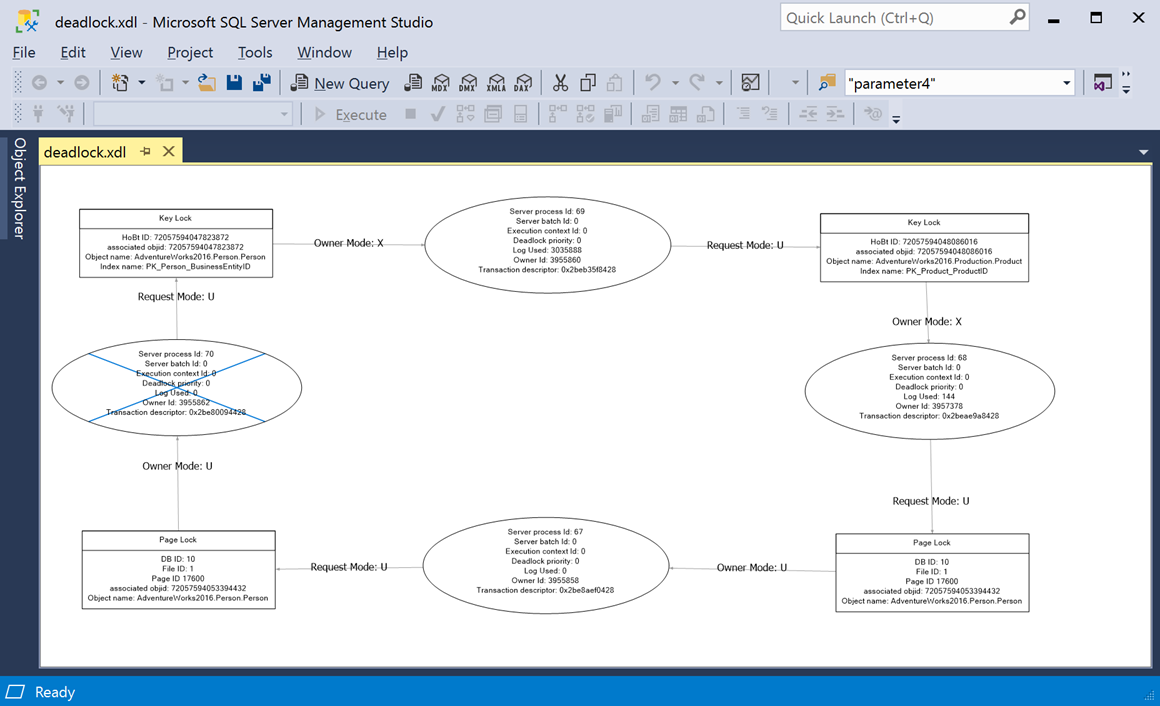
That’s pretty awesome if you ask me! The same can be done with other interesting events, like blocking or errors with high severity.
Recap
The EmailResponse object allows you to set up an alerting system based on Extended Events. All you have to do is set up a session that captures interesting events and then you can configure which events need to be notified and how.
In the next recipe you will learn how to execute T-SQL commands in response to specific events. Keep watching the XESmartTarget tag for the next recipes!
Recipe 3: Merging and manipulating events
Welcome to the third recipe of this Extended Events cookbook! You will find the first blog post of the series here and you can browse all recipes with the xesmarttarget tag on this blog.
The problem
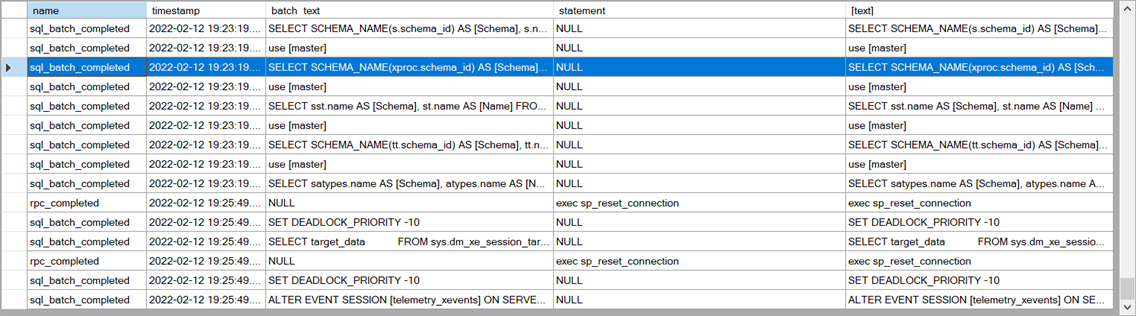
In the previous recipe, we wrote event data to a table in the database and each event used field and action names to map to the column names in the table. The same information (the text of the command) was stored in two separate columns, depending on the event type:
- batch_text for sql_batch_completed events
- statement for rpc_completed events
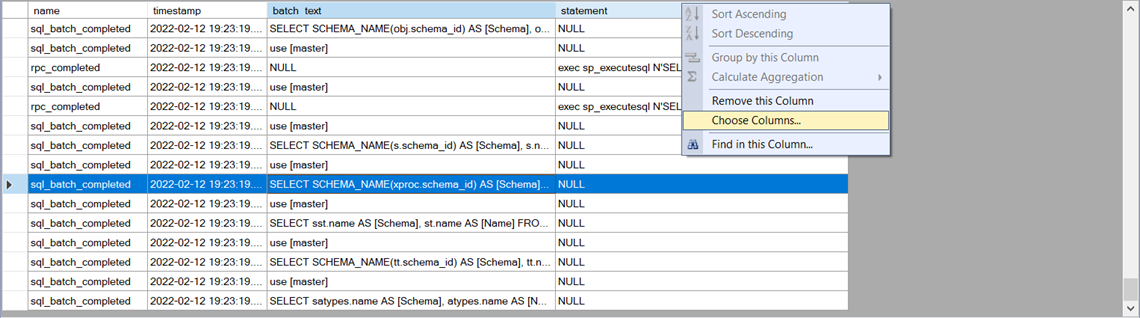
SSMS has a nice feature that allows you to create a merged column using data from several columns. Here is how you do it:
As you can see, the two even types are returning NULL for the columns that they don’t have:

You can create a merged column by right clicking the table header and clicking “Choose Columns”:
In the dialog you can click on “New” in the section for merged columns:
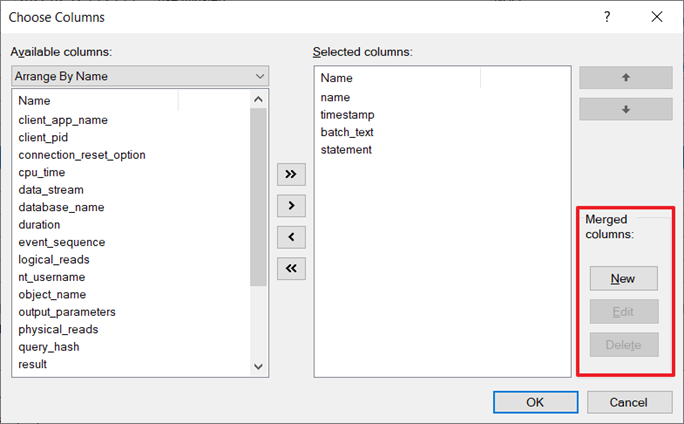
In the next dialog you can select which columns to merge. In this case you want to merge batch_text and statement:

The result looks like this:
When the data is missing from one column, it is taken from the other column and the merged column always contain some data to show.
It would be nice if I could do that with XESmartTarget as well, merging multiple columns before writing them to the target table. Turns out it is possible, with some work on the configuration file.
The session
First, we need a session. Since it is the same session as the one used for the second recipe, I will show you how you can recreate the same session with a different name (Recipe03) using the previous session as a template. Of course, I will use dbatools for that.
Get-DbaXESession -SqlInstance "localhost\SQLEXPRESS" -Session Recipe02 |
    Export-DbaXESessionTemplate -Path C:\temp\xe |
    Import-DbaXESessionTemplate  -SqlInstance "localhost\SQLEXPRESS" -Name "Recipe03"
Start-DbaXESession -SqlInstance "localhost\SQLEXPRESS" -Session Recipe03
It could not be easier! dbatools is the best!
If you insist doing things the hard way, you can reuse the script from the first recipe and change the name of the session.
XESmartTarget
The configuration needs to be a bit more complex this time. The column “text” on the target table will have to receive data from different events, which have attributes with different names. To accomplish this, the configuration file will have to leverage two features: event filters and expression columns.
The first one is easy: you can decide which events gets processed by the Response using the “Events” attribute. I introduced this possibility in Recipe 1.
Expression columns use the same syntax as calculated columns in SQL Server. To use an expression column in XESmartTarget, you can declare in the configuration file in the form column name = expression. This will allow you to calculate expressions, using fields and actions from the events as operands and all the functions and operators available in .NET DataTable objects.
In this case, the rpc_completed event will have to rename its “statement” column to “sql” and the sql_batch_completed event will have to rename its “batch_text” column to “sql”. While we’re at it, let’s also create a column “total_io” that contains logical_reads + writes. Let’s see how you can do it:
{
    "Target": {
        "ServerName": "$ServerName",
        "SessionName": "Recipe03",
        "FailOnProcessingError": false,
        "Responses": [
            {
                "__type": "TableAppenderResponse",
                "ServerName": "$ServerName",
                "DatabaseName": "XERecipes",
                "TableName": "Recipe_03_Queries",
                "AutoCreateTargetTable": true,
                "OutputColumns": [
                    "name",
                    "collection_time",
                    "client_app_name",
                    "server_principal_name",
                    "database_name",
                    "sql AS statement",
                    "total_io AS logical_reads + writes"
                ],
                "Events": [
                    "rpc_completed"
                ]
            },
            {
                "__type": "TableAppenderResponse",
                "ServerName": "$ServerName",
                "DatabaseName": "XERecipes",
                "TableName": "Recipe_03_Queries",
                "AutoCreateTargetTable": false,
                "OutputColumns": [
                    "name",
                    "collection_time",
                    "client_app_name",
                    "server_principal_name",
                    "database_name",
                    "sql AS batch_text",
                    "total_io AS logical_reads + writes"
                ],
                "Events": [
                    "sql_batch_completed"
                ]
            }
        ]
    }
}
Besides filters and expressions, this JSON file also introduces the ability to process the events using multiple response objects, even of different types.
Let’s save this file as c:\temp\Recipe_03_Output_Table_Expressions.json and run XESmartTarget:
"%ProgramFiles%\XESmartTarget\xesmarttarget.exe" --File c:\temp\Recipe_03_Output_Table_Expressions.json --GlobalVariables ServerName=(local)\SQLEXPRESS
As you can see from the output, XESmartTarget initializes two independent TableAppenderResponse objects and each one works on the events defined in the filter and outputs the columns defined in the OutputColumns property, including the expressions described above.
Querying the target table, you can see that the “sql” column contains data from both events, achieving the same result as the merged column in SSMS:

Recap
Filters and Expression Columns allow you to achieve more complex results, like combining data from different fields or actions into a single column, or calculating expressions.
In the next recipe you will learn how to combine Responses of different types and use XESmartTarget to send email notifications when a particular event is captured. Keep an eye on the XESmartTarget tag for the next recipes!
Recipe 2: Writing Extended Events to a table
Welcome to the second recipe of this Extended Events cookbook! You will find the first blog post of the series here and you can browse all recipes with the xesmarttarget tag on this blog.
The problem
This time, you want capture all the queries executing on your server and save the Extended Events data to a table in SQL Server. One of the things you cannot achieve easily with the standard targets in Extended Events is writing to a database table. If you check the documentation and all the blogs that you find on the Internet, all of them recommend using two possible methods to extract the information from the session:
- Shredding the XML of the session data from the ring buffer target
- Using
master.sys.fn_xe_file_target_read_fileto read the session data from a file target
The first approach is extremely painful (XML shredding – enough said).
The second approach requires a file target, which is not always available. It also requires to stop the session to read all the data, or write extremely complicated code to read the data incrementally while the session is running (believe me, I did it and my brain still hurts).
This is where XESmartTarget jumps in to help you! All you have to do is write some configuration in a json file and let XESmartTarget do its magic.
For this task you can use a TableAppenderResponse, that takes care of reading all the events from the session using the streaming API and write them to a target table, that can also be created automatically by XESmartTarget itself.
The session
This time you can use a plain SQL script to create the session. It is going to capture rpc_completed and sql_batch_completed events, the same in a Profiler Standard trace.
Remember that you don’t need to set up any targets, it’s enough to add the events and start the session, like this:
IF NOT EXISTS ( SELECT * FROM sys.server_event_sessions WHERE name = 'Recipe02')

CREATE EVENT SESSION [Recipe02] ON SERVER
ADD EVENT sqlserver.rpc_completed(
    ACTION(
        package0.event_sequence,
        sqlserver.client_app_name,
        sqlserver.client_pid,
        sqlserver.database_name,
        sqlserver.nt_username,
        sqlserver.query_hash,
        sqlserver.server_principal_name,
        sqlserver.session_id
    )
    WHERE ([package0].[equal_boolean]([sqlserver].[is_system],(0)))
),
ADD EVENT sqlserver.sql_batch_completed(
    ACTION(
        package0.event_sequence,
        sqlserver.client_app_name,
        sqlserver.client_pid,
        sqlserver.database_name,
        sqlserver.nt_username,
        sqlserver.query_hash,
        sqlserver.server_principal_name,
        sqlserver.session_id
    )
    WHERE ([package0].[equal_boolean]([sqlserver].[is_system],(0)))
)
GO

IF NOT EXISTS ( SELECT * FROM sys.dm_xe_sessions WHERE name = 'Recipe02')
    ALTER EVENT SESSION Recipe02 ON SERVER STATE = START;
XESmartTarget
Now that the session is set up, you can use XESmartTarget to process the data. As you learned in the previous recipe, all you have to do is create a JSON file with configuration data, according to what the documentation says. This time, the JSON file looks like this:
{
    "Target": {
        "ServerName": "$ServerName",
        "SessionName": "Recipe02",
        "FailOnProcessingError": false,
        "Responses": [
            {
                "__type": "TableAppenderResponse",
                "ServerName": "$ServerName",
                "DatabaseName": "XERecipes",
                "TableName": "Recipe_02_Queries",
                "AutoCreateTargetTable": false,
                "OutputColumns": [
                    "name",
                    "collection_time",
                    "client_app_name",
                    "server_principal_name",
                    "database_name",
                    "batch_text",
                    "statement"
                ],
                "Events": [
                    "rpc_completed",
                    "sql_batch_completed"
                ]
            }
        ]
    }
}
It is very similar to the one we had for CsvAppenderResponse, but there are some interesting things to note.
First, you will notice that we have some placeholders that start with the dollar sign, like $ServerName. Those are Global Variables, that allow you to reuse the same JSON file in multiple situations. You can provide the values for the Global variables from the command line of XESmartTarget, in the form –GlobalVariables key1=value1 key2=value2 … keyN=valueN
In this example, you don’t have to create a new JSON file for every server that you connect to, but you can reuse the same file, by specifying the name of the server in the Global Variables.
Another thing worth noting is the AutoCreateTable property: it controls whether XESmartTarget will attempt to create the target table based on the columns specified in the OutputColumns property. XESmartTarget will try to guess the correct data types, but it will have no way to determine the maximum length for string columns, so they will be created as nvarchar(max). If you want a more precise data type definition, I suggest that you create the table manually and set this property to false.
There is another property that controls the behaviour of the TableAppenderResponse, even if it does not appear in the configuration file above. UploadIntervalSeconds controls how often XESmartTarget uploads the data to the target table. The default is 10 seconds: if you’re ok with that, you can omit it in the configuration file, otherwise you’re free to set it to a different value. Between uploads, the data is held in memory, so make sure to reduce this interval when you have a lot of events captured by your session.
Save the JSON file as c:\temp\Recipe_02_Output_Table.json and you’re ready to invoke XESmartTarget. This time, the command line will need the server’s name specified as a Global Variable:
"%ProgramFiles%\XESmartTarget\xesmarttarget.exe" --File c:\temp\Recipe_02_Output_Table.json --GlobalVariables ServerName=(local)\SQLEXPRESS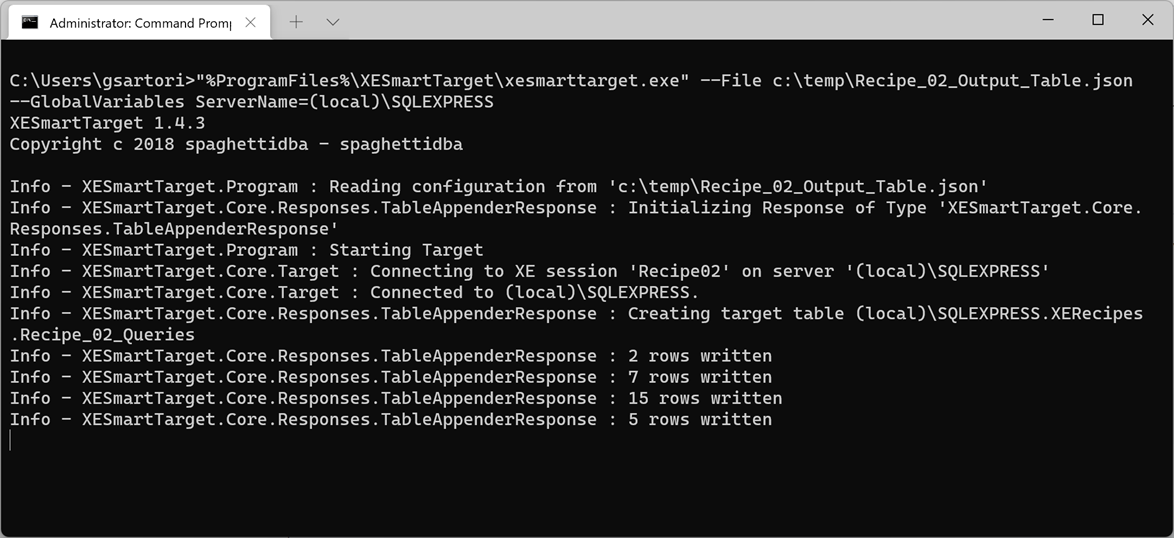
The output will tell you when the target table has been created and will count the rows written by each upload. Let’s check the data in the database with a quick query:

How cool! The table has been created and the data is being written to it every 10 seconds. That’s one thing that is not easy to achieve with the built-in targets!
Recap
You wanted to save all the commands executed on your SQL Server to a table in your database, so you configured XESmartTarget using the TableAppenderResponse. That was super easy, wasn’t it?
In the next recipe you will learn how to manipulate the output further, using expression columns and event filters. Stay tuned!
Recipe 1: Writing Extended Events to a CSV file
Welcome to the first recipe of this Extended Events cookbook! You will find the first blog post of the series here and you can browse all recipes with the xesmarttarget tag on this blog.
Recipes: what are the ingredients?
Every recipe starts with a problem to solve and has three ingredients:
- A session to capture the events
- A JSON configuration file for XESmartTarget to process the events
- A client application to read the data produced by XESmartTarget
The problem
In this case, imagine that you wanted to observe the commands executed on a SQL Server instance and save them to a file to process them later. Of course, Extended Events can do that with the built-in targets. However, when you write to a file target, the file has to reside on the disks of the SQL Server machine (well, actually, the file could be sitting on a file share writable by SQL Server or even on BLOB storage on Azure, but let’s keep it simple). How do you use the storage of the client machine instead of using the precious filesystem of the server machine?
Here is where XESmartTarget can help you with a CsvAppenderResponse. This Response type writes all the events it receives to a CSV file, that can be saved on the client machine, without wasting disk space on the server. You can decide which events to process and which columns to include in the CSV file, but more on that later.
The session
First of all, you need a session: how do you create it? I know what you’re thinking: “if this was a trace, I would know how to get it”. Right. Many DBAs are still using Traces, because Extended Events have not been very friendly to them. Profiler was super easy to use: start the program, connect, select a template, choose events and columns, start the trace and you see the data right away in the GUI. Extended Events can be a bit overwhelming because there are multiple concepts to get hold of: sessions, events, targets, fields, actions… Yeah, it’s the same old story: more power, more responsibility.
It was not just you: everyone was confused by Extended Events when it first shipped with SQL Server 2012 (well, we had something in 2008, but it wasn’t really a replacement for traces until 2012).
Chrissy LeMaire was just as confused as you, so she did what the giants do: she studied the topic in depth and not only she made it easier for herself, but she made it easier for everyone using dbatools. If you don’t know what dbatools is, you really need to check it out: it’s a Powershell module that allows DBAs to perform all their day-to-day tasks on SQL Servers using powershell. Everything you can do with SSMS (and much more!) can be done with dbatools. Chrissy created a lot of dbatools commands to work with Extended Events and now everything is much easier!
But is it really as easy as working with traces? With Profiler, you would have the Standard template and you would only need to click start. Can it be that simple with dbatools? Let’s find out.
One of the great features that Chrissy added to dbatools is the ability to create a session from a template. She gathered a lot of useful session definitions from community blog posts, scripts, and templates from Microsoft tools, then she included those definitions in dbatools. It’s the same as in Profiler: all you have to do is select the appropriate template:
Get-DbaXESessionTemplate | Out-GridView

In this case you can use the “Profiler Standard” template and of course it’s there and you can do it with just a couple of lines of PowerShell:
Import-DbaXESessionTemplate -SqlInstance "localhost\SQLEXPRESS" -Name "Recipe01" -Template "Profiler Standard"Start-DbaXESession -Session "Recipe01" -SqlInstance " localhost\SQLEXPRESS"That couldn’t be easier! Notice that the commands above did not add any targets to the session: the streaming API will take care of processing the data.
If you don’t like dbatools or don’t want to use powershell, the script for the session is this:
IF NOT EXISTS ( SELECT * FROM sys.server_event_sessions WHERE name = 'Recipe01')

CREATE EVENT SESSION [Recipe01] ON SERVER
ADD EVENT sqlserver.attention(
    ACTION(
		 package0.event_sequence
		,sqlserver.client_app_name
		,sqlserver.client_pid
		,sqlserver.database_id
		,sqlserver.nt_username
		,sqlserver.query_hash
		,sqlserver.server_principal_name
		,sqlserver.session_id
	)
    WHERE ([package0].[equal_boolean]([sqlserver].[is_system],(0)))
),
ADD EVENT sqlserver.existing_connection(
	SET collect_options_text=(1)
    ACTION(
		 package0.event_sequence
		,sqlserver.client_app_name
		,sqlserver.client_pid
		,sqlserver.nt_username
		,sqlserver.server_principal_name
		,sqlserver.session_id
	)
),
ADD EVENT sqlserver.login(
	SET collect_options_text=(1)
    ACTION(
		 package0.event_sequence
		,sqlserver.client_app_name
		,sqlserver.client_pid
		,sqlserver.nt_username
		,sqlserver.server_principal_name
		,sqlserver.session_id
	)
),
ADD EVENT sqlserver.logout(
    ACTION(
		 package0.event_sequence
		,sqlserver.client_app_name
		,sqlserver.client_pid
		,sqlserver.nt_username
		,sqlserver.server_principal_name
		,sqlserver.session_id
	)
),
ADD EVENT sqlserver.rpc_completed(
    ACTION(
		 package0.event_sequence
		,sqlserver.client_app_name
		,sqlserver.client_pid
		,sqlserver.database_id
		,sqlserver.nt_username
		,sqlserver.query_hash
		,sqlserver.server_principal_name
		,sqlserver.session_id
	)
    WHERE ([package0].[equal_boolean]([sqlserver].[is_system],(0)))
),
ADD EVENT sqlserver.sql_batch_completed(
    ACTION(
		 package0.event_sequence
		,sqlserver.client_app_name
		,sqlserver.client_pid
		,sqlserver.database_id
		,sqlserver.nt_username
		,sqlserver.query_hash
		,sqlserver.server_principal_name
		,sqlserver.session_id
	)
    WHERE ([package0].[equal_boolean]([sqlserver].[is_system],(0)))
),
ADD EVENT sqlserver.sql_batch_starting(
    ACTION(
		 package0.event_sequence
		,sqlserver.client_app_name
		,sqlserver.client_pid
		,sqlserver.database_id
		,sqlserver.nt_username
		,sqlserver.query_hash
		,sqlserver.server_principal_name
		,sqlserver.session_id
	)
    WHERE ([package0].[equal_boolean]([sqlserver].[is_system],(0)))
);

IF NOT EXISTS ( SELECT * FROM sys.dm_xe_sessions WHERE name = 'Recipe01')
    ALTER EVENT SESSION Recipe01 ON SERVER STATE = START;
Now that you have a session running you can work with the events it captures, using XESmartTarget.
XESmartTarget
The tool already ships with multiple Response types: all you have to do is prepare a configuration file. In this case you will use a CsvAppenderResponse. If you go to the documentation page, you will see what properties are exposed by this Response type, which can be set in a JSON configuration file.
OK, let’s do it! Following the example on the documentation, you can craft your own JSON file to configure XESmartTarget:
{
    "Target": {
        "ServerName": "(local)\\SQLEXPRESS",
        "SessionName": "Recipe01",
        "Responses": [
            {
                "__type": "CsvAppenderResponse",
                "OutputFile": "c:\\temp\\output.csv",
                "OverWrite": "true",
                "OutputColumns": [
                    "name",
                    "collection_time",
                    "client_app_name",
                    "server_principal_name",
                    "database_name",
                    "batch_text",
                    "statement"
                ],
                "Events": [
                    "rpc_completed",
                    "sql_batch_completed"
                ]
            }
        ]
    }
}
There are a couple of things to note on this file. First, it’s a JSON file, so it has to comply with the syntax of Javascript: backslash in strings has to be escaped with “\”, so it becomes “\\”. For each object in the “Responses” array, the property “__type” controls which Response type is used, then you can use its properties inside that block. For CsvAppenderResponse, the property “OutputColumns” controls which columns will be written to the CSV file. These columns are fields or actions from the events.
The property “Events” controls which events are processed by the current Response.
If your session captures multiple event types, you can choose which ones are processed by each Response, using the “Events” property. In this case, the profiler default template capture events that you don’t want to process, like existing connections, so you can filter for “rpc_completed” and “sql_batch_completed” events only.
Now, save the file as c:\temp\Recipe_01_Output_CSV.json and you can use it with XESmartTarget, by running this:
"%ProgramFiles%\XESmartTarget\xesmarttarget.exe" --File c:\temp\Recipe_01_Output_CSV.json

The output on the cmd window won’t tell you much, except that XESmartTarget is running, it’s connected to the appropriate session and the it’s writing to the CSV file.
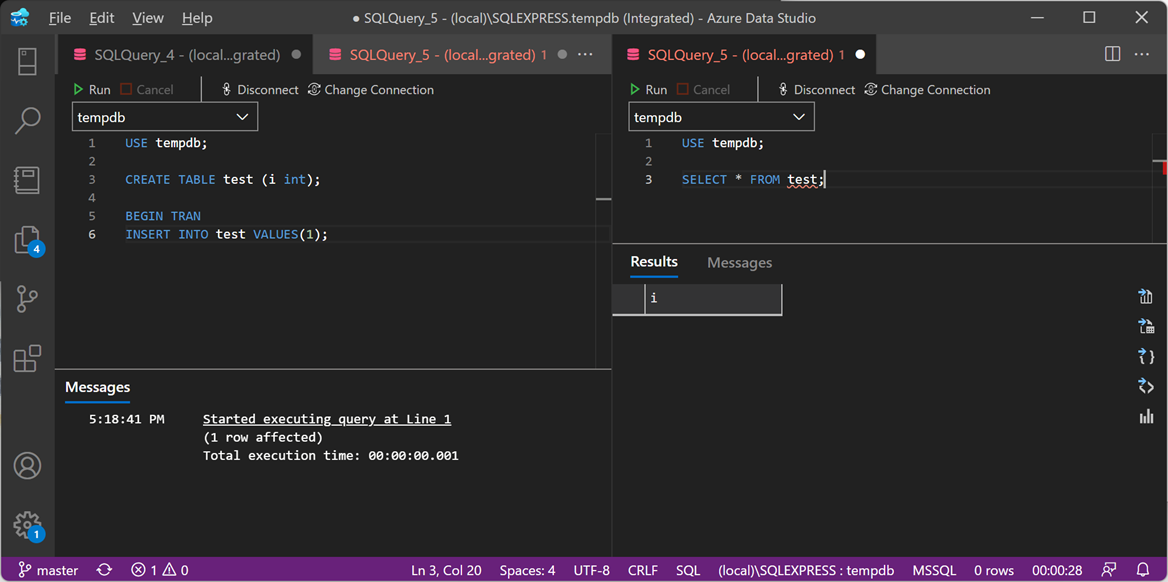
Let’s check what happens if you run some commands from Azure Data Studio:

The cmd window doesn’t say anything new, but if you open the CSV file with VSCode you will see that some data has been saved:

Code is great for inspecting CSV files, because it has the ability to reload the file when new rows are added and also has nice plugins like Rainbow CSV to help you interpret the contents correctly.
When you are finished with your capture, you can press CTRL+C on the cmd window where XESmartTarget is running and it will shut down.
Recap
You wanted to save all the commands executed on your SQL Server to a CSV file on your computer. You had to set up a session for that, which was super easy, thanks to dbatools. Then you configured XESmartTarget to process all the events and save them to the CSV file of your choice. You could also watch the events flowing to the file in real-time, thanks to Code and its plugins.
In this recipe you familiarized with XESmartTarget and had a glimpse of its capabilities. The next recipe will introduce more capabilities and showcase more features of the JSON configuration format. Stay tuned!
10 DBA recipes with XESmartTarget
Some time ago, I started a project called XESmartTarget. I find it super useful and you should probably know about it. It’s totally my fault if you’re not using it and I apologize for all the pain that it could have saved you, but it didn’t because I did not promote it enough.
Now I want to remedy my mistake with a 10 days series of blog posts on XESmartTarget, which will show you how useful it can be and how it can be used to accomplish your daily DBA tasks using Extended Events.
In this first post of the series, I will introduce XESmartTarget, show how it works and how to configure it. For the next 10 days I will publish a post to show you how to solve a specific problem using XESmartTarget. Let’s go!
What is XESmartTarget?
XESmartTarget is a small command line utility that can connect to an Extended Events session using the streaming API and can perform actions in response to the events captured by the session. The actions can vary from saving to a table in a database, writing to a CSV file, sending alerts and many more.
You can think of XESmartTarget as a processing engine for Extended Events, that you can run from the command line, without having to write a single line of code.
Where does it run?
XESmartTarget does not need to run on the server, it can run on any Windows machine that can connect to the target SQL Server instance. You can certainly run it on the server, but you don’t need to. XESmartTarget depends on Microsoft Visual C++ 2013 Redistributable: if you have the client utilities (SSMS) on your computer then you’re good to go, otherwise you can always download from Microsoft. It doesn’t run on Linux, I’m sorry.
How do I get it?
It’s open-source software: you can download it from GitHub and install it. You have a x64 setup kit and a x86 setup kit: make sure to pick the correct version for your operating system. Your browser may complain about it being unsafe, despite being signed with a code signing cert (sigh…). Don’t worry, go ahead and download it. Windows may also complain when running the .msi, so you will have to bypass SmartScreen as well. By default, the software gets installed to c:\Program Files\XESmartTarget
Why do I need it?
The built-in targets for Extended Events are great, but they don’t cover 100% of the spectrum. Some targets, like writing to a database table, would be extremely useful but are not there. There are multiple reasons, but mainly this is because of performance concerns: Extended Events have been designed to be fast and have a low performance impact on the server being monitored. Writing to a file or to a memory buffer is a fast operation, writing to a table or applying additional logic can end up slowing down the collection process and the SQL Server instance. However, Microsoft decided to give us the ability to post-process the events in the .xel files or process the events in near real-time using the streaming API for Extended Events. XESmartTarget uses the streaming API to receive the events from the server and the API itself has a built-in protection mechanism that prevents the server from being chocked by the client: if the client can’t keep up with the data rate from the server, it gets disconnected.
Having an API to process events means that we can write code to perform common actions on the events. I created 7 types of Response classes, that can receive data from the events and process them to let you perform actions that you can’t perform using the built-in targets:
- CsvAppenderReponse – writes event data to a CSV file
- EmailResponse – sends alerts via email based on event data
- ExecuteTSQLResponse – runs T-SQL commands for each event captured
- TableAppenderReponse – writes event data to a table in a SQL Server database
- GroupedTableAppenderReponse – aggregates event data in memory and then merges with existing data in the target table
- ReplayResponse – replays sql_batch_completed and rpc_completed events
- GelfTcpResponse – writes events to a GrayLog server
- TelegrafAppenderReponse – writes to an InfluxDB database using Telegraf
Will I have to write code?
If you really, really want to write code, you can do it: XESmartTarget is a .dll library that you can incorporate in your project. That’s what we did with dbatools. The license is super permissive, so go ahead and do it!
However, one of the strengths of XESmartTarget is that it requires absolutely no coding: all you have to do is configure XESmartTarget to do what you want. It is a command line tool and it accepts some parameters:
-F|--File <path to the .JSON configuration file>
        Uses the supplied .json file to configure the source of the events and the list of responses
-N|--NoLogo
        Hides copyright banner at startup
-Q|--Quiet
        Suppresses output to console
-G|--GlobalVariables <variable1=value1 variableN=valueN>
        Replaces $variableN with valueN in configuration files
-L|--LogFile <path to log file>
        Writes the log to the file specified
As you can see, you can use a .json file to provide the configuration. Not everyone likes JSON for configuration files, but I find it easy to use and good enough for the purpose. A nice addition to the standard JSON format is the ability to add comments using the javascript notation.
A typical .json configuration file looks like this:
{
    "Target": {
        "ServerName": "server to monitor, where the session is running",
        "SessionName": "name of the session",
        "Responses": [
            {
                // Properties for Response1
            },
            {
                // Properties for ResponseN
            }
        ]
    }
}
Each Response subclass has a set of public properties that can be set in the configuration file. You can visit the documentation page for each Response type to discover what are the properties available to you and see an example json file.
For instance, TableAppenderResponse has some properties to set the target server/database/table for the events and you can set them like this:
{
    "Target": {
        "ServerName": "(local)\\SQLEXPRESS",
        "SessionName": "commands",
        "Responses": [
            {
                "__type": "TableAppenderResponse",
                "ServerName": "(local)\\SQLEXPRESS",
                "DatabaseName": "DBAStuff",
                "TableName": "queries",
                "AutoCreateTargetTable": true,
                "UploadIntervalSeconds": 10,
                "OutputColumns": [
                    "name",
                    "collection_time",
                    "client_app_name",
                    "server_principal_name",
                    "database_name",
                    "batch_text",
                    "statement"
                ],
                "Events": [
                    "rpc_completed",
                    "sql_batch_completed"
                ]
            }
        ]
    }
}
Once you have your .json configuration file ready and your Extended Events session running, you can start XESmartTarget. It’s a command like tool, so it won’t show any GUI, but it will print messages to the console or to the log file to indicate that it’s doing some work.
As an example, you can save the above as c:\temp\capture_commands.json and run it with this command line:
“C:\program files\xesmarttarget\xesmarttarget.exe” --File c:\temp\capture_commands.jsonYou will see something similar to this:

If you look in your database, you will see some rows in the target table:

If you want to stop XESmartTarget, you can press CTRL+C.
What else can it do?
The sky is the limit. In the next posts of this series, I will demonstrate how to accomplish typical DBA tasks using XESmartTarget and you will learn how to use the appropriate Response type for every need. You will also see how to unleash the most advanced features of the configuration files, to filter events, group and summarize data, use fields and actions as parameters and more.
Keep an eye on the xesmarttarget tag on this blog!
Where are my recipes?
There you go:
https://spaghettidba.com/2022/02/22/recipe-1-writing-extended-events-to-a-csv-file/
https://spaghettidba.com/2022/02/23/recipe-2-writing-extended-events-to-a-table/
https://spaghettidba.com/2022/02/24/recipe-3-merging-and-manipulating-events/
https://spaghettidba.com/2022/02/25/recipe-4-sending-alerts-via-email/
https://spaghettidba.com/2022/02/28/recipe-5-killing-blocking-spids/
https://spaghettidba.com/2022/02/28/recipe-6-auditing-successful-logins/
https://spaghettidba.com/2022/03/01/recipe-7-finding-unused-tables/
https://spaghettidba.com/2022/03/02/recipe-8-analyzing-a-workload/
https://spaghettidba.com/2022/03/03/recipe-9-capturing-queries-and-plans/
https://spaghettidba.com/2022/03/04/recipe-10-writing-events-to-influxdb/
