Category Archives: Uncategorized
DataMoshpit!
Today I’m presenting at DataMospit, the most metal conference in the data space!
You can download the Sea of Madness bingo card from here: https://github.com/spaghettidba/CodeSamples/raw/master/SQLServerInfernals/InfernalBingo.xlsx
The winner will get a 1 year subscription to QMonitor, the fantastic SQL Server monitoring solution from Quantumdatis.
Good luck!
Code signing for mere mortals
Well, turns out code signing is pretty complex, so I’m writing this blog post as a guide for my future self. I hope he will appreciate, and perhaps some of you may find it useful as well.
The need for code signing
There is a lot of malware out there, we all know it, so you’d better be careful with what you download and install on your computer. Browsers try to help with that and will warn you when you download a suspicious piece of software:

You will have to be very persistent if you really mean to keep it:

If you try to install it, Windows will warn you again that you shouldn’t really install random stuff from the Internet:

Why does happen with some files and doesn’t happen with the Chrome installer or Acrobat reader? Because those setup kits are signed with a certificate from Google and Adobe, released by a certification authority that checks that Google is actually Google and not a disgruntled random guy pretending to be Google.
This means you can sign your code too, you just need to get a code signing certificate from a certification authority and they will be happy to give you one in exchange for money.
Get a Code Signing Certificate
There are many certification authorities and I don’t have enough experience to recommend one in particular. In my case, I ended up working with DigiCert, because at the time they offered complimentary certificates for MVPs.
After registering an account, the first thing you have to do is request a new code signing certificate. The cert authority will perform all required checks, like checking your ID/passport, set up a video call where you sign a form in front of the operator… long story short, they will make sure that you are who you claim you are.
After the check is done, they will issue a certificate, that you can use to sign your code. Hooray!
At this time, you will also get a private key, that you will need to perform all the operations on your code signing certificate. The private key is another certificate, that you will have to make sure to keep in a safe place. Starting from June 1st 2023, regulations require that you store your private keys on a hardware token that provides strong encryption or online in an encrypted key vault.
Either way, make sure you don’t lose it.
Sign your code with the Code Signing Certificate
In order to sign your code, you will need to install the Windows SDK Signing Tools, which are part of the Windows SDK. You can download the appropriate version for your OS from Microsoft.
The tool that you’re looking for is called signtool.exe and you can find it in C:\Program Files (x86)\Windows Kits\10\App Certification Kit\signtool.exe
Usage: signtool <command> [options]

  Valid commands:
    sign       --  Sign files using an embedded signature.
    timestamp  --  Timestamp previously-signed files.
    verify     --  Verify embedded or catalog signatures.
    catdb      --  Modify a catalog database.
    remove     --  Remove embedded signature(s) or reduce the size of an
                   embedded signed file.
The command that we need is “sign”. There are a lot of options for this command and I have a very limited knowledge of what does what. What did the trick for me is this combination of parameters:
signtool.exe sign
    /f <path to your cert>
    /p <password to open the cert>
    /sha1 <sha1 fingerprint>
    /t <url of the timestamp server>
    /d <description of the content>
    /fd <file digest algorithm>
    <path of the file to sign>
In my case, to sign XESmartTarget, I entered this command:
signtool sign
    /f "c:\digicert\codesigning2023.pfx"
    /p "MySuperDuperPassword"
    /sha1 "00AABBCCDDEEFF0011223344556677889900AABB"
    /t "http://timestamp.digicert.com"
    /d "XESmartTarget"
    /fd sha1
    "c:\temp\XESmartTarget_x64.msi"
Every parameter is in a new line for readability, but you command will be on a single line.
Looks pretty easy, but I can tell you it’s not. Well, not for me at least. In order to produce the above command line, you will need a number of things:
- The certificate in .pfx format
- The password of the certificate
- The sha1 fingerprint
- The URL of the timestamp server
Convert your code signing certificate to the .pfx format
The certification authority will provide the certificate in many possible formats. Not all formats are good for you: you need .pfx because that’s the one that works with signtool. Maybe it works with other formats, I don’t know, but .pfx worked for me.
In my case, DigiCert provided the certificates either in .p7b, .cer, .crt or .pem format. All these formats are base64 encoded and can be opened with a text editor. If you open a certificate in notepad, you will see something like this:
-----BEGIN CERTIFICATE-----
NIIG3TCCBFmaAqIBAgIEDZk+BM+4uNO1I19N3Mqg0zANBgfqhkiGrw0BAQsFQDBp
MQewCRYDVaQGEwJVUzeXMBUeA1UBChMNRGlnaULlcnQqIEauYy4xRTA/BbNWBAbT
..................lots of gibberish..................
bNWKqgD+rgfsIhBMsEn0ulSMt0JE7q32PeBeVETFv1nQfnljjVA==
-----END CERTIFICATE-----
The .pfx format is different, it is a binary format and cannot be opened with a text editor.
In order to convert your .pem certificate to .pfx format, you will need another tool called openssl. You can download and install for your OS or you can use a winget command: winget install openssl.
Once you have openssl, you can use this command to convert your base64 certificate to the .pfx format:
openssl pkcs12 -inkey c:\digicert\privatekey.pem -in c:\digicert\codesigning.crt -export -out c:\digicert\codesigning.pfxOpenssl will prompt for the password of the private key. Did I mention you should not lose it?
Enter pass phrase for c:\digicert\privatekey.pem: <-- private key password
Enter Export Password:   <-- this is the password of the exported certificate
Verifying - Enter Export Password: <-- type again
The export password is the one that you will need to pass to signtool in the /p parameter.
Convert your private key to .pem format
If your private key is not in base64 format, openssl will fail:
Could not read private key from -inkey file from c:\digicert\privatekey.p12I don’t remember exactly how, but my private key is in .p12 format (it’s a binary encrypted format): if that is all you have, you will need to convert it first.
Openssl can convert the private key for you:
openssl pkcs12 -in c:\digicert\privatekey.p12 -out c:\digicert\privatekey.pem -clcertsNow that you have the private key in the .pem format, you can go back to the previous step and generate the .pfx certificate.
Get the certificate fingerprint
Your certitification authority should display the certificate sha thumbprint on the certificate order in your personal area. At least, DigiCert does. This information can be displayed as “thumbprint” or “fingerprint” and it’s a binary string.
If you can’t find this information on the certificate order, you can extract it from the certificate itself, again using openssl:
openssl x509 -noout -fingerprint -sha1 -inform pem -in "C:\digicert\codesigning.pem"
The output will look like this:
sha1 Fingerprint=00:AA:BB:CC:DD:EE:FF:00:11:22:33:44:55:66:77:88:99:00:AA:BBThis fingerprint should match the one you have on your certificate order and must be used in the signtool command line without the “:”. In this case it becomes 00AABBCCDDEEFF0011223344556677889900AABB
Putting it all together
Once you have your certificate ready, you can use signtool to sign your artifacts. In order to make this process easier, I created a couple of scripts that I use in Visual Studio builds as post build scripts.
My Wix setup project has this Post-build Event Command Line:
call $(ProjectDir)postbuild.bat "!(TargetPath)" "$(TargetDir)$(SolutionName)_$(Platform)$(TargetExt)"postbuild.bat looks like this:
powershell.exe -ExecutionPolicy Bypass -NoProfile -NonInteractive -File %~dp0\SignMsi.ps1 -InputFile %1 -OutputFile %2SignMsi.ps1 is where all the magic happens:
[CmdletBinding()]
Param(
    [Parameter(Mandatory=$True,Position=1)]
    [string]$InputFile,
    [Parameter(Mandatory=$True,Position=2)]
    [string]$OutputFile
)


if(-not (Test-Path $PSScriptRoot\SignParams.ps1))
{
    Write-Warning "No code signing is applied to the .msi file."
    Write-Warning "You need to create a file called SignParams.ps1 and provide signing info."
    Move-Item $InputFile $OutputFile -Force
    exit
}

# read paramters
$signParams = get-content $PSScriptRoot\SignParams.ps1 -Raw
Invoke-Expression $signParams

$params = $(
     'sign'
    ,'/f'
    ,('"' + $certPath + '"')
    ,'/p'
    ,('"' + $certPass + '"')
    ,'/sha1'
    ,$certSha
    ,'/t'
    ,('"' + $certTime + '"')
    ,'/d'
    ,'"XESmartTarget"'
    ,"/fd"
    ,"sha1"
)

& $signTool ($params + $InputFile)

Write-Output "Moving $InputFile --> $OutputFile"
Move-Item $InputFile $OutputFile -Force
SignMsi.ps1 looks for a file named SignParams.ps1 in the same folder and if it finds the file if processes the contents and proceeds to sign the artifacts, otherwise it just ignores signing, which can be good for pre-prod or test environments.
The SignParams.ps1 file contains the parameters needed by signtool and it looks like this:
$signTool = "C:\Program Files (x86)\Windows Kits\10\App Certification Kit\signtool.exe"
$certPath = "c:\digicert\codesigning2023.pfx"
$certPass = "MySuperDuperPassword"
$certSha = "00AABBCCDDEEFF0011223344556677889900AABB"
$certTime = "http://timestamp.digicert.com"
This should make your life pretty easy.
Cheers!
SQLSaturday is dead, long live DataSaturdays
This is a very brief post to inform you that PASS has died, killed by the for-profit company behind it.
That’s sad beyond words, but we, as a community, are not destined to the same fate. The community will rise again and build something new.
One of the things that we don’t want to lose is SQLSaturday. It’s been a substantial vehicle for involving community members locally and globally. It has been the launchpad for many community speakers. It has been the opportunity for many people to connect with other community members, share their knowledge and learn something new. Connect, share, learn… that sound familiar, right?
We don’t want to take the existing SQL Saturday and give it a new name, we want to start a new community initiative that enables us to continue delivering events. It needs to be a platform that allows us to continue doing what we were doing.
Do you want to be involved? Here’s what you can do:
- Head to datasaturdays.com and have a look. There’s not much content right now, but you have to start from something…
- Go to GitHub and join the discussion
There are many aspects that we need to cover and we know we’re not perfect right now. Please bear with us, we want to improve.
The main message here is that we need your help to continue running events for people to share, network and learn. A name a just a name and there’s more that identifies our community.
Come and help us, be a part of the solution
Generating a Jupyter Notebook for Glenn Berry’s Diagnostic Queries with PowerShell
The March release of Azure Data Studio now supports Jupyter Notebooks with SQL kernels. This is a very interesting feature that opens new possibilities, especially for presentations and for troubleshooting scenarios.
For presentations, it is fairly obvious what the use case is: you can prepare notebooks to show in your presentations, with code and results combined in a convenient way. It helps when you have to establish a workflow in your demos that the attendees can repeat at home when they download the demos for your presentation.
For troubleshooting scenarios, the interesting feature is the ability to include results inside a Notebook file, so that you can create an empty Notebook, send it to your client and make them run the queries and send it back to you with the results populated. For this particular usage scenario, the first thing that came to my mind is running the diagnostic queries by Glenn Berry in a Notebook.
Obviously, I don’t want to create such a Notebook manually by adding all the code cells one by one. Fortunately, PowerShell is my friend and can do the heavy lifting for me.
Unsurprisingly, dbatools comes to the rescue: André Kamman added a cmdlet that downloads, parses and executes Glenn Berry’s diagnostic queries and added the cmdlet to dbatools. The part that can help me is not a public function available to the user, but I can still go to GitHub and download the internal function Invoke-DbaDiagnosticQueryScriptParser for my needs.
The function returns a list of queries that I can use to generate the Jupyter Notebook:
This file contains hidden or bidirectional Unicode text that may be interpreted or compiled differently than what appears below. To review, open the file in an editor that reveals hidden Unicode characters.
Learn more about bidirectional Unicode characters
| # | |
| # Purpose: take the diagnostic queries from Glenn Berry | |
| # and generate a Jupyter Notebook to run in Azure Data Studio | |
| # | |
| # Example usage: | |
| # create-diagnostic-notebook.ps1 -diagnosticScriptPath "C:\Program Files\WindowsPowerShell\Modules\dbatools\0.9.777\bin\diagnosticquery\SQLServerDiagnosticQueries_2019_201901.sql" -notebookOutputPath "diagnostic-notebook.ipynb" | |
| # | |
| [CmdletBinding()] | |
| Param( | |
| [parameter(Mandatory)] | |
| [System.IO.FileInfo]$diagnosticScriptPath, | |
| [System.IO.FileInfo]$notebookOutputPath | |
| ) | |
| # | |
| # Function taken from dbatools https://github.com/sqlcollaborative/dbatools/blob/development/internal/functions/Invoke-DbaDiagnosticQueryScriptParser.ps1 | |
| # Parses the diagnostic script and breaks it into individual queries, | |
| # with text and description | |
| # | |
| function Invoke-DbaDiagnosticQueryScriptParser { | |
| [CmdletBinding(DefaultParameterSetName = "Default")] | |
| Param( | |
| [parameter(Mandatory)] | |
| [ValidateScript( {Test-Path $_})] | |
| [System.IO.FileInfo]$filename, | |
| [Switch]$ExcludeQueryTextColumn, | |
| [Switch]$ExcludePlanColumn, | |
| [Switch]$NoColumnParsing | |
| ) | |
| $out = "Parsing file {0}" -f $filename | |
| write-verbose -Message $out | |
| $ParsedScript = @() | |
| [string]$scriptpart = "" | |
| $fullscript = Get-Content -Path $filename | |
| $start = $false | |
| $querynr = 0 | |
| $DBSpecific = $false | |
| if ($ExcludeQueryTextColumn) {$QueryTextColumn = ""} else {$QueryTextColumn = ", t.[text] AS [Complete Query Text]"} | |
| if ($ExcludePlanColumn) {$PlanTextColumn = ""} else {$PlanTextColumn = ", qp.query_plan AS [Query Plan]"} | |
| foreach ($line in $fullscript) { | |
| if ($start -eq $false) { | |
| if (($line -match "You have the correct major version of SQL Server for this diagnostic information script") -or ($line.StartsWith("– Server level queries ***"))) { | |
| $start = $true | |
| } | |
| continue | |
| } | |
| if ($line.StartsWith("– Database specific queries ***") -or ($line.StartsWith("– Switch to user database **"))) { | |
| $DBSpecific = $true | |
| } | |
| if (!$NoColumnParsing) { | |
| if (($line -match "– uncomment out these columns if not copying results to Excel") -or ($line -match "– comment out this column if copying results to Excel")) { | |
| $line = $QueryTextColumn + $PlanTextColumn | |
| } | |
| } | |
| if ($line -match "-{2,}\s{1,}(.*) \(Query (\d*)\) \((\D*)\)") { | |
| $prev_querydescription = $Matches[1] | |
| $prev_querynr = $Matches[2] | |
| $prev_queryname = $Matches[3] | |
| if ($querynr -gt 0) { | |
| $properties = @{QueryNr = $querynr; QueryName = $queryname; DBSpecific = $DBSpecific; Description = $queryDescription; Text = $scriptpart} | |
| $newscript = New-Object -TypeName PSObject -Property $properties | |
| $ParsedScript += $newscript | |
| $scriptpart = "" | |
| } | |
| $querydescription = $prev_querydescription | |
| $querynr = $prev_querynr | |
| $queryname = $prev_queryname | |
| } else { | |
| if (!$line.startswith("–") -and ($line.trim() -ne "") -and ($null -ne $line) -and ($line -ne "\n")) { | |
| $scriptpart += $line + "`n" | |
| } | |
| } | |
| } | |
| $properties = @{QueryNr = $querynr; QueryName = $queryname; DBSpecific = $DBSpecific; Description = $queryDescription; Text = $scriptpart} | |
| $newscript = New-Object -TypeName PSObject -Property $properties | |
| $ParsedScript += $newscript | |
| $ParsedScript | |
| } | |
| $cells = @() | |
| Invoke-DbaDiagnosticQueryScriptParser $diagnosticScriptPath | | |
| Where-Object { -not $_.DBSpecific } | | |
| ForEach-Object { | |
| $cells += [pscustomobject]@{cell_type = "markdown"; source = "## $($_.QueryName)`n`n$($_.Description)" } | |
| $cells += [pscustomobject]@{cell_type = "code"; source = $_.Text } | |
| } | |
| $preamble = @" | |
| { | |
| "metadata": { | |
| "kernelspec": { | |
| "name": "SQL", | |
| "display_name": "SQL", | |
| "language": "sql" | |
| }, | |
| "language_info": { | |
| "name": "sql", | |
| "version": "" | |
| } | |
| }, | |
| "nbformat_minor": 2, | |
| "nbformat": 4, | |
| "cells": | |
| "@ | |
| $preamble | Out-File $notebookOutputPath | |
| $cells | ConvertTo-Json | Out-File -FilePath $notebookOutputPath -Append | |
| "}}" | Out-File -FilePath $notebookOutputPath -Append |
In order to use the script, you need to provide the path to the file that contains the diagnostic queries and the path where the new Jupyter Notebook should be generated. Dbatools includes the latest version of the diagnostic scripts already, so you just need to choose which flavor you want to use. You will find all available scripts in the module directory of dbatools:
$dbatoolsPath = Split-Path -parent (Get-Module -ListAvailable dbatools).path
$dbatoolsPath
Get-ChildItem "$dbatoolsPath\bin\diagnosticquery" | Select-Object Name
The script above produces this output:
C:\Program Files\WindowsPowerShell\Modules\dbatools\0.9.777

Name
----
SQLServerDiagnosticQueries_2005_201901.sql
SQLServerDiagnosticQueries_2008R2_201901.sql
SQLServerDiagnosticQueries_2008_201901.sql
SQLServerDiagnosticQueries_2012_201901.sql
SQLServerDiagnosticQueries_2014_201901.sql
SQLServerDiagnosticQueries_2016SP2_201901.sql
SQLServerDiagnosticQueries_2016_201901.sql
SQLServerDiagnosticQueries_2017_201901.sql
SQLServerDiagnosticQueries_2019_201901.sql
SQLServerDiagnosticQueries_AzureSQLDatabase_201901.sql
Once you decide which file to use, you can pass it to the script:
create-diagnostic-notebook.ps1 `
    -diagnosticScriptPath "C:\Program Files\WindowsPowerShell\Modules\dbatools\0.9.777\bin\diagnosticquery\SQLServerDiagnosticQueries_2019_201901.sql" `
    -notebookOutputPath "diagnostic-notebook.ipynb"
What you obtain is a Jupyter Notebook that you can open in Azure Data Studio:
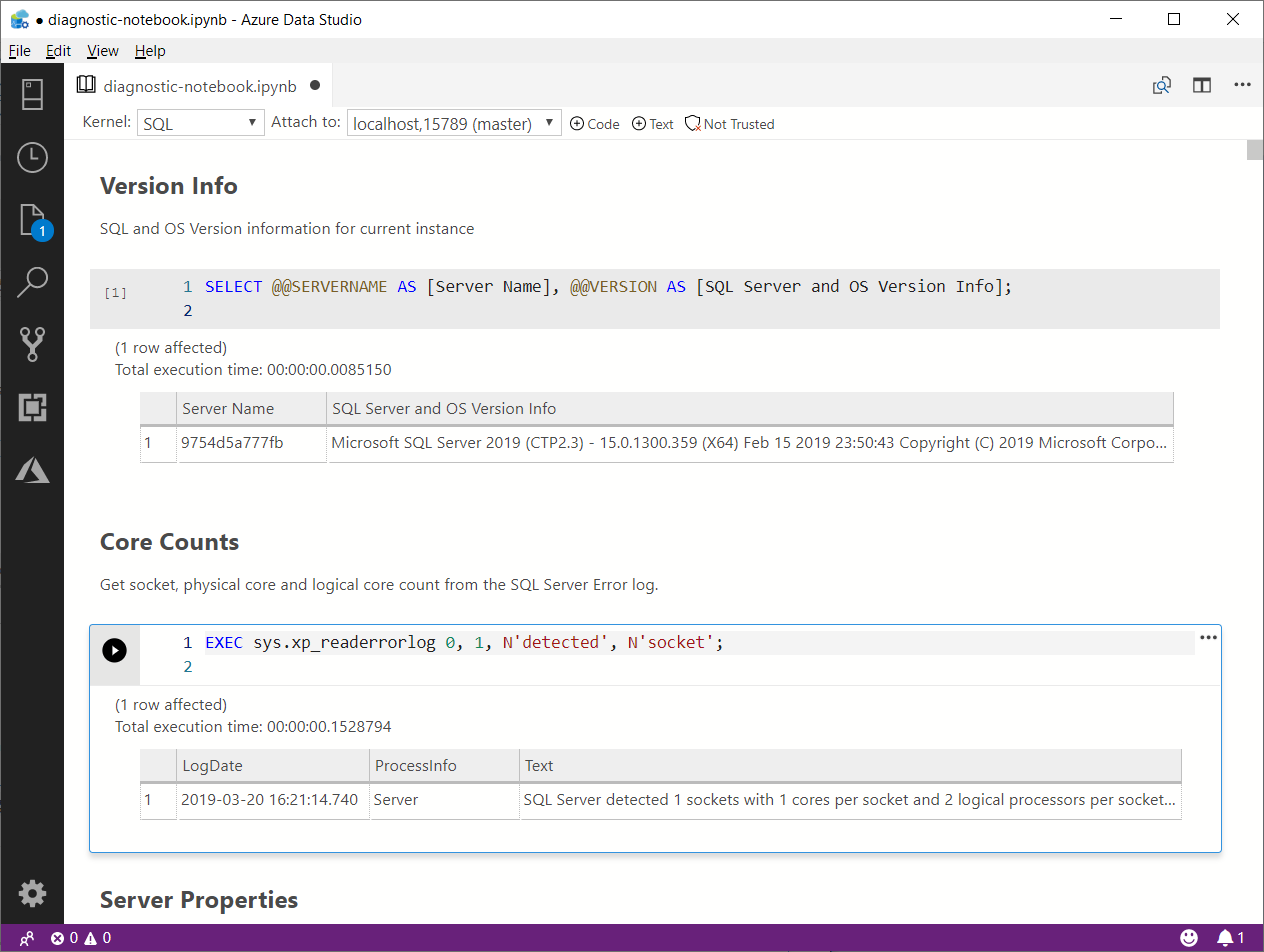
This is nice way to incorporate the code and results in a single file, that you can review offline later. This also allows you to send the empty notebook to a remote client, ask to run one or more queries and send back the notebook including the results for you to review.
Happy Notebooking!
Using Virtual Desktops for Presentations
Today I was reading William Durkin‘s fine post on Presentation Mode in SSMS vNext when inspiration struck.
One of the things that really annoys me when presenting is the transition between slides and demos. Usually, I try to improve the process as much as possible by having the least minimum amount of windows open while presenting, so that I don’t land on the wrong window. Unfortunately, that is not always easy.
Another thing that I would like to be smoother is the transition itself. The ideal process should be:
- Leave the powerpoint slides open at full screen
- Switch immediately to the virtual machine with the demos
- Go back to the slides, to the exact point where I left
What I usually do is show the desktop with the WIN+D hotkey, then activate the Virtualbox window with my demos, but this shows my desktop for a moment and I don’t really like this extra transition.
I could also use ALT+Tab to switch to the Virtualbox window, but this would briefly show the list of running applications, which is not exactly what I want.
Turns out that Windows 10 has the perfect solution built-in: Virtual Desktops.
Here is the setup described:
- If you press WIN+Tab, you will see a “New desktop” button on the bottom right corner. Use it to create three desktops:
- desktop 3 for the slides
- desktop 2 for the demos
- desktop 1 for the rest
- Press WIN+Tab, find your virtual machine and move it to desktop 2. It is really easy: you just have right click the window you want to send to a different desktop and select which desktop to use.

- Open your presentation and start it by pressing F5. Again, hit WIN+Tab, find the fullscreen window of your PowerPoint presentation and move it to desktop 3.
- In order to transition from one desktop to another, you can use the hotkey CTRL+WIN+Arrow, as shown in this GIF:

Here it is! Perfectly smooth, a nice transition animation and nothing but your slides and your demos shown to the attendees.
Upcoming Speaking Engagements
In the next few months I will be speaking at some awesome events around Europe.

SQLBits is THE SQL Server event in Europe, with a very long tradition and a fantastic audience. I totally love SQLBits!
This time I will speak about “Benchmarking like a PRO“. In this session I will demonstrate how to capture a baseline with RML Utilities and how to replay it against a target machine to compare baseline and benchmarks. I will use a PowerShell script of my creation and I will walk you through the code and outcomes.
![]()
SQLNexus is quickly gaining a reputation as a fantastic event, which is nothing but the truth.
My session is going to be again “Benchmarking like a PRO”, this time on a IMAX screen 🙂

“SQLGrillen: Databases, Bratwurst & Beer”. Not much to add 🙂
This time I will pose as Virgil and guide you through the SQL Server Hell in my “SQL Server Infernals” session.
Dublin is a special place. I’ve been in Dublin as an attendee in 2014 and it’s a wonderful city, with one of the best SQL Saturdays I’ve ever been to.
I am honored to say that I will deliver my session “Responding to Extended Events in near real-time“.
That’s it for the moment. Enough to keep me busy for some time to come 🙂
Upcoming Speaking Engagements
The next few months will be crazy for me. I will be travelling a lot around Europe, speaking about SQL Server topics.
Here is where you will find me in the upcoming weeks:
- May 4: SQLNexus
SQLNexus is a new conference in Copenhagen and will be the official launch event in Denmark for SQL Server 2016.
I will speak about “Responding to Extended Events in near Real-Time”.
- May 5: SQLBits
SQLBits doesn’t need to be introduced. It’s the biggest SQL Server event in Europe and it will also be the official SQL Server 2016 launch event in UK.
Again, I will speak about “Responding to Extended Events in near Real-Time”.
- May 16: NTK
NTK is a famous conference in Slovenia, which has been running for many years now. This year it will be held in Portorosz, near the Italian border.
It’s going to be fun: I will speak about “Benchmarking, Baselining and Workload Analysis”.
- June 14: INSIDE-SQL
INSIDE-SQL is also a new event, run this year for the first time. It’s an event focused on in-depth concepts, delivered in 75 minutes sessions, with long breaks between sessions, so that attendees can go to the next session without rushing and can hang out with the speakers and ask questions.
I will deliver two sessions:
“Responding to Extended Events in near Real-Time”
“Advanced T-SQL Techniques”
- June 24: SQL Saturday Paris
Free SQL Server training from the 40th floor of the Tour Montparnasse in Paris.What else can I say?
I will be speaking about “New Security Features in SQL Server 2016”
- September 10: SQL Saturday Cambridge
One of the coolest SQLSats around!
This time I’ll be speaking about “SQL Server Infernals”, AKA “how to torture your SQL Server instances to death with worst practices”. It’s going to be fun!
I hope to see you at these super cool events!
Hangout #18 with Boris Hristov
Yesterday evening I had the honour and pleasure of recording one of his famous SQL Hangout with my friend Boris Hristov (b|t).
We discussed some of the new features in SQL Server 2014, in particular the new Cardinality Estimator and the Delayed Durability. Those are definitely interesting innovations and something everybody should be checking out when planning new work on SQL Server 2014. The two features have nothing to do with each other, but we decided to speak about both of them nevertheless.
I really like the hangout format: it’s informal, fun to record and to watch. I hope you’ll have the same fun watching it.
Enjoy!
RunCore mSata SSD on Dell precision laptops
What I was planning to write on this post is a total different story from the one you will read here. I was ready to describe in detail how to open the laptop, put the drive in and combine the speed of SSD with the capacity of traditional spin disks on your laptop.
Well, you won’t read anything about that here: despite being advertised as compatible on the product page, this mSata drive won’t work on Dell precision laptops. Full stop.

It’s still unclear to me if it is a firmware issue or a more troublesome problem. The fact remains: this product is not suitable for a Dell precision mobile workstation.
After reading this review, I decided to buy the 120 GB drive (RCP-V-T501B-MC) for my Dell precision M4600. I could find one only at MyDigitalDiscount, an online shop I didn’t know at the time. However, the item was showing as available and I placed the order on August 29.
Item price:    $ 359
Shipping cost: $  35
--------------------
Total:         $ 394
The next day, the item was showing as “available in 5-10 business days” and remained that way for three weeks. The product was actually sent my way on September 22 and arrived in Italy on September 27.
The Italian customs kept it until October 13 and I finally had the drive in my hands on October 14.
VAT and customs expenses: $  95
--------------------------------
Grand total:              $ 489
You can imagine my frustration when the drive didn’t work. You may be interested to know that I’m not alone: this thread on notebookreview.com proves that other people were tricked by RunCore’s compatibility claims.
I contacted the vendor to return the item and I requested a refund. I will keep you posted on the status of my request: it could tell much about this vendor’s credibility.
On the other hand I also contacted RunCore to see if the issue can be solved (I highly doubt it). No news to date: I will keep you posted on this one as well, for the same reasons as above.
UPDATE 2011-10-19: MyDigitalDiscont customer service contacted me today and looks like I can be refunded. I still don’t know if the refund will cover shipping costs (back and forth), but it’s a starting point. On the compatibility issue, they say that they received the list from RunCore, which I can believe, since it’s displayed on RunCore’s site.
UPDATE 2011-10-20: MyDigitalDiscount will refund the returned item’s cost completely and will also pay for the shipping of a new product in substitution. I will have to pay the shipping costs for the return and I will also pay the customs expenses for the old and new order.
I must say that I’m very pleased with their behaviour and, honestly, I can’t blame them for the compatibility issue.UPDATE 2011-10-21: I contacted RunCore directly and they say that they will perform some compatibility tests shortly. I’m waiting for these tests to complete before arranging the return with MyDigitalDiscont: maybe there’s a way to make the drive work.
UPDATE 2011-11-02: RunCore support contacted me today and put an end to my expectations. The drive is NOT compatible with Dell Precision laptops and needs an hardware modification. Meanwhile, their product detail page still claims this drive’s compatibility with Dell laptops:

UPDATE 2011-12-01: RunCore finally decided that it was time to remove the part that claimed compatibility with Dell Precision laptops from their product page. I still wonder what would one do with this drive, as I don’t think there is any single compatible laptop on the market. Maybe this product was conceived future hardware. Go figure.
The Spaghetti-Western Database
Today I noticed in my WordPress site stats that somebody landed on this blog from a search engine with the keywords “spaghetti dba”.
I found it hilarious that somebody was really searching for me that way, and I performed the search on Google to see how this blog would rank.
The third result from Google made me chuckle: The Spaghetti-Western Database Trailer. And here is the video showing on that page:
Awesome. I love Spaghetti-Western movies and I love databases, I couldn’t ask for more!
The video is a trailer to the site www.spaghetti-western.net and… Oh! Wait: is that a NoSQL database? #fail
