DataMoshpit!
Today I’m presenting at DataMospit, the most metal conference in the data space!
You can download the Sea of Madness bingo card from here: https://github.com/spaghettidba/CodeSamples/raw/master/SQLServerInfernals/InfernalBingo.xlsx
The winner will get a 1 year subscription to QMonitor, the fantastic SQL Server monitoring solution from Quantumdatis.
Good luck!
Code signing for mere mortals
Well, turns out code signing is pretty complex, so I’m writing this blog post as a guide for my future self. I hope he will appreciate, and perhaps some of you may find it useful as well.
The need for code signing
There is a lot of malware out there, we all know it, so you’d better be careful with what you download and install on your computer. Browsers try to help with that and will warn you when you download a suspicious piece of software:
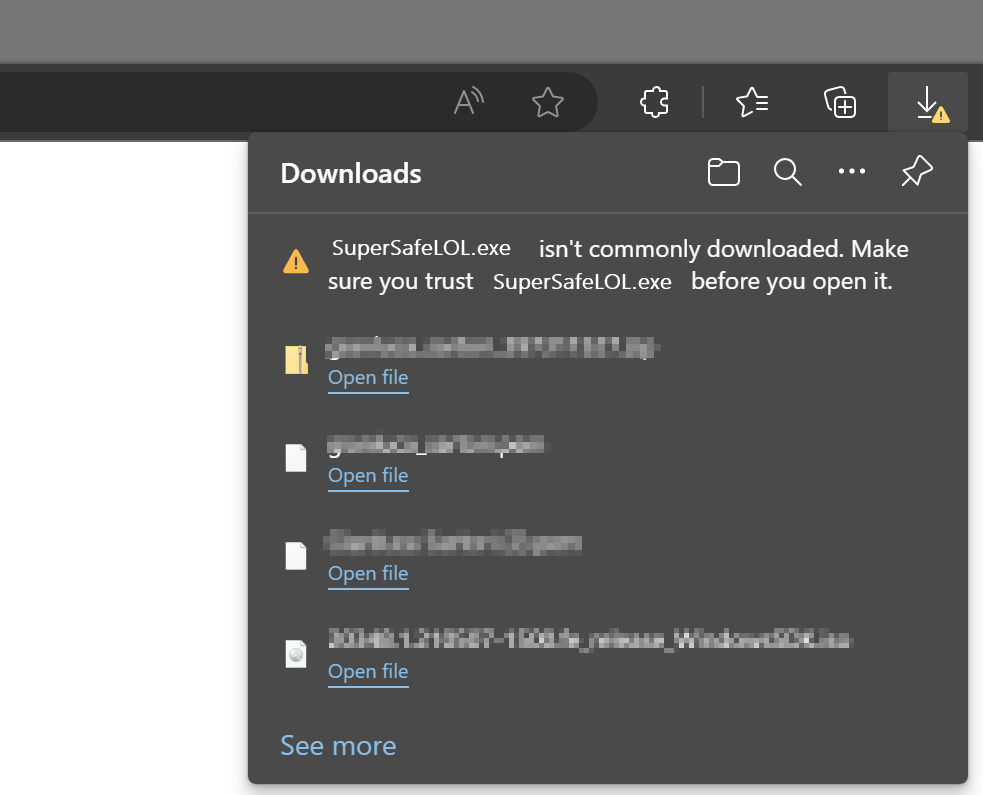
You will have to be very persistent if you really mean to keep it:

If you try to install it, Windows will warn you again that you shouldn’t really install random stuff from the Internet:

Why does happen with some files and doesn’t happen with the Chrome installer or Acrobat reader? Because those setup kits are signed with a certificate from Google and Adobe, released by a certification authority that checks that Google is actually Google and not a disgruntled random guy pretending to be Google.
This means you can sign your code too, you just need to get a code signing certificate from a certification authority and they will be happy to give you one in exchange for money.
Get a Code Signing Certificate
There are many certification authorities and I don’t have enough experience to recommend one in particular. In my case, I ended up working with DigiCert, because at the time they offered complimentary certificates for MVPs.
After registering an account, the first thing you have to do is request a new code signing certificate. The cert authority will perform all required checks, like checking your ID/passport, set up a video call where you sign a form in front of the operator… long story short, they will make sure that you are who you claim you are.
After the check is done, they will issue a certificate, that you can use to sign your code. Hooray!
At this time, you will also get a private key, that you will need to perform all the operations on your code signing certificate. The private key is another certificate, that you will have to make sure to keep in a safe place. Starting from June 1st 2023, regulations require that you store your private keys on a hardware token that provides strong encryption or online in an encrypted key vault.
Either way, make sure you don’t lose it.
Sign your code with the Code Signing Certificate
In order to sign your code, you will need to install the Windows SDK Signing Tools, which are part of the Windows SDK. You can download the appropriate version for your OS from Microsoft.
The tool that you’re looking for is called signtool.exe and you can find it in C:\Program Files (x86)\Windows Kits\10\App Certification Kit\signtool.exe
Usage: signtool <command> [options]

  Valid commands:
    sign       --  Sign files using an embedded signature.
    timestamp  --  Timestamp previously-signed files.
    verify     --  Verify embedded or catalog signatures.
    catdb      --  Modify a catalog database.
    remove     --  Remove embedded signature(s) or reduce the size of an
                   embedded signed file.
The command that we need is “sign”. There are a lot of options for this command and I have a very limited knowledge of what does what. What did the trick for me is this combination of parameters:
signtool.exe sign
    /f <path to your cert>
    /p <password to open the cert>
    /sha1 <sha1 fingerprint>
    /t <url of the timestamp server>
    /d <description of the content>
    /fd <file digest algorithm>
    <path of the file to sign>
In my case, to sign XESmartTarget, I entered this command:
signtool sign
    /f "c:\digicert\codesigning2023.pfx"
    /p "MySuperDuperPassword"
    /sha1 "00AABBCCDDEEFF0011223344556677889900AABB"
    /t "http://timestamp.digicert.com"
    /d "XESmartTarget"
    /fd sha1
    "c:\temp\XESmartTarget_x64.msi"
Every parameter is in a new line for readability, but you command will be on a single line.
Looks pretty easy, but I can tell you it’s not. Well, not for me at least. In order to produce the above command line, you will need a number of things:
- The certificate in .pfx format
- The password of the certificate
- The sha1 fingerprint
- The URL of the timestamp server
Convert your code signing certificate to the .pfx format
The certification authority will provide the certificate in many possible formats. Not all formats are good for you: you need .pfx because that’s the one that works with signtool. Maybe it works with other formats, I don’t know, but .pfx worked for me.
In my case, DigiCert provided the certificates either in .p7b, .cer, .crt or .pem format. All these formats are base64 encoded and can be opened with a text editor. If you open a certificate in notepad, you will see something like this:
-----BEGIN CERTIFICATE-----
NIIG3TCCBFmaAqIBAgIEDZk+BM+4uNO1I19N3Mqg0zANBgfqhkiGrw0BAQsFQDBp
MQewCRYDVaQGEwJVUzeXMBUeA1UBChMNRGlnaULlcnQqIEauYy4xRTA/BbNWBAbT
..................lots of gibberish..................
bNWKqgD+rgfsIhBMsEn0ulSMt0JE7q32PeBeVETFv1nQfnljjVA==
-----END CERTIFICATE-----
The .pfx format is different, it is a binary format and cannot be opened with a text editor.
In order to convert your .pem certificate to .pfx format, you will need another tool called openssl. You can download and install for your OS or you can use a winget command: winget install openssl.
Once you have openssl, you can use this command to convert your base64 certificate to the .pfx format:
openssl pkcs12 -inkey c:\digicert\privatekey.pem -in c:\digicert\codesigning.crt -export -out c:\digicert\codesigning.pfxOpenssl will prompt for the password of the private key. Did I mention you should not lose it?
Enter pass phrase for c:\digicert\privatekey.pem: <-- private key password
Enter Export Password:   <-- this is the password of the exported certificate
Verifying - Enter Export Password: <-- type again
The export password is the one that you will need to pass to signtool in the /p parameter.
Convert your private key to .pem format
If your private key is not in base64 format, openssl will fail:
Could not read private key from -inkey file from c:\digicert\privatekey.p12I don’t remember exactly how, but my private key is in .p12 format (it’s a binary encrypted format): if that is all you have, you will need to convert it first.
Openssl can convert the private key for you:
openssl pkcs12 -in c:\digicert\privatekey.p12 -out c:\digicert\privatekey.pem -clcertsNow that you have the private key in the .pem format, you can go back to the previous step and generate the .pfx certificate.
Get the certificate fingerprint
Your certitification authority should display the certificate sha thumbprint on the certificate order in your personal area. At least, DigiCert does. This information can be displayed as “thumbprint” or “fingerprint” and it’s a binary string.
If you can’t find this information on the certificate order, you can extract it from the certificate itself, again using openssl:
openssl x509 -noout -fingerprint -sha1 -inform pem -in "C:\digicert\codesigning.pem"
The output will look like this:
sha1 Fingerprint=00:AA:BB:CC:DD:EE:FF:00:11:22:33:44:55:66:77:88:99:00:AA:BBThis fingerprint should match the one you have on your certificate order and must be used in the signtool command line without the “:”. In this case it becomes 00AABBCCDDEEFF0011223344556677889900AABB
Putting it all together
Once you have your certificate ready, you can use signtool to sign your artifacts. In order to make this process easier, I created a couple of scripts that I use in Visual Studio builds as post build scripts.
My Wix setup project has this Post-build Event Command Line:
call $(ProjectDir)postbuild.bat "!(TargetPath)" "$(TargetDir)$(SolutionName)_$(Platform)$(TargetExt)"postbuild.bat looks like this:
powershell.exe -ExecutionPolicy Bypass -NoProfile -NonInteractive -File %~dp0\SignMsi.ps1 -InputFile %1 -OutputFile %2SignMsi.ps1 is where all the magic happens:
[CmdletBinding()]
Param(
    [Parameter(Mandatory=$True,Position=1)]
    [string]$InputFile,
    [Parameter(Mandatory=$True,Position=2)]
    [string]$OutputFile
)


if(-not (Test-Path $PSScriptRoot\SignParams.ps1))
{
    Write-Warning "No code signing is applied to the .msi file."
    Write-Warning "You need to create a file called SignParams.ps1 and provide signing info."
    Move-Item $InputFile $OutputFile -Force
    exit
}

# read paramters
$signParams = get-content $PSScriptRoot\SignParams.ps1 -Raw
Invoke-Expression $signParams

$params = $(
     'sign'
    ,'/f'
    ,('"' + $certPath + '"')
    ,'/p'
    ,('"' + $certPass + '"')
    ,'/sha1'
    ,$certSha
    ,'/t'
    ,('"' + $certTime + '"')
    ,'/d'
    ,'"XESmartTarget"'
    ,"/fd"
    ,"sha1"
)

& $signTool ($params + $InputFile)

Write-Output "Moving $InputFile --> $OutputFile"
Move-Item $InputFile $OutputFile -Force
SignMsi.ps1 looks for a file named SignParams.ps1 in the same folder and if it finds the file if processes the contents and proceeds to sign the artifacts, otherwise it just ignores signing, which can be good for pre-prod or test environments.
The SignParams.ps1 file contains the parameters needed by signtool and it looks like this:
$signTool = "C:\Program Files (x86)\Windows Kits\10\App Certification Kit\signtool.exe"
$certPath = "c:\digicert\codesigning2023.pfx"
$certPass = "MySuperDuperPassword"
$certSha = "00AABBCCDDEEFF0011223344556677889900AABB"
$certTime = "http://timestamp.digicert.com"
This should make your life pretty easy.
Cheers!
Recipe 10: Writing Events to InfluxDB
Welcome to the last recipe of this Extended Events cookbook! You will find the first blog post of the series here and you can browse all recipes with the xesmarttarget tag on this blog.
The problem
The TIG software stack (Telegraf, InfluxDB, Grafana) is a very powerful combination of software tools that can help you collect, store and analyze data that has a time attribute. In particular, InfluxDB is a time series database, built with sharding, partitioning and retention policies in mind. It is absolutely fantastic for storing telemetry data, like performance counters from SQL Server or other software products.
In order to store data in InfluxDB, you can use Telegraf, a data collection agent that takes care of extracting telemetry data from the object to observe and upload it to the InfluxDB database. Telegraf is built with the concept of plugins: each object to observe has its own plugin and it’s not surprising at all to find a specialized plugin for SQL Server.
Using the SQL Server plugin, you can connect Telegraf to SQLServer, populate an InfluxDB database and visualize the performance metrics using Grafana. In fact, there are multiple readily available dashboards designed for the data collected by the Telegraf plugin for SQL Server. You can simply download and install those dashboards or build your custom dashboards to create a complete monitoring solution for SQL Server.
However, Telegraf is designed to pull data from SQL Server at regular intervals and cannot receive events from Extended Events sessions. Fortunately, there is a way around this limitation, using XESmartTarget and the TelegrafAppenderResponse.
This response type doesn’t work like the other ones: it connects to an Extended Events session and outputs the events it receives on STDOUT, using the Line Protocol format used by Telegraf. It is designed to be used in combination with Telegraf: it’s Telegraf itself that starts XESmartTarget and then listens to its STDOUT to produce the points to upload to InfluxDB.
It sounds complicated, but it is not. Let me show you how it works with an example.
In this case, we are going to capture the following events to upload them to InfluxDB: errors, timeout, blocking and deadlocking. Let’s do this!
The session
Of course, we need a session. It is going to contain all the four events that we need:
IF NOT EXISTS (SELECT * FROM sys.server_event_sessions WHERE name = 'Recipe10')

CREATE EVENT SESSION [Recipe10] ON SERVER
    ADD EVENT sqlserver.blocked_process_report (
        ACTION(
            package0.event_sequence,
            sqlserver.client_app_name,
            sqlserver.client_hostname,
            sqlserver.database_name,
            sqlserver.server_instance_name,
            sqlserver.server_principal_name,
            sqlserver.session_id,
            sqlserver.sql_text
        )
    )
,ADD EVENT sqlserver.error_reported (
        ACTION(
            package0.event_sequence,
            sqlserver.client_app_name,
            sqlserver.client_hostname,
            sqlserver.database_name,
            sqlserver.server_instance_name,
            sqlserver.server_principal_name,
            sqlserver.session_id
        )
        WHERE ([severity] >= (16))
    )
,ADD EVENT sqlserver.rpc_completed (
        ACTION(
            package0.event_sequence,
            sqlserver.client_app_name,
            sqlserver.client_hostname,
            sqlserver.database_name,
            sqlserver.query_hash,
            sqlserver.server_instance_name,
            sqlserver.server_principal_name,
            sqlserver.session_id
        )
        WHERE ([result] = (2))
    )
,ADD EVENT sqlserver.sql_batch_completed (
        ACTION(
            package0.event_sequence,
            sqlserver.client_app_name,
            sqlserver.client_hostname,
            sqlserver.database_name,
            sqlserver.query_hash,
            sqlserver.server_instance_name,
            sqlserver.server_principal_name,
            sqlserver.session_id
        )
        WHERE ([result] = (2))
    )
,ADD EVENT sqlserver.xml_deadlock_report (
        ACTION(
            package0.event_sequence,
            sqlserver.client_app_name,
            sqlserver.client_hostname,
            sqlserver.database_name,
            sqlserver.server_instance_name,
            sqlserver.server_principal_name,
            sqlserver.session_id
        )
);

IF NOT EXISTS (SELECT * FROM sys.dm_xe_sessions WHERE name = 'Recipe10')
    ALTER EVENT SESSION Recipe10 ON SERVER STATE = START;
GO
Let’s have a look at the script.
The errors are captured by the error_reported event, with a filter for severe errors (severity > 16).
The blocked_process_report event takes care of blocking. To make it work, you will have to configure the blocked process threshold configuration option.
Xml_deadlock_report captures all the deadlocks.
The timeouts are captured by rpc_completed and sql_batch_completed events with filter for result = 2 (error). It’s not only timeouts, but a large chunk of these are timeouts.
XESmartTarget
Now that we have a session, we need to provide the configuration for XESmartTarget.
{
    "Target": {
        "ServerName": "$ServerName",
        "SessionName": "Recipe10",
        "FailOnProcessingError": false,
        "Responses": [
            {
                "__type": "TelegrafAppenderResponse",
                "Events": [
                    "error_reported"
                ],
                "OutputMeasurement": "sqlserver_events_errors",
                "OutputTags": [
                    "server_instance_name",
                    "name",
                    "client_app_name",
                    "server_principal_name",
                    "client_hostname",
                    "database_name",
                    "severity",
                    "error_number"
                ],
                "OutputFields": [
                    "event_sequence",
                    "message"
                ]
            },
            {
                "__type": "TelegrafAppenderResponse",
                "Events": [
                    "sql_batch_completed"
                ],
                "OutputMeasurement": "sqlserver_events_timeouts",
                "OutputTags": [
                    "server_instance_name",
                    "name",
                    "client_app_name",
                    "server_principal_name",
                    "client_hostname",
                    "database_name"
                ],
                "OutputFields": [
                    "event_sequence",
                    "sql_text AS batch_text",
                    "cpu_time",
                    "duration",
                    "logical_reads",
                    "physical_reads",
                    "writes",
                    "query_hash",
                    "row_count"
                ]
            },
            {
                "__type": "TelegrafAppenderResponse",
                "Events": [
                    "rpc_completed"
                ],
                "OutputMeasurement": "sqlserver_events_timeouts",
                "OutputTags": [
                    "server_instance_name",
                    "name",
                    "client_app_name",
                    "server_principal_name",
                    "client_hostname",
                    "database_name"
                ],
                "OutputFields": [
                    "event_sequence",
                    "sql_text AS statement",
                    "cpu_time",
                    "duration",
                    "logical_reads",
                    "physical_reads",
                    "writes",
                    "query_hash",
                    "row_count"
                ]
            },
            {
                "__type": "TelegrafAppenderResponse",
                "Events": [
                    "xml_deadlock_report"
                ],
                "OutputMeasurement": "sqlserver_events_deadlocks",
                "OutputTags": [
                    "server_instance_name",
                    "name",
                    "client_app_name",
                    "server_principal_name",
                    "client_hostname",
                    "database_name"
                ],
                "OutputFields": [
                    "event_sequence",
                    "session_id",
                    "xml_report"
                ]
            },
            {
                "__type": "TelegrafAppenderResponse",
                "Events": [
                    "blocked_process_report"
                ],
                "OutputMeasurement": "sqlserver_events_blocking",
                "OutputTags": [
                    "server_instance_name",
                    "name",
                    "client_app_name",
                    "server_principal_name",
                    "client_hostname",
                    "database_name"
                ],
                "OutputFields": [
                    "event_sequence",
                    "blocked_process",
                    "duration",
                    "index_id",
                    "lock_mode",
                    "object_id",
                    "resource_owner_type",
                    "transaction_id"
                ]
            }
        ]
    }
}
OutputMeasurement indicates the name of the measurement (that’s the equivalent of a table in InfluxDB). OutputTags and OutputFields indicate which “columns” will be added to the measurement. In InfluxDB you don’t have tables and you don’t have columns, but each point (that’s the equivalent of a row) has attributes of two types: tags (these are the key attributes, which are indexed) and fields (these are the value attributes, that contain the data).
The combination of timestamp + tags must be unique: if you send a point with the same tag values and the same timestamp as an existing point in the measurement, the existing point gets overwritten.
For instance, you could have a point with timestamp + tags (database name) and fields (data size, log size). Tags are indexed and are used to locate the points and aggregate them, while fields usually contain the numeric attributes that can be plotted on a chart or aggregated before visualizing.
In this configuration, XESmartTarget is not started directly by you, but it is started by Telegraf, using the execd plugin. Telegraf itself needs its configuration file, which looks like this:
# Telegraf Configuration
#

# Configuration for telegraf agent
[agent]

  interval = "15s"
  round_interval = true

  metric_batch_size = 5000
  metric_buffer_limit = 15000

  collection_jitter = "0s"

  flush_interval = "10s"
  flush_jitter = "0s"

  ## By default or when set to "0s", precision will be set to the same timestamp order as the collection interval, with the maximum being 1s. (interval = "10s", precision = "1s")
  ## Valid time units are "ns", "us" (or "┬╡s"), "ms", "s".
  precision = "1s"

  ## Log
  debug = true
  quiet = false

  ##  empty string means to log to stderr.
  logfile = "C:\\temp\\telegraf_log.log"

  logfile_rotation_interval = "7d"
  logfile_rotation_max_size = "50MB"
  logfile_rotation_max_archives = 7

  ## Add tag "host" to every collected metric, the host is the machine on which telegraf runs
  ## Override default hostname, if empty use os.Hostname()
  hostname = ""
  ## If set to true, do no set the "host" tag in the telegraf agent.
  omit_hostname = false

[[inputs.execd]]
  command = [
    'powershell',
    '-File',
    'C:\temp\Recipe_10_telegraf_xesmarttarget.ps1',
    '-ServerName',
    'localhost\SQLEXPRESS'
  ]
  signal = "none"
  restart_delay = "2m"
  data_format = "influx"


  [[processors.strings]]

  namepass = ["sqlserver_events_*"]

    [[processors.strings.replace]]


    tag = "server_instance_name"
    old = "\\"
    new = ":"

# Configuration for sending metrics to InfluxDB
[[outputs.influxdb]]

  urls = ["https://localhost:8086"]

  # database = ""
  database_tag = "demo"
  exclude_database_tag = false

  skip_database_creation = true

  # retention_policy = ""
  # retention_policy_tag = ""
  # exclude_retention_policy_tag = false

  # write_consistency = "any"

  ## Timeout for HTTP messages.
  timeout = "5s"

  ## HTTP User-Agent
  # user_agent = "telegraf"

  ## HTTP Content-Encoding for write request body, can be set to "gzip" to
  ## compress body or "identity" to apply no encoding.
  content_encoding = "gzip"
Save this as c:\temp\telegraf.conf. As you can see from the telegraf configuration file, it has to start a powershell script that in turn takes care of running XESmartTarget. The script is super simple and it looks like this:
[CmdletBinding()]
Param(
  [Parameter(Mandatory=$True,Position=0)]
  [string]$ServerName
)

$params = $(
    "--File",
    "$PsScriptRoot\Recipe_10_Telegraf.json",
    "--NoLogo",
    "--Quiet",
    "--GlobalVariables",
    "ServerName=$ServerName"
)


& "C:\Program Files\XESmartTarget\XESmartTarget.exe" $Params

exit 1
You can save it as C:\temp\Recipe_10_telegraf_xesmarttarget.ps1 and start Telegraf, using the configuration file provided.
The syntax for that is the following:
Telegraf.exe --config c:\temp\telegraf.confTelegraf will not show much on its console window, but under the hood it is starting XESmartTarget and it receives all the events in Line Protocol format from the TelegrafAppenderResponse.
You can set up a dashboard to display all the data, like this one from QMonitor, the monitoring solution built by Quantumdatis. QMonitor is built on top of the TIG stack and uses multiple components, including XESmartTarget, to extract, upload and analyze SQL Server performance data.
The events dashboard looks like this:

If you click one of the events, you can see the details of the event. In this case, the dashboard displays data about deadlocks:

All the data on this dashboard comes from the events captured by XESmartTarget and uploaded to InfluxDB by Telegraf.
Recap
Thanks to XESmartTarget it is extremely easy to capture events and process them with very little effort. You can perform a great variety of tasks with XEsmartTarget, from writing to a table in the database to the most complex tasks, like aggregating data in memory or sending emails.
You can review all the posts in the series, browsing the XESmartTarget tag. If you have questions on XESmartTarget don’t be shy and send me an email or comment here. Thanks for your attention!
Recipe 9: Capturing Queries and Plans
Welcome to a new recipe of this Extended Events cookbook! You will find the first blog post of the series here and you can browse all recipes with the xesmarttarget tag on this blog.
The problem
In the previous recipe we used XESmartTarget to analyze a workload and we could characterize it by application/login/database. Now let’s take one more step: let’s capture all the queries and their plans and add query_hash and query_plan_hash to the analysis table. We will also capture plans and query text on separate tables.
The session
The session looks a bit like the one that we had for the previous recipe, but the events are different.
IF NOT EXISTS ( SELECT * FROM sys.server_event_sessions WHERE name = 'Recipe09')

CREATE EVENT SESSION [Recipe09] ON SERVER
ADD EVENT sqlserver.sp_statement_completed(
	SET collect_statement=(1)
    ACTION(
		sqlserver.client_app_name,
		sqlserver.client_hostname,
		sqlserver.database_name,
		sqlserver.plan_handle,
		sqlserver.query_hash,
		sqlserver.query_plan_hash,
		sqlserver.server_principal_name
	)
    WHERE ([sqlserver].[query_hash] <> 0)
),
ADD EVENT sqlserver.sql_statement_completed(
	SET collect_statement=(1)
    ACTION(
		sqlserver.client_app_name,
		sqlserver.client_hostname,
		sqlserver.database_name,
		sqlserver.plan_handle,
		sqlserver.query_hash,
		sqlserver.query_plan_hash,
		sqlserver.server_principal_name
	)
    WHERE ([sqlserver].[query_hash] <> 0)
)
GO

IF NOT EXISTS ( SELECT * FROM sys.dm_xe_sessions WHERE name = 'Recipe09')
    ALTER EVENT SESSION Recipe09 ON SERVER STATE = START;
This time, instead of capturing sql_batch_completed and rpc_completed, we have to capture sql_statement_completed and sp_statement_completed. This is because we have to capture events that carry the plan_handle, query_hahs and query_plan_hash columns, that are available on the individual statements rather than the whole batches or stored procedures.
XESmartTarget
First, we need to create some tables to store the data captured by the session:
CREATE TABLE [dbo].[Recipe_09_WorkloadAnalysis](
	[snapshot_id] [datetime2](7) NULL,
	[client_app_name] [nvarchar](255) NULL,
	[server_principal_name] [nvarchar](128) NULL,
	[database_name] [nvarchar](128) NULL,
	[query_hash] [decimal](20, 0) NULL,
	[query_plan_hash] [decimal](20, 0) NULL,
	[tot_cpu] [bigint] NULL,
	[tot_duration] [bigint] NULL,
	[tot_reads] [bigint] NULL,
	[tot_writes] [bigint] NULL,
	[execution_count] [bigint] NULL,
	CONSTRAINT UQ_Recipe_09_WorkloadAnalysis
		UNIQUE (snapshot_id, client_app_name, server_principal_name, database_name, query_hash, query_plan_hash)

)

CREATE TABLE [dbo].[Recipe_09_WorkloadAnalysis_Queries](
	[query_hash] [numeric](20, 0) PRIMARY KEY,
	[sql_text] [nvarchar](max) NULL
)

CREATE TABLE [dbo].[Recipe_09_WorkloadAnalysis_Plans](
	[query_plan_hash] [numeric](20, 0) PRIMARY KEY,
	[query_plan] [xml] NULL
)
The target configuration is rather complex: we have three tables to populate, so we need three separate Responses.
{
    "Target": {
        "ServerName": "$ServerName",
        "SessionName": "Recipe09",
        "FailOnProcessingError": false,
        "Responses": [
            {
                "__type": "GroupedTableAppenderResponse",
                "ServerName": "$ServerName",
                "DatabaseName": "XERecipes",
                "TableName": "Recipe_09_WorkloadAnalysis",
                "AutoCreateTargetTable": false,
                "OutputColumns": [
                    "snapshot_id AS CONVERT(SUBSTRING(CONVERT(collection_time,'System.String'),1,16),'System.DateTime')",
                    "client_app_name",
                    "server_principal_name",
                    "database_name",
                    "query_hash",
                    "query_plan_hash",
                    "SUM(cpu_time) AS tot_cpu",
                    "SUM(duration) AS tot_duration",
                    "SUM(logical_reads) AS tot_reads",
                    "SUM(writes) AS tot_writes",
                    "COUNT(collection_time) AS execution_count"
                ]
            },
            {
                "__type": "GroupedTableAppenderResponse",
                "ServerName": "$ServerName",
                "DatabaseName": "XERecipes",
                "TableName": "Recipe_09_WorkloadAnalysis_Queries",
                "AutoCreateTargetTable": false,
                "OutputColumns": [
                    "query_hash",
                    "MIN(statement) AS sql_text"
                ]
            },
            {
                "__type": "ExecuteTSQLResponse",
                "ServerName": "$ServerName",
                "DatabaseName": "XERecipes",
                "TSQL": "INSERT INTO Recipe_09_WorkloadAnalysis_Plans SELECT TOP(1) {query_plan_hash} AS query_plan_hash, query_plan FROM sys.dm_exec_query_plan({plan_handle}) AS qp WHERE NOT EXISTS(SELECT * FROM Recipe_09_WorkloadAnalysis_Plans WITH (READCOMMITTEDLOCK) WHERE query_plan_hash = {query_plan_hash})"
            }
        ]
    }
}
The first Response takes care of aggregating the data, as we did for the previous recipe. This time we have some more columns to group on (query_hash and query_plan_hash), but it’s rather similar to what we did last time.
The second Response saves the text of the queries by query hash. We can safely use MIN(statement) to make sure that we capture one instance of the query text for each plan_hash.
The third Response captures the query plans. Instead of capturing the plan from the session, we’re extracting it from sys.dm_exec_query_plan. I’m not really sure this is a great idea from a performance standpoint, but I’m just demonstrating a concept here: I strongly suggest that you measure the impact before running this against a production server.
OK, let’s save the configuration and start XESmartTarget:
"%ProgramFiles%\XESmartTarget\xesmarttarget.exe" --File C:\temp\Recipe_09_Workload_Analysis.json --GlobalVariables ServerName=(local)\SQLEXPRESSAfter a while, we can inspect the data in the target tables. As expected, the first one contains the workload data:

The second table contains all the queries:

And the last one contains all the query plans:

Using this data, we can easily identify the most cpu intensive queries, using this statement:
SELECT TOP(10) wa.query_hash, MIN(sql_text) AS sql_text, SUM(tot_cpu) AS sum_tot_cpu
FROM [dbo].[Recipe_09_WorkloadAnalysis] AS wa
INNER JOIN [dbo].[Recipe_09_WorkloadAnalysis_Queries] AS q
	ON wa.query_hash = q.query_hash
GROUP BY wa.query_hash
ORDER BY sum_tot_cpu DESC

There is not much going on on this instance, but still the query to extract plans tops the chart. Hmmm… it looks like extracting query plans this way is probably not a great idea after all 🙂
Recap
Combining multiple Response types, you can achieve very complex results. XESmartTarget can be a life saver when you have to pull event data from many events and manipulate the data in many ways.
In the next recipe we will see how to write events to a time-series database like InfluxDB, using XESmartTarget and the TelegrafAppenderResponse. Keep an eye on the XESmartTarget tag!
Recipe 8: Analyzing a Workload
Welcome to a new recipe of this Extended Events cookbook! You will find the first blog post of the series here and you can browse all recipes with the xesmarttarget tag on this blog.
The problem
The idea comes from a blog post by Brent Ozar about “How to Find Out Whose Queries are Using The Most CPU“. Brent uses the Resource Governor to detect who’s using the CPU. That’s an interesting approach, but you can do the same more efficiently with XESmartTarget.
Analyzing a workload means capturing all the queries on a server, categorize them by application name, database name and login name, and creating samples at regular intervals, in order to describe the behavior of the workload over time, let’s say every one minute.
The session
The events that you need this time are rpc_completed and sql_batch_completed. These two events are enough to describe the workload. Here is what the session script looks like:
IF NOT EXISTS ( SELECT * FROM sys.server_event_sessions WHERE name = 'Recipe08')

CREATE EVENT SESSION [Recipe08] ON SERVER
ADD EVENT sqlserver.rpc_completed(
    ACTION(
        package0.event_sequence,
        sqlserver.client_app_name,
        sqlserver.client_pid,
        sqlserver.database_name,
        sqlserver.nt_username,
        sqlserver.server_principal_name,
        sqlserver.session_id
    )
    WHERE ([package0].[equal_boolean]([sqlserver].[is_system],(0)))
),
ADD EVENT sqlserver.sql_batch_completed(
    ACTION(
        package0.event_sequence,
        sqlserver.client_app_name,
        sqlserver.client_pid,
        sqlserver.database_name,
        sqlserver.nt_username,
        sqlserver.server_principal_name,
        sqlserver.session_id
    )
    WHERE ([package0].[equal_boolean]([sqlserver].[is_system],(0)))
)
GO

IF NOT EXISTS ( SELECT * FROM sys.dm_xe_sessions WHERE name = 'Recipe08')
    ALTER EVENT SESSION Recipe08 ON SERVER STATE = START;
XESmartTarget
This is what the configuration looks like:
{
    "Target": {
        "ServerName": "$ServerName",
        "SessionName": "Recipe08",
        "FailOnProcessingError": false,
        "Responses": [
            {
                "__type": "GroupedTableAppenderResponse",
                "ServerName": "$ServerName",
                "DatabaseName": "XERecipes",
                "TableName": "Recipe_08_WorkloadAnalysis",
                "AutoCreateTargetTable": false,
                "OutputColumns": [
                    "snapshot_id AS CONVERT(SUBSTRING(CONVERT(collection_time,'System.String'),1,16),'System.DateTime')",
                    "client_app_name",
                    "server_principal_name",
                    "database_name",
                    "SUM(cpu_time) AS tot_cpu",
                    "SUM(duration) AS tot_duration",
                    "SUM(logical_reads) AS tot_reads",
                    "SUM(writes) AS tot_writes",
                    "COUNT(collection_time) AS execution_count"
                ],
                "Events": [
                    "rpc_completed",
                    "sql_batch_completed"
                ]
            }
        ]
    }
}
We used the GroupedTableAppender before, but this time we are grouping data using an Expression Column as part of the GROUP BY columns, in order to get a date column with precision up to the minute, to use as a snapshot_id. The expression converts the column “collection_time” (it’an automatic column, added by XESmartTarget to all the events captured) from DateTime to String, removing the last two digits (the seconds). The conversion depends on a weird combination of the short date and long time formats:

In this case, the snapshot_id will be in the format dd-MM-yyyy HH:mm:ss, so taking the first 16 characters, as the SUBSTRING function here does, returns dd-MM-yyyy HH:mm, for instance 18-02-2022 10:15. If you’re using a different format, make sure you’re changing the expression accordingly. Converting it back to System.DateTime ensures that you get a proper datetime2 column that you can sort on.
Before starting XESmartTarget, you’d better create the target table manually:
CREATE TABLE [dbo].[Recipe_08_WorkloadAnalysis](
	[snapshot_id] [datetime2](7) NULL,
	[client_app_name] [nvarchar](255) NULL,
	[server_principal_name] [nvarchar](128) NULL,
	[database_name] [nvarchar](128) NULL,
	[tot_cpu] [bigint] NULL,
	[tot_duration] [bigint] NULL,
	[tot_reads] [bigint] NULL,
	[tot_writes] [bigint] NULL,
	[execution_count] [bigint] NULL,
	CONSTRAINT UQ_Recipe_08_WorkloadAnalysis
		UNIQUE (snapshot_id, client_app_name, server_principal_name, database_name)
)
Now that the table is ready, you can save the configuration file and start XESmartTarget:
"%ProgramFiles%\XESmartTarget\xesmarttarget.exe" --File c:\temp\Recipe_08_WorkloadAnalysis.json --GlobalVariables ServerName=(local)\SQLEXPRESSLet’s leave this running for a while and have a look at the data in the target table:

To answer the question in Brent’s post, Whose Queries are Using The Most CPU? Let’s find out! Turns out it’s me (surprise!):

Not only I can analyze the workload as a whole, but I can also plot cpu usage by database or login or application in a chart like this:

Well, maybe Azure Data Studio is probably not the best tool for the job, but you can use something like Grafana to plot the data.
Recap
GroupedTableAppenderResponse is a super powerful tool! It can group on Expression Columns and can be incredibly helpful when you have to summarize event data over time.
In the next recipe we will see how to take GroupedTableAppenderResponse to the next level and simulate what Query Store does (especially useful if you’re not on 2016 or later). Keep an eye on the XESmartTarget tag!
Recipe 7: Finding Unused Tables
Welcome toa new recipe of this Extended Events cookbook! You will find the first blog post of the series here and you can browse all recipes with the xesmarttarget tag on this blog.
The problem
The previous recipe showed you how to capture data from Extended Events sessions, summarize it in memory and then save it to a table in SQL Server, merging with any existing rows. This comes extremely handy when the events are not useful individually, but when the story is told by the aggregation of all the events.
Another possible problem that can be solved with the same technique is finding unused objects in the database. It looks like a trivial problem, but it’s not.
The easiest way to determine if a table is used or not is… deleting it and waiting for users to complain 🙂 Of course, the easiest method is not always the most appropriate, and this makes no exception.
Audits would be extremely useful for this, because they capture the right events. Unfortunately they suffer from the same limitation discussed in the previous recipe: you don’t need the individual audit entries, all you need is a counter of accesses to the table. Again, GroupedTableAppenderResponse has got you covered.
The session
The session for this recipe is going to be a bit weird. Instead of capturing the audit events, you’ll have to use a different type of event. The audit events are private and can only be used by the audit feature, so you need to track something else.
The lock_acquired events seem to have everything that you need: every time a table is accessed, a lock on the table is placed, so you can track them and determine whether the table is used or not. Let’s create a session:
IF NOT EXISTS ( SELECT * FROM sys.server_event_sessions WHERE name = 'Recipe07')

CREATE EVENT SESSION [Recipe07] ON SERVER
ADD EVENT sqlserver.lock_acquired (
    SET collect_database_name = (0)
        ,collect_resource_description = (1)
    ACTION(sqlserver.client_app_name, sqlserver.is_system, sqlserver.server_principal_name)
    WHERE (
        [package0].[equal_boolean]([sqlserver].[is_system], (0)) -- user SPID
        AND [package0].[equal_uint64]([resource_type], (5)) -- OBJECT
        AND [package0].[not_equal_uint64]([database_id], (32767))  -- resourcedb
        AND [package0].[greater_than_uint64]([database_id], (4)) -- user database
        AND [package0].[greater_than_equal_int64]([object_id], (245575913)) -- user object
        AND (
               [mode] = (1) -- SCH-S
            OR [mode] = (6) -- IS
            OR [mode] = (8) -- IX
            OR [mode] = (3) -- S
            OR [mode] = (5) -- X
        )
    )
);
GO


IF NOT EXISTS ( SELECT * FROM sys.dm_xe_sessions WHERE name = 'Recipe07')
    ALTER EVENT SESSION Recipe07 ON SERVER STATE = START;
XESmartTarget
The configuration takes advantage of the capabilities of GroupedTableAppenderResponse: the events are processed by two separate Responses and merged into the same target table. The first Response only takes care of reads, while the second Response takes care of writes.
{
    "Target": {
        "ServerName": "$ServerName",
        "SessionName": "Recipe07",
        "FailOnProcessingError": false,
        "Responses": [
            {
                "__type": "GroupedTableAppenderResponse",
                "ServerName": "$ServerName",
                "DatabaseName": "XERecipes",
                "TableName": "Recipe_07_TableAudit",
                "AutoCreateTargetTable": false,
                "OutputColumns": [
                    "client_app_name",
                    "database_id",
                    "object_id",
                    "MAX(collection_time) AS last_read"
                ],
                "Events": [
                    "lock_acquired"
                ],
                "Filter": "mode NOT IN ('X','IX')"
            },
            {
                "__type": "GroupedTableAppenderResponse",
                "ServerName": "$ServerName",
                "DatabaseName": "XERecipes",
                "TableName": "Recipe_07_TableAudit",
                "AutoCreateTargetTable": false,
                "OutputColumns": [
                    "client_app_name",
                    "database_id",
                    "object_id",
                    "MAX(collection_time) AS last_write"
                ],
                "Events": [
                    "lock_acquired"
                ],
                "Filter": "mode IN ('X','IX')"
            }
        ]
    }
}
Let’s save the JSON file as c:\temp\Recipe_07_Table_Audit.json.
Before you can run XESmartTarget, you need to create the target table with this script:
USE [XERecipes]
GO

CREATE TABLE [dbo].[Recipe_07_TableAudit](
	[client_app_name] [nvarchar](255) NULL,
	[database_id] [int] NULL,
	[object_id] [int] NULL,
	[last_read] [datetime2](7) NULL,
	[last_write] [datetime2](7) NULL
) ON [PRIMARY]
GO
If you don’t create the table upfront, XESmartTarget will try to create it, but the first Response that hits the database will do that and, in this case, you have different responses with different sets of output columns, so the resulting table would be missing one column in any case.
OK, now that the target table is ready, it’s time to run XESmartTarget:
"%ProgramFiles%\XESmartTarget\xesmarttarget.exe" --File c:\temp\Recipe_07_Table_Audit.json --GlobalVariables ServerName=(local)\SQLEXPRESSThe console window shows that the two Responses are writing data independently:

If you query the target table, you will see that some tables appear there. Some will have a last_read date, some will have a last_write date and some will have both dates.

If you keep the application running for a meaningful amount of time, you will see all the tables appear in the target table, except for the ones that are not used. That’s pretty cool!
In case you’re wondering, this works also if you have Read Committed Snapshot Isolation activated on your database.
Recap
GroupedTableAppenderResponse can help you accomplish many tasks, including finding unused tables.
In the next recipe you will see use the GroupedTableAppenderResponse to analyze a workload and use the “collection_time” automatic column to create series of data based on the time of the event. Keep watching the XESmartTarget tag!
Recipe 6: Auditing Successful Logins
Welcome to a new recipe of this Extended Events cookbook! You will find the first blog post of the series here and you can browse all recipes with the xesmarttarget tag on this blog.
The problem
Sometimes you are not interested in the individual events captured by a session, but you want to extract some information from a series of events, by grouping and aggregating them. This is the case of events that happen very often, like, logon events, that can help you validate your story.
Imagine that you inherited a big, busy and chaotic SQL Server instance, with lots of databases and logins. One of the things that you probably want to do is track which logins are active and which ones are not and can be safely disabled.
One of the possible ways of doing this is to enable successful and failed login auditing in ERRORLOG, but this creates a lot of noise. No thanks, I don’t want a messy ERRORLOG.
Another possibility is to capture login events with an Extended Events session and write them to a file target. However, with this approach you capture the individual events, which you don’t need. What you really want is a very simple information: when has each login accessed the server the last time? Writing session data to a file target does not answer that question directly, but forces you to read and aggregate all the data in the file at a later time.
XESmartTarget can help with this, using the GroupedTableAppenderResponse. This Response type aggregates the data in memory before writing it to a target table, where it is merged with the existing data.
The session
Let’s set up a session for this. You need to capture the “login” event, which contains all the data that you need.
IF NOT EXISTS ( SELECT * FROM sys.server_event_sessions WHERE name = 'Recipe06')

CREATE EVENT SESSION [Recipe06] ON SERVER
ADD EVENT sqlserver.login(
    SET collect_database_name=(1)
    ACTION(
        sqlserver.client_app_name,
        sqlserver.server_principal_name
    )
)
GO


IF NOT EXISTS ( SELECT * FROM sys.dm_xe_sessions WHERE name = 'Recipe06')
    ALTER EVENT SESSION Recipe06 ON SERVER STATE = START;
XESmartTarget
This is what the configuration looks like:
{
    "Target": {
        "ServerName": "$ServerName",
        "SessionName": "Recipe06",
        "FailOnProcessingError": false,
        "Responses": [
            {
                "__type": "GroupedTableAppenderResponse",
                "ServerName": "$ServerName",
                "DatabaseName": "XERecipes",
                "TableName": "Recipe_06_LoginAudit",
                "AutoCreateTargetTable": false,
                "OutputColumns": [
                    "server_principal_name",
                    "database_name",
                    "client_app_name",
                    "MIN(collection_time) AS first_seen",
                    "MAX(collection_time) AS last_seen",
                    "COUNT(collection_time) AS logon_count"
                ],
                "Events": [
                    "login"
                ]
            }
        ]
    }
}
It’s very similar to the TableAppenderResponse, with one main difference: you can have aggregated columns, using the usual aggregation functions and aliases to assign a name to the columns. All the columns included in the output and not aggregated are used to create the groups. The data is aggregated first in memory and then it is merged with the data already in the table, using the group by columns as the join key.
There is one important rule to respect though: the name of the aggregated column cannot be the same as any other column from the events, so make sure to assign a new name.
Let’s save the file as c:\temp\Recipe_06_Login_Audit.json and run XESmartTarget:
"%ProgramFiles%\XESmartTarget\xesmarttarget.exe" --File c:\temp\Recipe_06_Login_Audit.json --GlobalVariables ServerName=(local)\SQLEXPRESSThe console window informs us that the rows are not being written directly to the target table, but they are grouped and aggregated according to the configuration.

Inspecting the data in the target table confirms that we have indeed 7 rows:

If you let XESmartTarget run for a while, it will keep writing more data to the target tables and it will update the counts, merging the data from memory with the data already in the table:

If you want to identify unused logins, all you have to do is run XESmartTarget for a meaningful amount of time (let’s say one month) and it will fill the data in the target table. Easy peasy.
Recap
GroupedTableAppenderResponse is a powerful tool to perform aggregations on the events captured by Extended Events sessions. It can be used to accomplish a lot of tasks.
In the next recipe you will learn how to use the GroupedTableAppenderResponse to identify unused tabled in the database. Keep watching the XESmartTarget tag!
Recipe 5: Killing blocking SPIDs
Welcome to the latest recipe of this Extended Events cookbook! You will find the first blog post of the series here and you can browse all recipes with the xesmarttarget tag on this blog.
The problem
In the previous recipe, you learned how to notify when specific events occur, using the EmailResponse. Notifications are appropriate when user intervention is required, but when the system can resolve the issue automatically it’s better to avoid notifying users of the issue altogether. Resolving the issue often means performing some action in the database, using T-SQL.
Of course, XESmartTarget has got you covered, with the ExecuteTSQLResponse.
For this post, the problem to solve is this: a session has an open transaction, is blocking other sessions, it’s been sleeping for a long time and it’s probably a good idea to kill it. This usually happens when there’s a problem in the application, that doesn’t handle transactions properly and leaves open transactions for a long time, maybe because it displays an error dialog, waiting for user input. There is very little that you can do in these cases: the blocked processes continue to pile up and the only thing left to do is kill the offending session.
Let’s see how to do that with XESmartTarget.
The session
Of course, there’s a session for that. The event to capture is the blocked_process_report. This event is connected to a server wide setting that controls the number of seconds after which a blocked process event is raised. That configuration option is “blocked process threshold”. If it is set to zero (default), the event is never raised. When it is set to a positive number N, the blocked_process_report event is raised every N seconds. Before you can use this event, you need to set “blocked process threshold” to, let’s say, 10 seconds:
EXEC sp_configure 'advanced', 1;
RECONFIGURE
EXEC sp_configure 'blocked process threshold', 10;
RECONFIGURE
GO
Then, you can set up the session to capture the blocked_process_report event. Since the event is fired every time a process is blocked for 10 seconds or multiples of 10 seconds, you probably want to capture only one instance of the event. You could filter the session, using the filters available for Extended Event sessions, but, in this case, I will show you how to filter events on XESmartTarget instead.
IF NOT EXISTS (SELECT * FROM sys.server_event_sessions WHERE name = 'Recipe05')

CREATE EVENT SESSION [Recipe05] ON SERVER
ADD EVENT sqlserver.blocked_process_report(
    ACTION(
        sqlserver.client_app_name,
        sqlserver.client_hostname,
        sqlserver.database_name,
        sqlserver.server_instance_name,
        sqlserver.server_principal_name,
        sqlserver.session_id,
        sqlserver.sql_text
    )
)
GO


IF NOT EXISTS (SELECT * FROM sys.dm_xe_sessions WHERE name = 'Recipe05')
    ALTER EVENT SESSION Recipe05 ON SERVER STATE = START;
XESmartTarget
The configuration for XESmartTarget uses the ExecuteTSQLResponse object, which has to be set up to execute commands on a target server. ServerName, DatabaseName, UserName, Password are used to establish the connection to the target server. TSQL is the command to execute.
{
    "Target": {
        "ServerName": "$ServerName",
        "SessionName": "Recipe05",
        "FailOnProcessingError": false,
        "Responses": [
            {
                "__type": "ExecuteTSQLResponse",
                "ServerName": "$ServerName",
                "DatabaseName": "master",
                "TSQL": "EXEC killBlocker {transaction_id}",  // the notation {propertyname} is used to
                                                              // include fields and action from the events
                "Events": [
                    "blocked_process_report"
                ],
                "Filter": "duration > 20000000 " // 20 seconds
            }
        ]
    }
}
The Filter property controls which events are processed by the Response and it is available for all Response types. In this case, we want to process only the events that have been blocked for more than 20 seconds. Ideally, XESmartTarget will kill their blocker, so that the event is not processed again.
The property TSQL can reference fields and actions from the source events using the notation {propertyname}. In this example, {transaction_id} is a parameter passed to the stored procedure killblocker and it is taken right from the blocked_process_report event.
The killblocker stored procedure has to be created in the master database and it looks like this:
USE master;
GO

IF OBJECT_ID('killBlocker') IS NULL EXEC('CREATE PROCEDURE killBlocker AS BEGIN RETURN END');
GO

--
-- Kills the session that is blocking the specified
-- transaction, when the blocking session is sleeping
-- and has not issued any command in the last 30 seconds
--
ALTER PROCEDURE killBlocker @transaction_id int
AS
BEGIN
    SET NOCOUNT ON;

    DECLARE @spid int;

    SELECT @spid = blocking_session_id
    FROM sys.dm_exec_sessions AS blocked_session
    INNER JOIN sys.dm_exec_requests AS blocked_request
        ON blocked_session.session_id = blocked_request.session_id
    INNER JOIN sys.dm_exec_sessions AS blocking_session
        ON blocked_request.blocking_session_id = blocking_session.session_id
    WHERE blocked_session.session_id = (
            SELECT DISTINCT request_session_id
            FROM sys.dm_tran_locks
            WHERE request_owner_id = @transaction_id
        )
        AND blocking_session.status = 'sleeping'
        AND blocking_session.last_request_start_time < DATEADD(second,-30,GETDATE());

    DECLARE @sql nvarchar(100) = 'KILL ' + CAST(@spid AS nvarchar(10));
    EXEC(@sql);
END
Save this JSON as c:\temp\Recipe_05_Kill_Blocking.json and, now that everything is in place, let’s run XESmartTarget:
"%ProgramFiles%\XESmartTarget\xesmarttarget.exe" --File c:\temp\Recipe_05_Kill_Blocking.json --GlobalVariables ServerName=(local)\SQLEXPRESSThere is not much to see on the console window. Let’s generate some blocking instead:

The command on the left leaves an open transaction, while the command on the right tries to access a resource held by the open transaction, so it gets blocked. Since the session on the left is sleeping, I expect it to be killed by XESmartTarget.

After 20 seconds of blocking, the session on the left gets killed and the blocked processes are free to continue. Yay!
Recap
The ExecuteTSQLResponse object allows you to execute custom T-SQL commands in response to Extended Events. The possibilities are unlimited: executing stored procedures, running updates on the database… the sky is the limit.
In the next recipe you will learn how to use the GroupedTableAppenderResponse to group and summarize events before writing the to a target table. There are countless applications for this technique, so make sure to Keep watching the XESmartTarget tag for the next recipes!
Recipe 4: Sending Alerts via Email
Welcome to the latest recipe of this Extended Events cookbook! You will find the first blog post of the series here and you can browse all recipes with the xesmarttarget tag on this blog.
The problem
In the previous recipe, you learned how to combine multiple Responses together and how to control their output, using filters and Expression Columns. Armed with this knowledge, you can now tackle the most complex problems, using all the available Response types. In this post you learn how to notify when specific events occur, using the EmailResponse.
One of the things that are missing from Extended Events is a mechanism for alerting. SQLTrace had Event Notifications (which is Service Broker on top of a trace), but Extended Events has nothing that comes close to it. No problem: XESmartTarget has your back again! You can use an EmailResponse to send alerts whenever an interesting event is captured.
Of course, not all events need to be notified via email. Probably you shouldn’t be using email at all for notifications, but I digress…
One type of event that you may want to be notified of is the deadlock event. Deadlocks are bad and getting an email when one deadlock is captured is pretty reasonable. Let’s see how to do that with XESmartTarget.
The session
Again, we need a session. This time the xml_deadlock_report event is the one that holds the information we are looking for. The script for the session is the following:
IF NOT EXISTS ( SELECT * FROM sys.server_event_sessions WHERE name = 'Recipe04')

CREATE EVENT SESSION [Recipe04] ON SERVER
ADD EVENT sqlserver.xml_deadlock_report(
    ACTION(
        sqlserver.client_app_name,
        sqlserver.client_hostname,
        sqlserver.database_name,
        sqlserver.server_instance_name,
        sqlserver.server_principal_name,
        sqlserver.session_id
    )
)
GO


IF NOT EXISTS ( SELECT * FROM sys.dm_xe_sessions WHERE name = 'Recipe04')
    ALTER EVENT SESSION Recipe04 ON SERVER STATE = START;
XESmartTarget
The EmailResponse sends an email for each event it processes. In this example, the properties “Attachment” and “AttachmentFileName” can indicate which field or action from the event contains the data to attach and the name of the attached file. In this case, we are using the xml_report field and we are attaching it to the email message as “deadlock.xdl”, so that it can be associated with SSMS.
{
    "Target": {
        "ServerName": "$ServerName",
        "SessionName": "Recipe04",
        "FailOnProcessingError": false,
        "Responses": [
            {
                "__type": "EmailResponse",
                "SMTPServer": "localhost",
                "Sender": "demo@localhost",
                "To": "dba@localhost",
                "Subject": "Deadlock occurred",
                "Body": "Oh no! We got a deadlock!",
                "Attachment": "xml_report",
                "AttachmentFileName": "deadlock.xdl",
                "HTMLFormat": true,
                "Events": [
                    "xml_deadlock_report"
                ]
            },
            {
                "__type": "TableAppenderResponse",
                "ServerName": "$ServerName",
                "DatabaseName": "XERecipes",
                "TableName": "Recipe_04_Deadlocking",
                "AutoCreateTargetTable": false,
                "OutputColumns": [
                    "name",
                    "collection_time",
                    "client_app_name",
                    "server_principal_name",
                    "database_name",
                    "xml_report"
                ],
                "Events": [
                    "xml_deadlock_report"
                ]
            }
        ]
    }
}
At the same time, a Response of the type TableAppenderResponse takes care of saving the event to a table in the database, in order to obtain a log of the events and process them later.
Let’s save the file as c:\temp\Recipe_04_Alert_Email.json and run XESmartTarget:
"%ProgramFiles%\XESmartTarget\xesmarttarget.exe" --File c:\temp\Recipe_04_Alert_Email.json --GlobalVariables ServerName=(local)\SQLEXPRESSAgain, XESmartTarget initializes two independent Response objects, this time of two different types: one TableAppenderResponse and one EmailResponse.

The EmailResponse has been configured to use “localhost” as SMTP server, so I downloaded and installed a little nifty application that helps you test and troubleshoot email delivery: it’s called PaperCut SMTP and it’s an absolute life saver! It incorporates the features of a SMTP server and an email client: it allows you to process email delivery as if it was a real SMTP server, but instead it saves the messages locally and displays them in a GUI similar to Outlook or a typical email client.

PaperCut displays all the emails generated by XESmartTarget, which also have an attachment named “deadlock.xdl”. If you download and open the file in SSMS, you will see a typical deadlock graph:

That’s pretty awesome if you ask me! The same can be done with other interesting events, like blocking or errors with high severity.
Recap
The EmailResponse object allows you to set up an alerting system based on Extended Events. All you have to do is set up a session that captures interesting events and then you can configure which events need to be notified and how.
In the next recipe you will learn how to execute T-SQL commands in response to specific events. Keep watching the XESmartTarget tag for the next recipes!
Recipe 3: Merging and manipulating events
Welcome to the third recipe of this Extended Events cookbook! You will find the first blog post of the series here and you can browse all recipes with the xesmarttarget tag on this blog.
The problem
In the previous recipe, we wrote event data to a table in the database and each event used field and action names to map to the column names in the table. The same information (the text of the command) was stored in two separate columns, depending on the event type:
- batch_text for sql_batch_completed events
- statement for rpc_completed events
SSMS has a nice feature that allows you to create a merged column using data from several columns. Here is how you do it:
As you can see, the two even types are returning NULL for the columns that they don’t have:

You can create a merged column by right clicking the table header and clicking “Choose Columns”:

In the dialog you can click on “New” in the section for merged columns:

In the next dialog you can select which columns to merge. In this case you want to merge batch_text and statement:

The result looks like this:

When the data is missing from one column, it is taken from the other column and the merged column always contain some data to show.
It would be nice if I could do that with XESmartTarget as well, merging multiple columns before writing them to the target table. Turns out it is possible, with some work on the configuration file.
The session
First, we need a session. Since it is the same session as the one used for the second recipe, I will show you how you can recreate the same session with a different name (Recipe03) using the previous session as a template. Of course, I will use dbatools for that.
Get-DbaXESession -SqlInstance "localhost\SQLEXPRESS" -Session Recipe02 |
    Export-DbaXESessionTemplate -Path C:\temp\xe |
    Import-DbaXESessionTemplate  -SqlInstance "localhost\SQLEXPRESS" -Name "Recipe03"
Start-DbaXESession -SqlInstance "localhost\SQLEXPRESS" -Session Recipe03
It could not be easier! dbatools is the best!
If you insist doing things the hard way, you can reuse the script from the first recipe and change the name of the session.
XESmartTarget
The configuration needs to be a bit more complex this time. The column “text” on the target table will have to receive data from different events, which have attributes with different names. To accomplish this, the configuration file will have to leverage two features: event filters and expression columns.
The first one is easy: you can decide which events gets processed by the Response using the “Events” attribute. I introduced this possibility in Recipe 1.
Expression columns use the same syntax as calculated columns in SQL Server. To use an expression column in XESmartTarget, you can declare in the configuration file in the form column name = expression. This will allow you to calculate expressions, using fields and actions from the events as operands and all the functions and operators available in .NET DataTable objects.
In this case, the rpc_completed event will have to rename its “statement” column to “sql” and the sql_batch_completed event will have to rename its “batch_text” column to “sql”. While we’re at it, let’s also create a column “total_io” that contains logical_reads + writes. Let’s see how you can do it:
{
    "Target": {
        "ServerName": "$ServerName",
        "SessionName": "Recipe03",
        "FailOnProcessingError": false,
        "Responses": [
            {
                "__type": "TableAppenderResponse",
                "ServerName": "$ServerName",
                "DatabaseName": "XERecipes",
                "TableName": "Recipe_03_Queries",
                "AutoCreateTargetTable": true,
                "OutputColumns": [
                    "name",
                    "collection_time",
                    "client_app_name",
                    "server_principal_name",
                    "database_name",
                    "sql AS statement",
                    "total_io AS logical_reads + writes"
                ],
                "Events": [
                    "rpc_completed"
                ]
            },
            {
                "__type": "TableAppenderResponse",
                "ServerName": "$ServerName",
                "DatabaseName": "XERecipes",
                "TableName": "Recipe_03_Queries",
                "AutoCreateTargetTable": false,
                "OutputColumns": [
                    "name",
                    "collection_time",
                    "client_app_name",
                    "server_principal_name",
                    "database_name",
                    "sql AS batch_text",
                    "total_io AS logical_reads + writes"
                ],
                "Events": [
                    "sql_batch_completed"
                ]
            }
        ]
    }
}
Besides filters and expressions, this JSON file also introduces the ability to process the events using multiple response objects, even of different types.
Let’s save this file as c:\temp\Recipe_03_Output_Table_Expressions.json and run XESmartTarget:
"%ProgramFiles%\XESmartTarget\xesmarttarget.exe" --File c:\temp\Recipe_03_Output_Table_Expressions.json --GlobalVariables ServerName=(local)\SQLEXPRESS
As you can see from the output, XESmartTarget initializes two independent TableAppenderResponse objects and each one works on the events defined in the filter and outputs the columns defined in the OutputColumns property, including the expressions described above.
Querying the target table, you can see that the “sql” column contains data from both events, achieving the same result as the merged column in SSMS:

Recap
Filters and Expression Columns allow you to achieve more complex results, like combining data from different fields or actions into a single column, or calculating expressions.
In the next recipe you will learn how to combine Responses of different types and use XESmartTarget to send email notifications when a particular event is captured. Keep an eye on the XESmartTarget tag for the next recipes!
