Blog Archives
Collecting Diagnostic data from multiple SQL Server instances with dbatools
Keeping their SQL Server instances under control is a crucial part of the job of a DBA. SQL Server offers a wide variety of DMVs to query in order to check the health of the instance and establish a performance baseline.
My favourite DMV queries are the ones crafted and maintained by Glenn Berry: the SQL Server Diagnostic Queries. These queries already pack the right amount of information and can be used to take a snapshot of the instance’s health and performance.
Piping the results of these queries to a set of tables at regular intervals can be a good way to keep an eye on the instance. Automation in SQL Server rhymes with dbatools, so today I will show you how to automate the execution of the diagnostic queries and the storage of the results to a centralized database that you can use as a repository for your whole SQL Server estate.
The script
The script I’m using for this can be found on GitHub and you can download it, modify it and adapt it to your needs.
I won’t include it here, there is really no need for that, as you can find it on Github already. So, go, grab it from this address, save it and open it in your favourite code editor.
Done? Excellent! Let’s go through it together.
The script, explained
What I really love about PowerShell is how simple it is to filter, extend and manipulate tabular data using the pipeline, in a way that resonates a lot with the experience of T-SQL developers.
The main part of the script is the one that invokes all the diagnostic queries included in the list $queries. This is done by invoking the cmdlet Invoke-DbaDiagnosticQuery, that takes care of using a version of the diagnostic query that matches the version of the target server and selecting the data. As usual with dbatools, the -SqlInstance parameter accepts a list of servers, so you can pass in the list of all the SQL Servers in your infrastructure.
Invoke-DbaDiagnosticQuery -SqlInstance $SourceServer -QueryName $queries
Sometimes the queries do not generate any data, so it is important to filter out the empty result sets.
Where-Object { $_.Result -ne $null }
In order to store the data collected at multiple servers and multiple points in time, you need to attach some additional columns to the result sets before writing them to the destination tables. This is a very simple task in PowerShell and it can be accomplished by using the Select-Object cmdlet.
Select-Object accepts a list of columns taken from the input object and can also add calculated columns using hashtables with label/expression pairs. The syntax is not the friendliest possible (in fact, I have to look it up every time I need it), but it gets the job done.
In this case, you need to add a column for the server name, one for the database name (only for database scoped queries) and one for the snapshot id. I decided to use a timestamp in the yyyyMMdd as the snapshot id. This is what the code to define the properties looks like:
        $TableName = $_.Name
        $DatabaseName = $_.Database
        $ServerName = $_.SqlInstance

        $snapshotProp = @{
            Label = "snapshot_id"
            Expression = {$SnapshotId}
        }
        $serverProp = @{
            Label = "Server Name"
            Expression = {$ServerName}
        }
        $databaseProp = @{
            Label = "Database Name"
            Expression = {$DatabaseName}
        }
Now that the hashtables that define the additional properties are ready, you need to decide whether the input dataset requires the new properties or not: if a property with the same name is already present you need to skip adding the new property.
Unfortunately, this has to be done in two different ways, because the dataset produced by the diagnostic queries could be returned as a collection of System.Data.Datarow objects or as a collection of PsCustomObject.
        if(-not (($_.Result.PSObject.Properties | Select-Object -Expand Name) -contains "Server Name")) {
            if(($_.Result | Get-Member -MemberType NoteProperty -Name "Server Name" | Measure-Object).Count -eq 0) {
                $expr += ' $serverProp, '
            }
        }
Now comes the interesting part of the
script: the data has to get written to a destination table in a database.
Dbatools has a cmdlet for that called Write-DbaDataTable.
Among the abilities of this nifty cmdlet, you can auto create the destination tables based on the data found in the input object, thus making your life much easier. In order to pass all the parameters to this cmdlet, I will use a splat, which improves readability quite a bit.
        $expr += '*'

        $param = @{
            SqlInstance     = $DestinationServer
            Database        = $DestinationDatabase
            Schema          = $DestinationSchema
            AutoCreateTable = $true
            Table           = $TableName
            InputObject     = Invoke-Expression $expr
        }
        Write-DbaDataTable @param
As you can see, you need to pass a
destination server name, a database name, a schema name and a table name. As I
already mentioned, Write-DbaDataTable will take care of creating the target
table.
One thing to note is how the data is passed
to the cmdlet: the InputObject is the result of an expression, based on the
dynamic select list generated inside the ForeEach-Object cmdlet. This is very
similar to building a dynamic query in T-SQL.
Conclusion
This script can be downloaded from GitHub and you can schedule it on a centralized management server in order to collect diagnostic data across your entire SQL Server estate.
Dbatools is the ultimate toolset for the dba: if you’re still using the GUI or overly complicated T-SQL scripts to administer and maintain your SQL Server estate, you’re missing out.
Dbatools is also a great opportunity for me to learn new tricks in Powershell, which is another great productivity tool that can’t be overlooked by DBAs. What are you waiting for? Go to dbatools.io now and start your journey: you won’t regret it.
Generating a Jupyter Notebook for Glenn Berry’s Diagnostic Queries with PowerShell
The March release of Azure Data Studio now supports Jupyter Notebooks with SQL kernels. This is a very interesting feature that opens new possibilities, especially for presentations and for troubleshooting scenarios.
For presentations, it is fairly obvious what the use case is: you can prepare notebooks to show in your presentations, with code and results combined in a convenient way. It helps when you have to establish a workflow in your demos that the attendees can repeat at home when they download the demos for your presentation.
For troubleshooting scenarios, the interesting feature is the ability to include results inside a Notebook file, so that you can create an empty Notebook, send it to your client and make them run the queries and send it back to you with the results populated. For this particular usage scenario, the first thing that came to my mind is running the diagnostic queries by Glenn Berry in a Notebook.
Obviously, I don’t want to create such a Notebook manually by adding all the code cells one by one. Fortunately, PowerShell is my friend and can do the heavy lifting for me.
Unsurprisingly, dbatools comes to the rescue: André Kamman added a cmdlet that downloads, parses and executes Glenn Berry’s diagnostic queries and added the cmdlet to dbatools. The part that can help me is not a public function available to the user, but I can still go to GitHub and download the internal function Invoke-DbaDiagnosticQueryScriptParser for my needs.
The function returns a list of queries that I can use to generate the Jupyter Notebook:
This file contains hidden or bidirectional Unicode text that may be interpreted or compiled differently than what appears below. To review, open the file in an editor that reveals hidden Unicode characters.
Learn more about bidirectional Unicode characters
| # | |
| # Purpose: take the diagnostic queries from Glenn Berry | |
| # and generate a Jupyter Notebook to run in Azure Data Studio | |
| # | |
| # Example usage: | |
| # create-diagnostic-notebook.ps1 -diagnosticScriptPath "C:\Program Files\WindowsPowerShell\Modules\dbatools\0.9.777\bin\diagnosticquery\SQLServerDiagnosticQueries_2019_201901.sql" -notebookOutputPath "diagnostic-notebook.ipynb" | |
| # | |
| [CmdletBinding()] | |
| Param( | |
| [parameter(Mandatory)] | |
| [System.IO.FileInfo]$diagnosticScriptPath, | |
| [System.IO.FileInfo]$notebookOutputPath | |
| ) | |
| # | |
| # Function taken from dbatools https://github.com/sqlcollaborative/dbatools/blob/development/internal/functions/Invoke-DbaDiagnosticQueryScriptParser.ps1 | |
| # Parses the diagnostic script and breaks it into individual queries, | |
| # with text and description | |
| # | |
| function Invoke-DbaDiagnosticQueryScriptParser { | |
| [CmdletBinding(DefaultParameterSetName = "Default")] | |
| Param( | |
| [parameter(Mandatory)] | |
| [ValidateScript( {Test-Path $_})] | |
| [System.IO.FileInfo]$filename, | |
| [Switch]$ExcludeQueryTextColumn, | |
| [Switch]$ExcludePlanColumn, | |
| [Switch]$NoColumnParsing | |
| ) | |
| $out = "Parsing file {0}" -f $filename | |
| write-verbose -Message $out | |
| $ParsedScript = @() | |
| [string]$scriptpart = "" | |
| $fullscript = Get-Content -Path $filename | |
| $start = $false | |
| $querynr = 0 | |
| $DBSpecific = $false | |
| if ($ExcludeQueryTextColumn) {$QueryTextColumn = ""} else {$QueryTextColumn = ", t.[text] AS [Complete Query Text]"} | |
| if ($ExcludePlanColumn) {$PlanTextColumn = ""} else {$PlanTextColumn = ", qp.query_plan AS [Query Plan]"} | |
| foreach ($line in $fullscript) { | |
| if ($start -eq $false) { | |
| if (($line -match "You have the correct major version of SQL Server for this diagnostic information script") -or ($line.StartsWith("– Server level queries ***"))) { | |
| $start = $true | |
| } | |
| continue | |
| } | |
| if ($line.StartsWith("– Database specific queries ***") -or ($line.StartsWith("– Switch to user database **"))) { | |
| $DBSpecific = $true | |
| } | |
| if (!$NoColumnParsing) { | |
| if (($line -match "– uncomment out these columns if not copying results to Excel") -or ($line -match "– comment out this column if copying results to Excel")) { | |
| $line = $QueryTextColumn + $PlanTextColumn | |
| } | |
| } | |
| if ($line -match "-{2,}\s{1,}(.*) \(Query (\d*)\) \((\D*)\)") { | |
| $prev_querydescription = $Matches[1] | |
| $prev_querynr = $Matches[2] | |
| $prev_queryname = $Matches[3] | |
| if ($querynr -gt 0) { | |
| $properties = @{QueryNr = $querynr; QueryName = $queryname; DBSpecific = $DBSpecific; Description = $queryDescription; Text = $scriptpart} | |
| $newscript = New-Object -TypeName PSObject -Property $properties | |
| $ParsedScript += $newscript | |
| $scriptpart = "" | |
| } | |
| $querydescription = $prev_querydescription | |
| $querynr = $prev_querynr | |
| $queryname = $prev_queryname | |
| } else { | |
| if (!$line.startswith("–") -and ($line.trim() -ne "") -and ($null -ne $line) -and ($line -ne "\n")) { | |
| $scriptpart += $line + "`n" | |
| } | |
| } | |
| } | |
| $properties = @{QueryNr = $querynr; QueryName = $queryname; DBSpecific = $DBSpecific; Description = $queryDescription; Text = $scriptpart} | |
| $newscript = New-Object -TypeName PSObject -Property $properties | |
| $ParsedScript += $newscript | |
| $ParsedScript | |
| } | |
| $cells = @() | |
| Invoke-DbaDiagnosticQueryScriptParser $diagnosticScriptPath | | |
| Where-Object { -not $_.DBSpecific } | | |
| ForEach-Object { | |
| $cells += [pscustomobject]@{cell_type = "markdown"; source = "## $($_.QueryName)`n`n$($_.Description)" } | |
| $cells += [pscustomobject]@{cell_type = "code"; source = $_.Text } | |
| } | |
| $preamble = @" | |
| { | |
| "metadata": { | |
| "kernelspec": { | |
| "name": "SQL", | |
| "display_name": "SQL", | |
| "language": "sql" | |
| }, | |
| "language_info": { | |
| "name": "sql", | |
| "version": "" | |
| } | |
| }, | |
| "nbformat_minor": 2, | |
| "nbformat": 4, | |
| "cells": | |
| "@ | |
| $preamble | Out-File $notebookOutputPath | |
| $cells | ConvertTo-Json | Out-File -FilePath $notebookOutputPath -Append | |
| "}}" | Out-File -FilePath $notebookOutputPath -Append |
In order to use the script, you need to provide the path to the file that contains the diagnostic queries and the path where the new Jupyter Notebook should be generated. Dbatools includes the latest version of the diagnostic scripts already, so you just need to choose which flavor you want to use. You will find all available scripts in the module directory of dbatools:
$dbatoolsPath = Split-Path -parent (Get-Module -ListAvailable dbatools).path
$dbatoolsPath
Get-ChildItem "$dbatoolsPath\bin\diagnosticquery" | Select-Object Name
The script above produces this output:
C:\Program Files\WindowsPowerShell\Modules\dbatools\0.9.777

Name
----
SQLServerDiagnosticQueries_2005_201901.sql
SQLServerDiagnosticQueries_2008R2_201901.sql
SQLServerDiagnosticQueries_2008_201901.sql
SQLServerDiagnosticQueries_2012_201901.sql
SQLServerDiagnosticQueries_2014_201901.sql
SQLServerDiagnosticQueries_2016SP2_201901.sql
SQLServerDiagnosticQueries_2016_201901.sql
SQLServerDiagnosticQueries_2017_201901.sql
SQLServerDiagnosticQueries_2019_201901.sql
SQLServerDiagnosticQueries_AzureSQLDatabase_201901.sql
Once you decide which file to use, you can pass it to the script:
create-diagnostic-notebook.ps1 `
    -diagnosticScriptPath "C:\Program Files\WindowsPowerShell\Modules\dbatools\0.9.777\bin\diagnosticquery\SQLServerDiagnosticQueries_2019_201901.sql" `
    -notebookOutputPath "diagnostic-notebook.ipynb"
What you obtain is a Jupyter Notebook that you can open in Azure Data Studio:
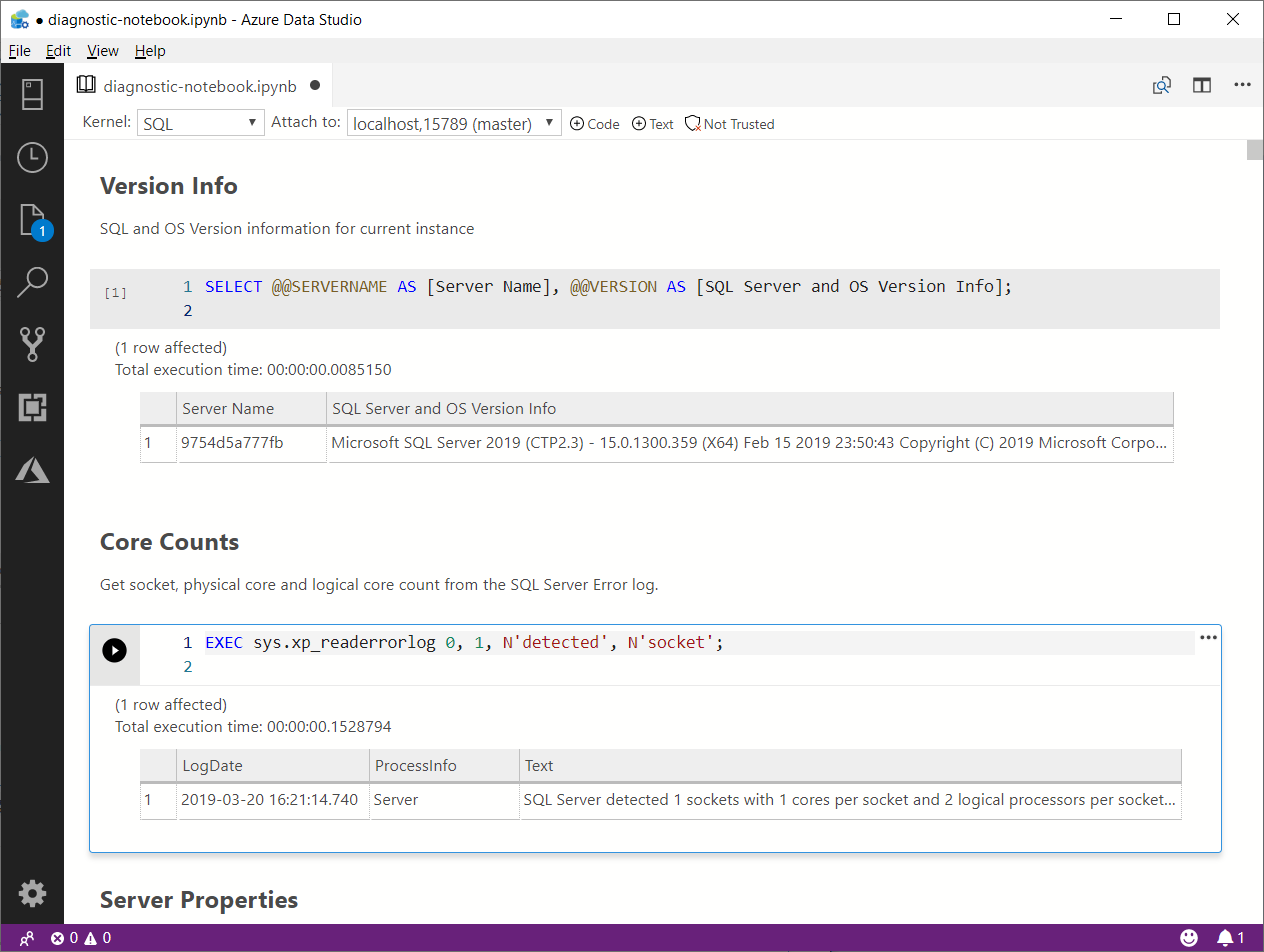
This is nice way to incorporate the code and results in a single file, that you can review offline later. This also allows you to send the empty notebook to a remote client, ask to run one or more queries and send back the notebook including the results for you to review.
Happy Notebooking!
