Blog Archives
Performing a real-time replay with WorkloadTools
In a previous blog post, I showed you how to use WorkloadTools to replay a workload in two different scenarios. However, there is a third scenario that is worth exploring: the real-time replay.
Before we jump to how, I’d better spend some words on why a real-time replay is needed.
The main reason is the complexity involved in capturing and analyzing a workload for extended periods of time. Especially when performing migrations and upgrades, it is crucial to capture the entire business cycle, in order to cover all possible queries issued by the applications. All existing benchmarking tools require to capture the workload to a file before it can be analyzed and/or replayed, but this becomes increasingly complicated when the length of the business cycle grows.
The first complication has to do with the size of the trace files, that will have to be accommodated to a disk location, either local or remote. It is not reasonable to expect to capture a workload on a busy server for, let’s say two weeks, because the size of the trace files can easily get to a few hundred GBs in less than one hour.
The second complication has to do with the ability of the benchmarking tools to process the trace files: bigger and more numerous files increase enormously the chances of breaking the tools. If you ever captured a big workload to a set of trace files to feed it to ReadTrace, you probably know what I’m talking about and chances are that you witnessed a crash or two. If you tried it with DReplay, you now probably have an ample collection of exotic and unhelpful error messages.
In this context, being able to process the events as soon as they occur is a plus, so that storing them to a file of any type is not needed. This is exactly what WorkloadTools does with the real-time replay feature.
Performing a real-time replay
All the considerations made for replaying a saved workload also apply to this scenario. First of all, you will need to set up a target environment that contains an up to date copy of the production database. Log shipping is a great tool for this: you can restore a full backup from production and restore all logs until the two databases are in sync. Immediately after restoring the last log backup with recovery, you can start the capture and replay on the production server.
The .json file for this activity will probably look like this:
{
    "Controller": {

        "Listener":
        {
            "__type": "ExtendedEventsWorkloadListener",
            "ConnectionInfo":
            {
                "ServerName": "SourceInstance"
            },
            "DatabaseFilter": "YourDatabase"
        },

        "Consumers":
        [
            {
                "__type": "ReplayConsumer",
                "ConnectionInfo":
                {
                    "ServerName": "TargetInstance",
                    "DatabaseName": "YourDatabase"
               }
            },
            {
                "__type": "AnalysisConsumer",
                "ConnectionInfo":
                {
                    "ServerName": "AnalysisInstance",
                    "DatabaseName": "SqlWorkload",
                    "SchemaName": "baseline"
                },
                "UploadIntervalSeconds": 60
            }
        ]
    }
}
On the target server, you can use SqlWorkload again to capture the performance data produced by the replay, using a .json file similar to the one used when analyzing the replay of a saved workload:
{
    "Controller": {
        "Listener":
        {
            "__type": "ExtendedEventsWorkloadListener",
            "ConnectionInfo":
            {
                "ServerName": "TargetInstance",
                "DatabaseName": "YourDatabase"
            }
        },

        "Consumers":
        [
            {
                "__type": "AnalysisConsumer",
                "ConnectionInfo":
                {
                    "ServerName": "AnalysisInstance",
                    "DatabaseName": "SqlWorkload",
                    // different schema from SqlWorkload 1
                    "SchemaName": "replay"
                },
                "UploadIntervalSeconds": 60
            }
        ]
    }
}
The overall architecture of the real-time replay looks like this:

It is crucial to start both instances of SqlWorkload at the same time, as the time dimension is always measured as the offset from the start of the analysis: starting both instances at the same time ensures that the same queries get executed around the same offset, so that you can compare apples to apples.
It is also extremely important to make sure that the target environment can keep up with the workload being replayed, otherwise the number of queries found in the same interval will never match between the two environments and the two workloads will start to diverge more and more. You can observe the data in WorkloadViewer while is gets written by the two analysis consumers and you can compare the number of batches per seconds to make sure that the target environment does not get overwhelmed by the workload. To refresh the data in WorkloadViewer, simply press F5.
The analysis and comparison of a real-time replay is not different from a deferred replay and you can use the same tools and apply the same considerations to both situations.
The interesting part of a real-time replay is the ability to perform the replay for extended periods of time, without the need to store the workload data to any type of intermediate format and without the need to analyze the workload data as a whole before you can proceed with the replay. The possibilities that this approach opens are really interesting and can be outside the usual scope of benchmarking tools.
As an example, you could decide to have a staging environment where you want to test the performance impact of new implementations directly against a production workload, gaining immediate insights regarding performance and catching runaway queries before they hit production. The traditional approach to this problem has always been based on test harnesses that simulate the critical parts of the workload, but building and maintaining these tools can be time consuming. With WorkloadTools you can measure the performance impact of your changes without having to build new tools and you can focus on what matters to you the most: your business.
Collecting Diagnostic data from multiple SQL Server instances with dbatools
Keeping their SQL Server instances under control is a crucial part of the job of a DBA. SQL Server offers a wide variety of DMVs to query in order to check the health of the instance and establish a performance baseline.
My favourite DMV queries are the ones crafted and maintained by Glenn Berry: the SQL Server Diagnostic Queries. These queries already pack the right amount of information and can be used to take a snapshot of the instance’s health and performance.
Piping the results of these queries to a set of tables at regular intervals can be a good way to keep an eye on the instance. Automation in SQL Server rhymes with dbatools, so today I will show you how to automate the execution of the diagnostic queries and the storage of the results to a centralized database that you can use as a repository for your whole SQL Server estate.
The script
The script I’m using for this can be found on GitHub and you can download it, modify it and adapt it to your needs.
I won’t include it here, there is really no need for that, as you can find it on Github already. So, go, grab it from this address, save it and open it in your favourite code editor.
Done? Excellent! Let’s go through it together.
The script, explained
What I really love about PowerShell is how simple it is to filter, extend and manipulate tabular data using the pipeline, in a way that resonates a lot with the experience of T-SQL developers.
The main part of the script is the one that invokes all the diagnostic queries included in the list $queries. This is done by invoking the cmdlet Invoke-DbaDiagnosticQuery, that takes care of using a version of the diagnostic query that matches the version of the target server and selecting the data. As usual with dbatools, the -SqlInstance parameter accepts a list of servers, so you can pass in the list of all the SQL Servers in your infrastructure.
Invoke-DbaDiagnosticQuery -SqlInstance $SourceServer -QueryName $queries
Sometimes the queries do not generate any data, so it is important to filter out the empty result sets.
Where-Object { $_.Result -ne $null }
In order to store the data collected at multiple servers and multiple points in time, you need to attach some additional columns to the result sets before writing them to the destination tables. This is a very simple task in PowerShell and it can be accomplished by using the Select-Object cmdlet.
Select-Object accepts a list of columns taken from the input object and can also add calculated columns using hashtables with label/expression pairs. The syntax is not the friendliest possible (in fact, I have to look it up every time I need it), but it gets the job done.
In this case, you need to add a column for the server name, one for the database name (only for database scoped queries) and one for the snapshot id. I decided to use a timestamp in the yyyyMMdd as the snapshot id. This is what the code to define the properties looks like:
        $TableName = $_.Name
        $DatabaseName = $_.Database
        $ServerName = $_.SqlInstance

        $snapshotProp = @{
            Label = "snapshot_id"
            Expression = {$SnapshotId}
        }
        $serverProp = @{
            Label = "Server Name"
            Expression = {$ServerName}
        }
        $databaseProp = @{
            Label = "Database Name"
            Expression = {$DatabaseName}
        }
Now that the hashtables that define the additional properties are ready, you need to decide whether the input dataset requires the new properties or not: if a property with the same name is already present you need to skip adding the new property.
Unfortunately, this has to be done in two different ways, because the dataset produced by the diagnostic queries could be returned as a collection of System.Data.Datarow objects or as a collection of PsCustomObject.
        if(-not (($_.Result.PSObject.Properties | Select-Object -Expand Name) -contains "Server Name")) {
            if(($_.Result | Get-Member -MemberType NoteProperty -Name "Server Name" | Measure-Object).Count -eq 0) {
                $expr += ' $serverProp, '
            }
        }
Now comes the interesting part of the
script: the data has to get written to a destination table in a database.
Dbatools has a cmdlet for that called Write-DbaDataTable.
Among the abilities of this nifty cmdlet, you can auto create the destination tables based on the data found in the input object, thus making your life much easier. In order to pass all the parameters to this cmdlet, I will use a splat, which improves readability quite a bit.
        $expr += '*'

        $param = @{
            SqlInstance     = $DestinationServer
            Database        = $DestinationDatabase
            Schema          = $DestinationSchema
            AutoCreateTable = $true
            Table           = $TableName
            InputObject     = Invoke-Expression $expr
        }
        Write-DbaDataTable @param
As you can see, you need to pass a
destination server name, a database name, a schema name and a table name. As I
already mentioned, Write-DbaDataTable will take care of creating the target
table.
One thing to note is how the data is passed
to the cmdlet: the InputObject is the result of an expression, based on the
dynamic select list generated inside the ForeEach-Object cmdlet. This is very
similar to building a dynamic query in T-SQL.
Conclusion
This script can be downloaded from GitHub and you can schedule it on a centralized management server in order to collect diagnostic data across your entire SQL Server estate.
Dbatools is the ultimate toolset for the dba: if you’re still using the GUI or overly complicated T-SQL scripts to administer and maintain your SQL Server estate, you’re missing out.
Dbatools is also a great opportunity for me to learn new tricks in Powershell, which is another great productivity tool that can’t be overlooked by DBAs. What are you waiting for? Go to dbatools.io now and start your journey: you won’t regret it.
How To Enlarge Your Columns With No Downtime
Let’s face it: column enlargement is a very sensitive topic. I get thousands of emails every month on this particular topic, although most of them end up in my spam folder. Go figure…
The inconvenient truth is that enlarging a fixed size column is a long and painful operation, that will make you wish there was a magic lotion or pill to use on your column to enlarge it on the spot.

Unfortunately, there is no such magic pill, but turns out you can use some SQL Server features to make the column enlargement less painful for your users.
First, let’s create a table with one smallint column, that we will try to enlarge later.
-- Go to a safe place
USE tempdb;
GO

IF OBJECT_ID('EnlargeTest') IS NOT NULL
    DROP TABLE EnlargeTest;

-- Create test table
CREATE TABLE EnlargeTest (
    SomeColumn smallint
);

-- Insert 1 million rows
INSERT INTO EnlargeTest (SomeColumn)
SELECT TOP(1000000) 1
FROM master.dbo.spt_values AS A
CROSS JOIN master.dbo.spt_values AS B;
If you try to enlarge this column with a straight “ALTER TABLE” command, you will have to wait for SQLServer to go through all the rows and write the new data type. Smallint is a data type that is stored in 2 bytes, while int requires 4 bytes, so SQL Server will have to enlarge each and every row to accommodate 2 extra bytes.
This operation requires some time and also causes a lot of page splits, especially if the pages are completely full.
SET STATISTICS IO, TIME ON;

-- Enlarge column
ALTER TABLE EnlargeTest ALTER COLUMN SomeColumn int;

SET STATISTICS IO, TIME OFF;

/*

(1000000 rows affected)
SQL Server parse and compile time:
   CPU time = 0 ms, elapsed time = 0 ms.
Table 'EnlargeTest'. Scan count 9, logical reads 3001171, physical reads 0, read-ahead reads 0, lob logical reads 0, lob physical reads 0, lob read-ahead reads 0.
Table 'Worktable'. Scan count 8, logical reads 2064041, physical reads 0, read-ahead reads 0, lob logical reads 0, lob physical reads 0, lob read-ahead reads 0.

 SQL Server Execution Times:
   CPU time = 13094 ms,  elapsed time = 11012 ms.

 */
The worst part of this approach is that, while the ALTER TABLE statement is running, nobody can access the table.
To overcome this inconvenience, there is a magic column enlargement pill that your table can take, and it’s called Row Compression.

Row compression pills. They used to be expensive, SQL Server 2016 SP1 made them cheap.
Let’s try and revert to the original column size and take the Row Compression pill:
-- Let's revert to smallint
ALTER TABLE EnlargeTest ALTER COLUMN SomeColumn smallint;

-- Add row compression
ALTER TABLE EnlargeTest REBUILD WITH (DATA_COMPRESSION = ROW);
With Row Compression, your fixed size columns can use only the space needed by the smallest data type where the actual data fits. This means that for an int column that contains only smallint data, the actual space usage inside the row is 1 or 2 bytes, not 4.
This is exactly what you need here:
SET STATISTICS IO, TIME ON;

-- Let's try to enlarge the column again
ALTER TABLE EnlargeTest ALTER COLUMN SomeColumn int;

SET STATISTICS IO, TIME OFF;

/*

 SQL Server Execution Times:
   CPU time = 0 ms,  elapsed time = 0 ms.

 */
Excellent! This time the command completes instantly and the ALTER COLUMN statement is a metadata only change.
The good news is that Row Compression is available in all editions of SQL Server since version 2016 SP1 and compression can be applied by rebuilding indexes ONLINE, with no downtime (yes, you will need Enteprise Edition for this).
The (relatively) bad news is that I tested this method on several versions of SQL Server and it only works on 2016 and above. Previous versions are not smart enough to take the compression options into account when enlarging the columns and they first enlarge and then reduce the columns when executing the ALTER COLUMN command. Another downside to this method is that row compression will refuse to work if the total size of your columns exceeds 8060 bytes, as the documentation states.
Bottom line is: painless column enlargement is possible, if you take the Row Compression pills. Just don’t overdo it: you don’t want to enlarge your columns too much, do you?
Installing SQL Server 2016 Language Reference Help from disk
A couple of years ago I blogged about Installing the SQL Server 2014 Language Reference Help from disk.
With SQL Server 2016 things changed significantly: we have the new Help Viewer 2.2, which is shipped with the Management Studio setup kit.
However, despite all the changes in the way help works and is shipped, I am still unable to download and install help content from the web, so I resorted to using the same trick that I used for SQL Server 2014.
This time the URLs and the files to download are different:
- Point your browser to http://services.mtps.microsoft.com/ServiceAPI/catalogs/sql2016/en-us
- Download the Language Reference Files:
If you’re a PowerShell person, these three lines will do:
Invoke-WebRequest -Uri "http://packages.mtps.microsoft.com/sql_2016_branding_en-us(1bd6e667-f159-ac3b-f0a5-964c04ca5a13).cab" `
	-OutFile "sql_2016_branding_en-us(1bd6e667-f159-ac3b-f0a5-964c04ca5a13).cab"
Invoke-WebRequest -Uri "http://packages.mtps.microsoft.com/v2sql_shared_language_reference_b4621_sql_130_en-us_1(83748a56-8810-751f-d453-00c5accc862d).cab" `
	-OutFile "v2sql_shared_language_reference_b4621_sql_130_en-us_1(83748a56-8810-751f-d453-00c5accc862d).cab"
Invoke-WebRequest -Uri "http://packages.mtps.microsoft.com/v2sql_shared_language_reference_b4621_sql_130_en-us_2(ccc38276-b744-93bd-9008-fe79b294ff41).cab" `
	-OutFile "v2sql_shared_language_reference_b4621_sql_130_en-us_2(ccc38276-b744-93bd-9008-fe79b294ff41).cab"
- Create a text file name HelpContentSetup.msha in the same folder as the .cab files and paste the following html:
<html xmlns="http://www.w3.org/1999/xhtml">
<head />
<body class="vendor-book">
    <div class="details">
        <span class="vendor">Microsoft</span>
        <span class="locale">en-us</span>
        <span class="product">SQL Server 2016</span>
        <span class="name">Microsoft SQL Server Language Reference</span>
    </div>
    <div class="package-list">
        <div class="package">
            <span class="name">SQL_2016_Branding_en-US</span>
            <span class="deployed">False</span>
            <a class="current-link" href="sql_2016_branding_en-us(1bd6e667-f159-ac3b-f0a5-964c04ca5a13).cab">sql_2016_branding_en-us(1bd6e667-f159-ac3b-f0a5-964c04ca5a13).cab</a>
        </div>
        <div class="package">
            <span class="name">v2SQL_Shared_Language_Reference_B4621_SQL_130_en-us_1</span>
            <span class="deployed">False</span>
            <a class="current-link" href="v2sql_shared_language_reference_b4621_sql_130_en-us_1(83748a56-8810-751f-d453-00c5accc862d).cab">v2sql_shared_language_reference_b4621_sql_130_en-us_1(83748a56-8810-751f-d453-00c5accc862d).cab</a>
        </div>
        <div class="package">
            <span class="name">v2SQL_Shared_Language_Reference_B4621_SQL_130_en-us_2</span>
            <span class="deployed">False</span>
            <a class="current-link" href="v2sql_shared_language_reference_b4621_sql_130_en-us_2(ccc38276-b744-93bd-9008-fe79b294ff41).cab">v2sql_shared_language_reference_b4621_sql_130_en-us_2(ccc38276-b744-93bd-9008-fe79b294ff41).cab</a>
        </div>
    </div>
</body>
</html>
- First, set the Help Viewer to open help from the local sources:
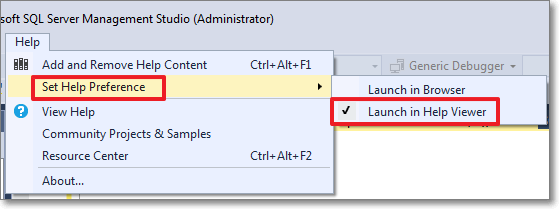
- Then select the “Add and Remove Help Content” command:

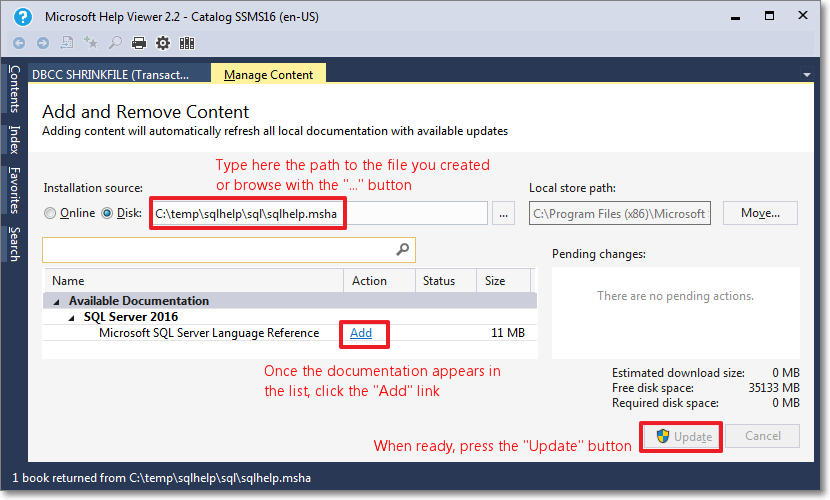
- This command opens the Help Viewer and asks for the content to add.
Browse to the file you created in step 3.
Click “Add” on all the items you wish to add to the library. In this case you will have only 1 item.
When done, click the “Update” button.
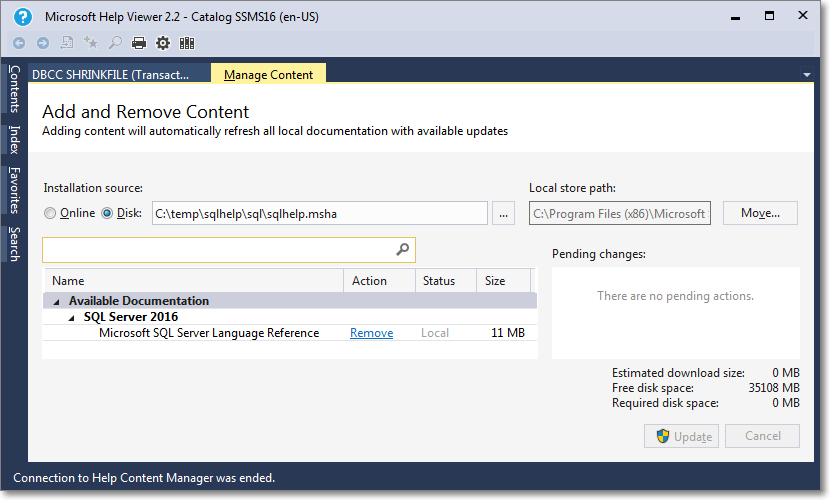
- Unfortunately, during the installation phase of the library item, something crashes and the installation won’t proceed until you tell it to ignore or report the error.

- Despite the crash, everything works as expected and you will find the topic installed in your help library:
Here it is, nice and easy. Hope it works for you too.
My Feedback on my PASS Abstracts Feedback
Brent Ozar recently published the feedback he got on his abstract submissions for PASS Summit 2016 and, as he often does, started a trend which some others followed. I think the feedback is interesting and useful for speakers that plan to improve their own submissions for the years to come, so I decided I will publish my feedback as well.
I did not get selected and, obviously, I would be happier if I got selected instead. This doesn’t mean I have problems with the selection process or the reviewers that implemented it. Instead I’m grateful for the enormous amount of work they did for the community, so a huge thank you goes to the committee.
Every year I see people publicly complain about the selection process or getting mad about being rejected. Folks, get over it: organizers have the right to choose whichever sessions they find more suitable for the Summit. It’s their responsibility to put together the best possible agenda and that doesn’t necessarily include your session.
That said, this is my feedback:
Responding to Extended Events in near real-time
Not Accepted: Higher rated session selected.
Category: General Session (75 minutes)
Track: Enterprise Database Administration & Deployment
Topic: Performance Monitoring / Tuning / Extended Events / Waits
Level: 300
Abstract: Extended Events provide deep insight into SQL Server’s behavior and allow us to gather information not available by other means. However, compared to other technologies such as SQL Trace and Event Notifications, a way to react to the events as soon as they happen seems to be lacking.
In this session we will see how the Extended Events streaming API can be used to process events in a near real-time fashion. We will demonstrate how this technology enables new possibilities to solve real world problems, such as capturing and notifying deadlocks or blocking sessions.
Prerequisites: Extended Events basics, C# basics, Powershell basics. The amount of coding required is in line with the average DBA skills.
Goal1: Introduce Extended Events and compare them with other monitoring technologies available in SQL Server
Goal2: Introduce the Extended Events streaming API and demonstrate how it can be used to process the events as soon as they occur, without shredding XML.
Goal3: Demonstrate how the Extended Events streaming API can be used to solve real world problems, such as building a monitoring and alerting solution for deadlocks and blocked sessions.
Comments:
Needs more specifics in abstract.
A : 4 The abstract digs a little deeper on what’s being offered by XEs, and what needs to be done to efficiently capture events in near real-time without bogging down the system
T : 5 The topic matches with the goals – and many people hesitate capturing large amounts of .xel files fearing shredding the xml. This session offers a new approach to capturing the same using streaming APIs, with C#/PowerShell
S : 5 Prereqs are a little steep, but given the outcome – justified, and will interest people.
Level looks ok for the prereqs and goals. Topic is ok. Abstract is good overall. Only issue is the second sentence reads a little oddly.
Abstract: Well written abstract with strong supportive goals. Topic: Great topic! Subjective: This sounds like a very interesting session. Taking xEvents to the next level. I would attend this session. I think it will be a large draw!
Feedback on comments:
“Needs more specifics in abstract”. What kind of specifics is needed in the abstract? A clue would be helpful here.
A/T/S: what do these letters stand for? I suppose they mean Abstract, Topic, Subjective. What do the numbers stand for? A mark maybe? Again, no explanation.
“The second sentence reads a little oddly”. I really don’t understand grammar or language comments. It’s not a conference on the English language and non-native speakers are already disadvantaged enough without being constantly reminded that their language skills can’t compare to Shakespeare’s. Speakers names are stripped away from the sessions, so the reviewers may not be aware that the session comes from a foreigner. If the topic is good and fits what the organizers are looking for, minor grammar/language mistakes can be fixed. BTW, one of the reviewers told me that when multiple sessions are on a tie, language is the tie breaker. Questionable, but understandable.
The feedback itself is not very useful for improving this submission for next year.
SQL Server Infernals: Worst Practices in Action
Not Accepted: Other sessions selected based on building a balanced program for track coverage, speaker coverage, topic coverage, and session rating.
Category: General Session (75 minutes)
Track: Enterprise Database Administration & Deployment
Topic: Internals: Storage Engine / Query Engine / Compression
Level: 100
Abstract: Let’s face it: Best Practices are too many to really know them all and choose which ones should be applied first. Does your telephone ring all the time? Do your users ask for that “quick report” that instead takes ages and keeps changing every time you think it’s done?
Have you ever thought that in dire times avoiding Worst Practices could be a good starting point and you can leave fine tuning for a better future? If the answer is “yes”, then this session is for you: we will discover together how not to torture a SQL Server instance and we will see how to avoid making choices that in the long run could turn out to be not as smart as they looked initially.
Prerequisites: Basic database design skills, basic development concepts, basic database administration skills.
Goal1: Demonstrate how bad Database Design decisions (irresponsible denormalization, EAV, bad data types, wrong or missing primary keys) can haunt a project through its whole lifetime.
Goal2: Illustrate how bad development practices (SQL Injection, RBAR, poor or no testing) can hurt performance, put security at risk and pose serious threats to the success of our projects.
Goal3: Enumerate and explain the worst installation and administration practices for SQL Server instances, offering the correct alternatives. Topics covered: HW choice, OS policies, security, ongoing administration, monitoring and tuning.
Comments:
Abstract: compelling
Topic: I like goals
Subjective rating: interesting, but level too low
Abstract: The outline and details of this abstract are well written
Topic: This is a great topic
Subjective: I may attend this session
The outline does not seem to clearly describe the contents of the presentation. The level of detail seems low – more detail might help attendees decide on value of attending. The title may not attract the appropriate attendees – it seems a little vague.
Abstract: Abstract is a little muddled. Goals are clearly laid out. Goals seem to contain the entire gamut of SQL Server. Perhaps a more focused area of SQL Server would help.
Topic: Title is cute.
Subjective: Could be a fun session.
Feedback on comments:
“Level too low”. Level is intentionally low: it’s meant as an introductory session. What to avoid is exactly that: an introductory topic for beginners. Have you ever noticed that basic introductory sessions pack the room? Should we take it as a clue that attendees want 100-level sessions? Apparently not.
“The outline does not seem to clearly describe the contents”. True, I agree. Next time I submit this session I will include in the abstract more details about the contents. It seems that including those details in the goals is not enough.
“Goals seem to contain the entire gamut of SQL Server”. True. I don’t see how this is a bad thing for an introductory session.
This feedback is much more useful than the other ones.
The shape of your Workload: Benchmarking and Baselining
Not Accepted: Higher rated session selected.
Category: General Session (75 minutes)
Track: Enterprise Database Administration & Deployment
Topic: Performance Monitoring / Tuning / Extended Events / Waits
Level: 300
Abstract: The key to optimizing SQL Server performance is to establish a performance baseline and thoroughly analyze the workload on the server. Collecting a baseline is not enough: it is important to analyze the workload in order to intervene effectively exactly where performance issues lie.
In this session we will describe the techniques and tools to analyze SQL Server performance and we will introduce benchmarking techniques that allow us to rate our tuning efforts. We will also introduce some tools included in SQL Server 2014, such as the Distributed Replay, and several third-party applications that come at little or no cost, but provide the highest benefit.
Prerequisites: Basic SQL Server performance tuning techniques (DMVs, Performance Counters), basic monitoring techniques (SQL Trace, Extended Events).
Goal1: Introduce SQL Server performance analysis tools (DMVs, Performance Counters, Data Collector) and demonstrate how to use them to collect a baseline.
Goal2: Introduce workload analysis techniques, using SQL Server and third party tools, including cache analysis queries, RML Utilities and ClearTrace.
Goal3: Demonstrate benchmarking techniques which will allow us to compare performance before and after applying tuning measures, using RML utilities, Distributed Replay and Qure Analyzer.
Comments:
Needs more specifics in abstract.
A : 5 The abstract clearly spells out the need for baseling, and benchmarking, to identify performance workload.
T : 5 The topic maps well with the session goals – and makes use of the Dist Replay Controller/Client to replay the prod workload on lower environments, and making use of RML utils and ClearTrace
S : 5 The prereqs are not steep, and the session offers a lot to replay prod workload on lower envs.
Topic is a good and relevant choice that appeals to a distinct attendee pool. Level appears good for the prereqs and goals.
Abstract is ok. Some word choices make the sentences difficult to follow (ie. ‘intervene effectively exactly’).
Abstract: Well written abstract with strong, supportive goals. Enough information is provided from which an attendee can make an informed decision on whether or not to attend this session.
Topic: Excellent topic. Likely a 200 level session, not 300.
Subjective: Great session which should draw in attendees. This is a skill every database professional needs.
Feedback on comments:
“Needs more specifics in abstract” and “enough information is provided” in the same feedback. Not very helpful.
“Some word choices make the sentences difficult to follow”. I’ve already said what I think about language comments.
Reading the comments, you would think it made the cut, but it didn’t. What can I say? Competition is tough: there are lots of great speakers with lots of great sessions.
“Likely a 200 level session, not 300”. I disagree: I’ve never seen anyone less than experienced fiddling with RML Utilities or distributed replay.
General feedback
The comments I received this time are less helpful than the ones I got last year on the same exact sessions. Yep: I submitted the same sessions last year and I got very useful comments that I used to improve my submissions this year. Unfortunately, it will be hard to improve next year.
The level discussion is completely subjective. I was under the impression that here in Europe we tend to rate sessions lower than Americans do, so a 200 session in Europe could easily be a 300 session in USA. Maybe my impression was wrong. However, it’s interesting to see how the session that I proposed with level 100 was deemed to be underrated and the one that I proposed with level 300 was deemed to be overrated. Levels are part of the session: the speaker chooses which level to go for and I would have a really hard time as a reviewer arguing against that decision without having seen the session.
Regarding the reason for rejection, I am not completely sure it can be helpful for improving next year’s submissions. For instance, my session on Extended Events got “Higher rated session selected” as the reason for rejection, but looking at the schedule there is no other session on Extended Events (which is quite surprising) and no other session on monitoring (which is even more surprising and maybe a bit disappointing). This means that the higher rated session does not have to be on the same topic, which makes the other reason for rejection (Other sessions selected based on building a balanced program for track coverage, speaker coverage, topic coverage, and session rating) difficult to decipher.
Lessons learned
- You’re selling the abstract, not the session
The reviewers are evaluating your abstract, not your session. All your efforts should be pushed towards perfecting your abstract. Craft it as your masterpiece. Start well in advance, don’t wait for the last minute. - Take as many shots as you can
Looking at the selection process from the outside it’s really hard to tell how it works, so submitting multiple abstracts can increase your chances of scoring a session. Maybe that session that you don’t like is exactly what the committee is looking for. Again, you’re selling only the abstract and if you get selected you have several months to improve the session. - There’s a review service offered by PASS. Use it.
There is no guarantee that it is going to be the best feedback you will get, but it’s some feedback at least. - You have friends in your #sqlfamily: ask for advice.
If you don’t trust the feedback that you get from the PASS review service, trust your friends. If you’re submitting for PASS Summit, chances are that you already have spoken at SQLSaturdays or other community events (if not, maybe you should think twice before submitting: PASS Summit is not for inexperienced speakers). In this case, you got in touch with the community leaders in your chapter, who probably keep scoring sessions at Summit year after year: ask them to review your sessions. I am sure that they will have precious suggestions for you. - If you’re not an English native speaker, ask a native speaker to proofread it
Sure, your English is great. Sure, the reviewers have something to say about native speakers’ English as well. Sure, language should not be the focus of the reviewers. However, see lesson learned #1. - Speaker/Abstract separation is a joke
If you read Brent’s feedback, one thing emerges quite clearly: in many cases, the reviewers know exactly whose abstract they are reviewing. This might be because they already have seen the session somewhere else or because the abstract contains some “distinctive features” (sp_AskXXX anyone?). This means that some speakers have an advantage over the average Joe, but rightly so: those speakers are awesome and well known for being awesome. I’m not saying that the “Top Guns” can submit their grocery list: what I’m saying is that they are not selling only their abstracts. Now that Brent has published his abstracts, I wonder what would happen next year if somebody submitted one of his sessions… 🙂
Bottom line
Being selected for speaking at the PASS Summit is damn hard. I hope that sharing my feedback will help you improving your submission next year. I also hope that you will find my advice useful, if you dare accepting advice from somebody who never managed to score a session himself.
Upcoming Speaking Engagements
The next few months will be crazy for me. I will be travelling a lot around Europe, speaking about SQL Server topics.
Here is where you will find me in the upcoming weeks:
- May 4: SQLNexus
SQLNexus is a new conference in Copenhagen and will be the official launch event in Denmark for SQL Server 2016.
I will speak about “Responding to Extended Events in near Real-Time”.
- May 5: SQLBits
SQLBits doesn’t need to be introduced. It’s the biggest SQL Server event in Europe and it will also be the official SQL Server 2016 launch event in UK.
Again, I will speak about “Responding to Extended Events in near Real-Time”.
- May 16: NTK
NTK is a famous conference in Slovenia, which has been running for many years now. This year it will be held in Portorosz, near the Italian border.
It’s going to be fun: I will speak about “Benchmarking, Baselining and Workload Analysis”.
- June 14: INSIDE-SQL
INSIDE-SQL is also a new event, run this year for the first time. It’s an event focused on in-depth concepts, delivered in 75 minutes sessions, with long breaks between sessions, so that attendees can go to the next session without rushing and can hang out with the speakers and ask questions.
I will deliver two sessions:
“Responding to Extended Events in near Real-Time”
“Advanced T-SQL Techniques”
- June 24: SQL Saturday Paris
Free SQL Server training from the 40th floor of the Tour Montparnasse in Paris.What else can I say?
I will be speaking about “New Security Features in SQL Server 2016”
- September 10: SQL Saturday Cambridge
One of the coolest SQLSats around!
This time I’ll be speaking about “SQL Server Infernals”, AKA “how to torture your SQL Server instances to death with worst practices”. It’s going to be fun!
I hope to see you at these super cool events!
Weird Things Happen with Windows Users
This will be no surprise to those who have been working with SQL Server for a long time, but it can be puzzling at first and actually I was a bit confused myself when I stumbled upon this behavior for the first time.
SQL Server treats windows users in a special way, a way that could lead us to some interesting observations.
First of all, we need a test database and a couple of windows principals to perform our tests:
1. In a command prompt, create a windows group named ‘testGroup’
net localgroup testGroup /ADD
2. In a command prompt, create a windows user named ‘testUser’ and add it to the group
net user testUser "testUser" /ADD

net localgroup testGroup testUser /ADD
3. In SSMS, create a test database:
CREATE DATABASE testWindowsUser;
Now that everything is set up, we can start our investigation.
You can create a database user for a Windows user with no corresponding login
When dealing with windows users, you don’t need to create a login in SQL Server in order to create a database user, but you can create it directly:
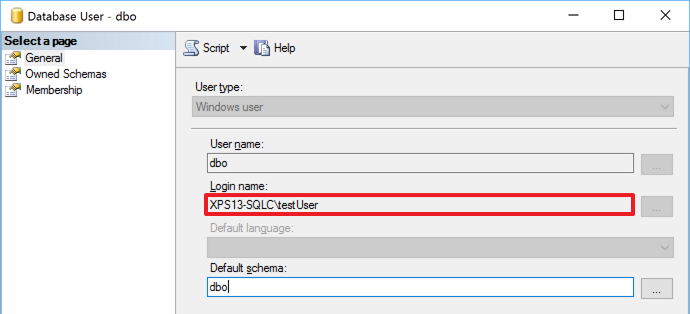
USE testWindowsUser;
GO

CREATE USER [XPS13-SQLC\testUser];
GO
We just created a user in the database, without creating a login first and without having to add “WITHOUT LOGIN” to the CREATE USER statement. If you search for a login with the same SID in sys.logins, nothing will turn up:
SELECT svp.name AS login_name,
	dbp.name AS user_name,
	dbp.default_schema_name
FROM sys.database_principals AS dbp
LEFT JOIN sys.server_principals AS svp
	ON dbp.sid = svp.sid
WHERE dbp.name LIKE '%testUser';
login_name  user_name            default_schema_name
----------- -------------------- --------------------
NULL        XPS13-SQLC\testUser  dbo
It is interesting to note that the default schema for the user, if you don’t specify one, will be “dbo”.
At this point, the Windows user cannot log in to SQL Server, but the user can be impersonated to perform operations against the databases, in the same exact way as with any other user without login.
Before we proceed with the investigation, let’s clean up our mess:
DROP USER [XPS13-SQLC\testUser];
You can create a database user for a Windows group with no corresponding login
If we try to do the same thing with a Windows group, we get even more interesting findings.
USE testWindowsUser;
GO

CREATE USER [XPS13-SQLC\testGroup]
GO
Again, we did not have to specify an existing login name and we did not have to add “WITHOUT LOGIN”. Looking at the user data in sys.database_principals and sys.logins shows again that no login is associated with this user, but this time we can see that no default schema was set.
SELECT svp.name AS login_name,
	dbp.name AS user_name,
	dbp.default_schema_name
FROM sys.database_principals AS dbp
LEFT JOIN sys.server_principals AS svp
	ON dbp.sid = svp.sid
WHERE dbp.name LIKE '%testGroup';
login_name  user_name             default_schema_name
----------- --------------------- --------------------
NULL        XPS13-SQLC\testGroup  NULL
As common sense suggests, we cannot impersonate a database user that corresponds to a Windows group. If we try that, we are met with an error message.
EXECUTE AS USER = 'XPS13-SQLC\testGroup'; -- '
Msg 15517, Level 16, State 1, Line 85
Cannot execute as the database principal because the principal "XPS13-SQLC\testGroup" does not exist,
this type of principal cannot be impersonated, or you do not have permission.
Windows users are granted access through groups in surprising ways
Now the fun begins. Turns out that you can impersonate a Windows user that is not a user in the database, as long as the Windows user is a member of the group.
Let’s grant some permissions to the group and see what happens:
ALTER ROLE db_owner ADD MEMBER [XPS13-SQLC\testGroup];
GO

EXECUTE AS USER = 'XPS13-SQLC\testUser'; -- '
EXEC('CREATE VIEW testView AS SELECT 1 AS one');
REVERT;
GO
Surprisingly enough, we were able to impersonate a database principal that doesn’t exist at all. In fact we dropped it right before we started to play with the groups, right? Let’s check again the database principals:
SELECT svp.name AS login_name,
	dbp.name AS user_name,
	dbp.default_schema_name
FROM sys.database_principals AS dbp
LEFT JOIN sys.server_principals AS svp
	ON dbp.sid = svp.sid
WHERE dbp.name LIKE '%test%';
GO
login_name  user_name             default_schema_name
----------- --------------------- --------------------
NULL        XPS13-SQLC\testGroup  NULL
NULL        XPS13-SQLC\testUser   XPS13-SQLC\testUser
Wait, what? Who created that user? Looks like SQL Server creates the database user automatically when it needs to impersonate one of the group members that are not created in the database yet.
Another interesting fact is that the default schema of the newly created user matches the user name. If we don’t like that, we can change it afterwards, but wouldn’t it be cool if we could simply change that on the Windows group and let it propagate to the users created during this process? Let’s try and see if this is possible.
-- First let's drop the user and dependent objects
DROP VIEW [XPS13-SQLC\testUser].testView;
DROP SCHEMA [XPS13-SQLC\testUser];
DROP USER [XPS13-SQLC\testUser];
GO

-- Then let's change the default schema for the group
ALTER USER [XPS13-SQLC\testGroup] WITH default_schema = dbo;
GO

-- Let's re-create the view impersonating the user
EXECUTE AS USER = 'XPS13-SQLC\testUser'; -- '
EXEC('CREATE VIEW testView AS SELECT 1 AS One');
REVERT
GO

-- Check if the view is there
SELECT OBJECT_SCHEMA_NAME(object_id) AS schema_name, name
FROM sys.views
WHERE name = 'testView';
GO

-- Check database users:
SELECT svp.name AS login_name,
	dbp.name AS user_name,
	dbp.default_schema_name
FROM sys.database_principals AS dbp
LEFT JOIN sys.server_principals AS svp
	ON dbp.sid = svp.sid
WHERE dbp.name LIKE '%test%';
GO
schema_name  name
------------ ---------
dbo          testView

login_name   user_name             default_schema_name
------------ --------------------- --------------------
NULL         XPS13-SQLC\testGroup  dbo
This time the view was placed in the “dbo” schema as expected (remember? We set the default schema on the group), but the really weird thing is that no new user was added. Why? I couldn’t find any answer in the documentation. It is even more puzzling that SQL Server was able to impersonate a user that is not present at all. Nevertheless, as far as I can remember it has always been like this, at least starting from SQL Server 2005.
To be sure we’re not imagining things, let’s change again the default schema of the Windows group:
-- Note the weird syntax
ALTER USER [XPS13-SQLC\testGroup] WITH default_schema = NULL;
GO

-- Let's re-create the view impersonating the user
EXECUTE AS USER = 'XPS13-SQLC\testUser'; -- '
EXEC('CREATE VIEW testView AS SELECT 1 AS One');
REVERT
GO

-- Check if the view is there
SELECT OBJECT_SCHEMA_NAME(object_id) AS schema_name, name
FROM sys.views
WHERE name = 'testView';
GO

-- Check database users:
SELECT svp.name AS login_name,
	dbp.name AS user_name,
	dbp.default_schema_name
FROM sys.database_principals AS dbp
LEFT JOIN sys.server_principals AS svp
	ON dbp.sid = svp.sid
WHERE dbp.name LIKE '%test%';
GO
schema_name          name
-------------------- ---------------------
dbo                  testView
XPS13-SQLC\testUser  testView

login_name           user_name             default_schema_name
-------------------- --------------------- --------------------
NULL                 XPS13-SQLC\testGroup  NULL
NULL                 XPS13-SQLC\testUser   XPS13-SQLC\testUser
Again, SQL Server creates a new user and assigns it a default schema with the same name. The view was placed in the user’s default schema.
Now let’s revert to a clean database and drop some objects.
DROP VIEW dbo.testView;
DROP VIEW [XPS13-SQLC\testUser].testView;
DROP SCHEMA [XPS13-SQLC\testUser];
DROP USER [XPS13-SQLC\testUser];
GO
In order to have a complete picture, we can now check what happens if we create a login for the windows user.
CREATE LOGIN [XPS13-SQLC\testUser] FROM WINDOWS;
GO

EXECUTE AS LOGIN = 'XPS13-SQLC\testUser';
EXEC('CREATE VIEW testView AS SELECT 1 AS One');
REVERT
GO

-- Check if the view is there
SELECT OBJECT_SCHEMA_NAME(object_id) AS schema_name, name
FROM sys.views
WHERE name = 'testView';
GO

-- Check database users:
SELECT svp.name AS login_name,
	dbp.name AS user_name,
	dbp.default_schema_name
FROM sys.database_principals AS dbp
LEFT JOIN sys.server_principals AS svp
	ON dbp.sid = svp.sid
WHERE dbp.name LIKE '%test%';
GO
schema_name          name
-------------------- ---------------------
XPS13-SQLC\testUser  testView


login_name           user_name             default_schema_name
-------------------- --------------------- --------------------
NULL                 XPS13-SQLC\testGroup  NULL
XPS13-SQLC\testUser  XPS13-SQLC\testUser   XPS13-SQLC\testUser
Again, SQL Server creates a new database user for this login and a schema with the same name. The view gets added to the user’s default schema.
What is interesting to note is that we could access the database by logging in as the Windows user, without having an explicit permission path to allow it. Only after accessing the database an explicit database user is created.
If we try the same thing with the default schema set to “dbo” on the windows group, the behavior matches what we got for the user:
-- let's try again with a default schema on the group
ALTER USER [XPS13-SQLC\testGroup] WITH default_schema = dbo;
GO

-- cleanup
DROP VIEW dbo.testView;
DROP VIEW [XPS13-SQLC\testUser].testView;
DROP SCHEMA [XPS13-SQLC\testUser];
DROP USER [XPS13-SQLC\testUser];
GO

EXECUTE AS LOGIN = 'XPS13-SQLC\testUser'; -- '
EXEC('CREATE VIEW testView AS SELECT 1 AS One');
REVERT
GO

-- Check if the view is there
SELECT OBJECT_SCHEMA_NAME(object_id) AS schema_name, name
FROM sys.views
WHERE name = 'testView';
GO

-- Check database users:
SELECT svp.name AS login_name,
	dbp.name AS user_name,
	dbp.default_schema_name
FROM sys.database_principals AS dbp
LEFT JOIN sys.server_principals AS svp
	ON dbp.sid = svp.sid
WHERE dbp.name LIKE '%test%';
GO
This means that this behavior has to be taken into account when we’re querying permissions on the databases to see who can access what. In order to know whether a windows user is member of a windows group, we can use the system function IS_MEMBER().
In our case, it would be enough to call the function in this way:
EXECUTE AS LOGIN = 'XPS13-SQLC\testUser'; -- '
SELECT IS_MEMBER('XPS13-SQLC\testGroup');
REVERT
GO
Unfortunately, there is no additional parameter available to specify which windows user to test for group membership and the function will always test against the current login. This has two important consequences:
- To test multiple logins, we need to impersonate them one at a time, which is difficult to achieve in scripts.
- There is no way to test database users: impersonating the database user will not be enough to test the windows group membership for the windows user associated to the database user.
Summing it up, this is what we have:
| Windows user impersonated as | Group’s Default Schema set | New user added | New user’s schema |
|---|---|---|---|
| Database User | No | Yes | User name |
| Database User | Yes | No | – |
| Login | No | Yes | User name |
| Login | Yes | No | – |
The dbo user can be mapped to a non-existing Windows User
This is extremely tricky and I was bitten by this behavior recently, wasting countless hours trying to figure out what was happening.
Imagine that a developer creates a database in the development environment, while logged in with Windows authentication. This is a very common scenario, both if you’re using a centralized development server or developers’ workstations.
When development is complete, the developer hands us a database backup to restore in production, because the database already contains some data (built-in values in lookup tables or something else required by the application). We restore the database in production, where the developer does not have a login, confident that he will be unable to access it. Well, that’s not exactly what is going to happen.
Let’s see it with an example:
-- Grant dbcreator permissions to the windows user
ALTER SERVER ROLE dbcreator ADD MEMBER [XPS13-SQLC\testUser]
GO

-- The user creates a database. It may happen in development, right?
EXECUTE AS LOGIN = 'XPS13-SQLC\testUser';
CREATE DATABASE testWindowsGroup
REVERT
GO

-- Let's pretend that developers finish working with the database
-- and ask to move it from development to production
-- He takes a backup and we restore it to production
BACKUP DATABASE testWindowsGroup TO DISK = 'c:\temp\testWindowsGroup.bak';
GO

-- We don't have two separate servers to test, we will simulate
-- the same situation by dropping some objects. Let's drop the database.
DROP DATABASE testWindowsGroup;
GO

-- Now let's drop the associated windows login
DROP LOGIN [XPS13-SQLC\testUser]
GO

-- The database gets restored in production (again, we will use the same instance,
-- but the main point is that the login of the database owner is not present).
RESTORE DATABASE testWindowsGroup FROM DISK = 'c:\temp\testWindowsGroup.bak'
GO

-- Who's the owner of the database? You, the DBA. Looking good.
SELECT db.name, svp.name
FROM sys.databases AS db
INNER JOIN sys.server_principals AS svp
	ON db.owner_sid = svp.sid
WHERE database_id = DB_ID('testWindowsGroup');
Everything is set up the way it should: the database is restored to production, the DBA is the database owner, the developer has no access to the database and everybody is happy.
Now imagine that a new totally unrelated database gets added to the production instance, a database where everybody in the company must have read-only access. We create a new login for a Windows group that includes all authorized logins and we grant access to the new database.
Again, let’s see it with an example (using tempdb):
-- Let's add a login for the group and grant permissions on another database
-- I will use tempdb here, but it could be any other database.
CREATE LOGIN [XPS13-SQLC\testGroup] FROM WINDOWS;
GO

USE tempdb;
GO

-- The group gets added to tempdb with read-only permissions
CREATE USER [XPS13-SQLC\testGroup] FOR LOGIN [XPS13-SQLC\testGroup];
ALTER ROLE db_datareader ADD MEMBER [XPS13-SQLC\testGroup];
GO

-- Let’s go back to the database we restored previously
USE testWindowsGroup;
GO

-- Now see what happens:
EXECUTE AS LOGIN = 'XPS13-SQLC\testUser'; -- '
EXEC('CREATE VIEW testView AS SELECT 1 AS One');
REVERT
GO
WTF? A windows user that has no matching SQL Server login could create a view in a database where no matching user exists? How could that happen?
-- Let's check the permissions of this user:
EXECUTE AS LOGIN = 'XPS13-SQLC\testUser'; -- '
SELECT IS_ROLEMEMBER('db_owner') AS IAmDbOwner,
	IS_MEMBER('db_owner') AS AgainDbOwner;
REVERT
GO
IAmDbOwner	AgainDbOwner
----------- -------------
          1             1
Weird. The login of the Windows user seems to be the database owner, but we checked upon restore that the DBA is the database owner. Moreover, there is no explicit login in the server for this Windows user and the only Windows group that contains this user does not have access at all to the database: how is this possible?
The answer is buried inside the database principals table:
-- The sid of the dbo user is still the sid of the user that created the database,
-- even if the windows user is not a login in SQL Server
SELECT sid
FROM sys.database_principals
WHERE name = 'dbo';
We got access to the database thanks to a windows group added to grant access to a totally unrelated database. The group has no permissions whatsoever on the database, but it allows its members to log in: the actual permissions on the database are granted through the SID of the dbo user.
This can be spotted immediately with the GUI, which is a fact that hides the resolution even more from experienced DBAs that don’t use the GUI at all.
Bottom line
Windows authentication comes handy most of the times and it offers better protection compared to SQL Server authentication, but sometimes the way SQL Server treats Windows users can be puzzling.
Don’t take things for granted and check now if you really understand who has access to your databases: the answer might be very different from what you expect.
P.S. If you’re wondering why I placed a comment with a quote after every “EXECUTE AS” statement, it’s just to fix this WordPress wacky syntax highlighter going nuts.
An annoying Bug in the Restore Dialog
Today, thanks to a customer, I discovered one of those annoying little things that can really drive you nuts.
Basically, they were trying to restore a backup using the SSMS Restore Database window and they kept getting “No backupset selected to be restored” whenever a backup file was selected.
You just had to select a file for restore and click OK…

… to be met with an error message in the Restore Database window:

The weird thing about it is that the backup file restored perfectly fine from a T-SQL script:
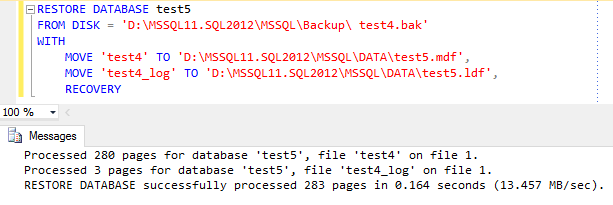
So it had to be something wrong with SSMS, but what?
Looking closer at the restore script, one thing stands out. Look at the file name:

Yep, there’s a leading whitespace in the file name. Could that be the source of the problem?
Let’s try again with the GUI in a slightly different way. This time I will copy the folder path from the “Backup File Location” textbox…

… and paste it directly in the “File name” textbox, right before the file name:
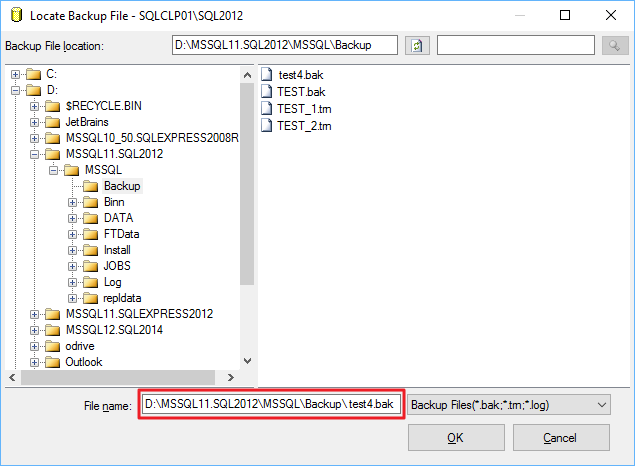
This time everything works as expected.
Bottom line:
- This is a bug in SSMS: go on and vote this Connect item to have it fixed in a future version.
- Don’t use the GUI to restore a database.
- Don’t use the GUI at all.
Native Client Aliases don’t like Trailing Spaces
I usually don’t post small things like this, but today I fought with this obnoxious problem long enough to convince me that it deserved a shout out to the community.
When you create an alias in the SQL Server Configuration Manager, make sure that the alias name contains no spaces, otherwise it won’t work as you expect.
In my case, I had a Reporting Services instance with many data sources pointing to a SQL Server instance (let’s call it MyServer) and I wanted to redirect connections to a different instance using an alias. So I opened Configuration Manager and created an alias like this:

To my great surprise, the alias didn’t work and it took quite some time to notice that something was wrong. The server “MyServer” was a perfectly working existing instance of SQL Server, so no connection was dropped: they all just happened to contact the wrong server. If spotting the problem was hard, fixing it turned out to be even harder: why on earth did the alias refuse to work, while all other aliases were working perfectly?
It turned out to be the simplest of all answers: a trailing space in the alias name.
Just looking at the alias properties it wasn’t too obvious that something was off, but clicking on the alias name field, the cursor appeared slightly more on the right than it should have been:
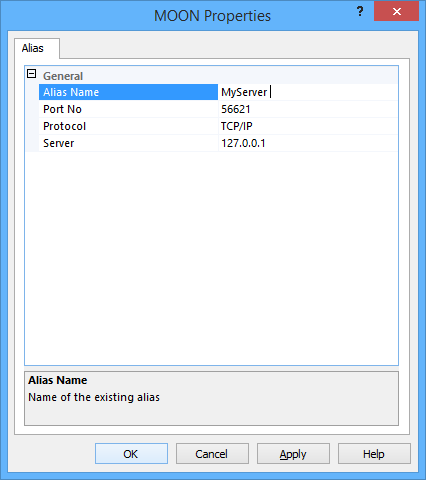
Bottom line is: always check your assumptions, because problems like to hide where you won’t search for them.
Counting the number of rows in a table
Don’t be fooled by the title of this post: while counting the number of rows in a table is a trivial task for you, it is not trivial at all for SQL Server.
Every time you run your COUNT(*) query, SQL Server has to scan an index or a heap to calculate that seemingly innocuous number and send it to your application. This means a lot of unnecessary reads and unnecessary blocking.
Jes Schultz Borland blogged about it some time ago and also Aaron Bertrand has a blog post on this subject. I will refrain from repeating here what they both said: go read their blogs to understand why COUNT(*) is a not a good tool for this task.
The alternative to COUNT(*) is reading the count from the table metadata, querying sys.partitions, something along these lines:
SELECT SUM(p.rows)
FROM sys.partitions p
WHERE p.object_id = OBJECT_ID('MyTable')
    AND p.index_id IN (0,1); -- heap or clustered index
Many variations of this query include JOINs to sys.tables, sys.schemas or sys.indexes, which are not strictly necessary in my opinion. However, the shortest version of the count is still quite verbose and error prone.
Fortunately, there’s a shorter version of this query that relies on the system function OBJECTPROPERTYEX:
SELECT OBJECTPROPERTYEX(OBJECT_ID('MyTable'),'cardinality')
Where does it read data from? STATISTICS IO doesn’t return anything for this query, so I had to set up an Extended Events session to capture lock_acquired events and find out the system tables read by this function:

Basically, it’s just sysallocunits and sysrowsets.
It’s nice, short and easy to remember. Enjoy.
