Blog Archives
Collecting Diagnostic data from multiple SQL Server instances with dbatools
Keeping their SQL Server instances under control is a crucial part of the job of a DBA. SQL Server offers a wide variety of DMVs to query in order to check the health of the instance and establish a performance baseline.
My favourite DMV queries are the ones crafted and maintained by Glenn Berry: the SQL Server Diagnostic Queries. These queries already pack the right amount of information and can be used to take a snapshot of the instance’s health and performance.
Piping the results of these queries to a set of tables at regular intervals can be a good way to keep an eye on the instance. Automation in SQL Server rhymes with dbatools, so today I will show you how to automate the execution of the diagnostic queries and the storage of the results to a centralized database that you can use as a repository for your whole SQL Server estate.
The script
The script I’m using for this can be found on GitHub and you can download it, modify it and adapt it to your needs.
I won’t include it here, there is really no need for that, as you can find it on Github already. So, go, grab it from this address, save it and open it in your favourite code editor.
Done? Excellent! Let’s go through it together.
The script, explained
What I really love about PowerShell is how simple it is to filter, extend and manipulate tabular data using the pipeline, in a way that resonates a lot with the experience of T-SQL developers.
The main part of the script is the one that invokes all the diagnostic queries included in the list $queries. This is done by invoking the cmdlet Invoke-DbaDiagnosticQuery, that takes care of using a version of the diagnostic query that matches the version of the target server and selecting the data. As usual with dbatools, the -SqlInstance parameter accepts a list of servers, so you can pass in the list of all the SQL Servers in your infrastructure.
Invoke-DbaDiagnosticQuery -SqlInstance $SourceServer -QueryName $queries
Sometimes the queries do not generate any data, so it is important to filter out the empty result sets.
Where-Object { $_.Result -ne $null }
In order to store the data collected at multiple servers and multiple points in time, you need to attach some additional columns to the result sets before writing them to the destination tables. This is a very simple task in PowerShell and it can be accomplished by using the Select-Object cmdlet.
Select-Object accepts a list of columns taken from the input object and can also add calculated columns using hashtables with label/expression pairs. The syntax is not the friendliest possible (in fact, I have to look it up every time I need it), but it gets the job done.
In this case, you need to add a column for the server name, one for the database name (only for database scoped queries) and one for the snapshot id. I decided to use a timestamp in the yyyyMMdd as the snapshot id. This is what the code to define the properties looks like:
        $TableName = $_.Name
        $DatabaseName = $_.Database
        $ServerName = $_.SqlInstance

        $snapshotProp = @{
            Label = "snapshot_id"
            Expression = {$SnapshotId}
        }
        $serverProp = @{
            Label = "Server Name"
            Expression = {$ServerName}
        }
        $databaseProp = @{
            Label = "Database Name"
            Expression = {$DatabaseName}
        }
Now that the hashtables that define the additional properties are ready, you need to decide whether the input dataset requires the new properties or not: if a property with the same name is already present you need to skip adding the new property.
Unfortunately, this has to be done in two different ways, because the dataset produced by the diagnostic queries could be returned as a collection of System.Data.Datarow objects or as a collection of PsCustomObject.
        if(-not (($_.Result.PSObject.Properties | Select-Object -Expand Name) -contains "Server Name")) {
            if(($_.Result | Get-Member -MemberType NoteProperty -Name "Server Name" | Measure-Object).Count -eq 0) {
                $expr += ' $serverProp, '
            }
        }
Now comes the interesting part of the
script: the data has to get written to a destination table in a database.
Dbatools has a cmdlet for that called Write-DbaDataTable.
Among the abilities of this nifty cmdlet, you can auto create the destination tables based on the data found in the input object, thus making your life much easier. In order to pass all the parameters to this cmdlet, I will use a splat, which improves readability quite a bit.
        $expr += '*'

        $param = @{
            SqlInstance     = $DestinationServer
            Database        = $DestinationDatabase
            Schema          = $DestinationSchema
            AutoCreateTable = $true
            Table           = $TableName
            InputObject     = Invoke-Expression $expr
        }
        Write-DbaDataTable @param
As you can see, you need to pass a
destination server name, a database name, a schema name and a table name. As I
already mentioned, Write-DbaDataTable will take care of creating the target
table.
One thing to note is how the data is passed
to the cmdlet: the InputObject is the result of an expression, based on the
dynamic select list generated inside the ForeEach-Object cmdlet. This is very
similar to building a dynamic query in T-SQL.
Conclusion
This script can be downloaded from GitHub and you can schedule it on a centralized management server in order to collect diagnostic data across your entire SQL Server estate.
Dbatools is the ultimate toolset for the dba: if you’re still using the GUI or overly complicated T-SQL scripts to administer and maintain your SQL Server estate, you’re missing out.
Dbatools is also a great opportunity for me to learn new tricks in Powershell, which is another great productivity tool that can’t be overlooked by DBAs. What are you waiting for? Go to dbatools.io now and start your journey: you won’t regret it.
Generating a Jupyter Notebook for Glenn Berry’s Diagnostic Queries with PowerShell
The March release of Azure Data Studio now supports Jupyter Notebooks with SQL kernels. This is a very interesting feature that opens new possibilities, especially for presentations and for troubleshooting scenarios.
For presentations, it is fairly obvious what the use case is: you can prepare notebooks to show in your presentations, with code and results combined in a convenient way. It helps when you have to establish a workflow in your demos that the attendees can repeat at home when they download the demos for your presentation.
For troubleshooting scenarios, the interesting feature is the ability to include results inside a Notebook file, so that you can create an empty Notebook, send it to your client and make them run the queries and send it back to you with the results populated. For this particular usage scenario, the first thing that came to my mind is running the diagnostic queries by Glenn Berry in a Notebook.
Obviously, I don’t want to create such a Notebook manually by adding all the code cells one by one. Fortunately, PowerShell is my friend and can do the heavy lifting for me.
Unsurprisingly, dbatools comes to the rescue: André Kamman added a cmdlet that downloads, parses and executes Glenn Berry’s diagnostic queries and added the cmdlet to dbatools. The part that can help me is not a public function available to the user, but I can still go to GitHub and download the internal function Invoke-DbaDiagnosticQueryScriptParser for my needs.
The function returns a list of queries that I can use to generate the Jupyter Notebook:
This file contains hidden or bidirectional Unicode text that may be interpreted or compiled differently than what appears below. To review, open the file in an editor that reveals hidden Unicode characters.
Learn more about bidirectional Unicode characters
| # | |
| # Purpose: take the diagnostic queries from Glenn Berry | |
| # and generate a Jupyter Notebook to run in Azure Data Studio | |
| # | |
| # Example usage: | |
| # create-diagnostic-notebook.ps1 -diagnosticScriptPath "C:\Program Files\WindowsPowerShell\Modules\dbatools\0.9.777\bin\diagnosticquery\SQLServerDiagnosticQueries_2019_201901.sql" -notebookOutputPath "diagnostic-notebook.ipynb" | |
| # | |
| [CmdletBinding()] | |
| Param( | |
| [parameter(Mandatory)] | |
| [System.IO.FileInfo]$diagnosticScriptPath, | |
| [System.IO.FileInfo]$notebookOutputPath | |
| ) | |
| # | |
| # Function taken from dbatools https://github.com/sqlcollaborative/dbatools/blob/development/internal/functions/Invoke-DbaDiagnosticQueryScriptParser.ps1 | |
| # Parses the diagnostic script and breaks it into individual queries, | |
| # with text and description | |
| # | |
| function Invoke-DbaDiagnosticQueryScriptParser { | |
| [CmdletBinding(DefaultParameterSetName = "Default")] | |
| Param( | |
| [parameter(Mandatory)] | |
| [ValidateScript( {Test-Path $_})] | |
| [System.IO.FileInfo]$filename, | |
| [Switch]$ExcludeQueryTextColumn, | |
| [Switch]$ExcludePlanColumn, | |
| [Switch]$NoColumnParsing | |
| ) | |
| $out = "Parsing file {0}" -f $filename | |
| write-verbose -Message $out | |
| $ParsedScript = @() | |
| [string]$scriptpart = "" | |
| $fullscript = Get-Content -Path $filename | |
| $start = $false | |
| $querynr = 0 | |
| $DBSpecific = $false | |
| if ($ExcludeQueryTextColumn) {$QueryTextColumn = ""} else {$QueryTextColumn = ", t.[text] AS [Complete Query Text]"} | |
| if ($ExcludePlanColumn) {$PlanTextColumn = ""} else {$PlanTextColumn = ", qp.query_plan AS [Query Plan]"} | |
| foreach ($line in $fullscript) { | |
| if ($start -eq $false) { | |
| if (($line -match "You have the correct major version of SQL Server for this diagnostic information script") -or ($line.StartsWith("– Server level queries ***"))) { | |
| $start = $true | |
| } | |
| continue | |
| } | |
| if ($line.StartsWith("– Database specific queries ***") -or ($line.StartsWith("– Switch to user database **"))) { | |
| $DBSpecific = $true | |
| } | |
| if (!$NoColumnParsing) { | |
| if (($line -match "– uncomment out these columns if not copying results to Excel") -or ($line -match "– comment out this column if copying results to Excel")) { | |
| $line = $QueryTextColumn + $PlanTextColumn | |
| } | |
| } | |
| if ($line -match "-{2,}\s{1,}(.*) \(Query (\d*)\) \((\D*)\)") { | |
| $prev_querydescription = $Matches[1] | |
| $prev_querynr = $Matches[2] | |
| $prev_queryname = $Matches[3] | |
| if ($querynr -gt 0) { | |
| $properties = @{QueryNr = $querynr; QueryName = $queryname; DBSpecific = $DBSpecific; Description = $queryDescription; Text = $scriptpart} | |
| $newscript = New-Object -TypeName PSObject -Property $properties | |
| $ParsedScript += $newscript | |
| $scriptpart = "" | |
| } | |
| $querydescription = $prev_querydescription | |
| $querynr = $prev_querynr | |
| $queryname = $prev_queryname | |
| } else { | |
| if (!$line.startswith("–") -and ($line.trim() -ne "") -and ($null -ne $line) -and ($line -ne "\n")) { | |
| $scriptpart += $line + "`n" | |
| } | |
| } | |
| } | |
| $properties = @{QueryNr = $querynr; QueryName = $queryname; DBSpecific = $DBSpecific; Description = $queryDescription; Text = $scriptpart} | |
| $newscript = New-Object -TypeName PSObject -Property $properties | |
| $ParsedScript += $newscript | |
| $ParsedScript | |
| } | |
| $cells = @() | |
| Invoke-DbaDiagnosticQueryScriptParser $diagnosticScriptPath | | |
| Where-Object { -not $_.DBSpecific } | | |
| ForEach-Object { | |
| $cells += [pscustomobject]@{cell_type = "markdown"; source = "## $($_.QueryName)`n`n$($_.Description)" } | |
| $cells += [pscustomobject]@{cell_type = "code"; source = $_.Text } | |
| } | |
| $preamble = @" | |
| { | |
| "metadata": { | |
| "kernelspec": { | |
| "name": "SQL", | |
| "display_name": "SQL", | |
| "language": "sql" | |
| }, | |
| "language_info": { | |
| "name": "sql", | |
| "version": "" | |
| } | |
| }, | |
| "nbformat_minor": 2, | |
| "nbformat": 4, | |
| "cells": | |
| "@ | |
| $preamble | Out-File $notebookOutputPath | |
| $cells | ConvertTo-Json | Out-File -FilePath $notebookOutputPath -Append | |
| "}}" | Out-File -FilePath $notebookOutputPath -Append |
In order to use the script, you need to provide the path to the file that contains the diagnostic queries and the path where the new Jupyter Notebook should be generated. Dbatools includes the latest version of the diagnostic scripts already, so you just need to choose which flavor you want to use. You will find all available scripts in the module directory of dbatools:
$dbatoolsPath = Split-Path -parent (Get-Module -ListAvailable dbatools).path
$dbatoolsPath
Get-ChildItem "$dbatoolsPath\bin\diagnosticquery" | Select-Object Name
The script above produces this output:
C:\Program Files\WindowsPowerShell\Modules\dbatools\0.9.777

Name
----
SQLServerDiagnosticQueries_2005_201901.sql
SQLServerDiagnosticQueries_2008R2_201901.sql
SQLServerDiagnosticQueries_2008_201901.sql
SQLServerDiagnosticQueries_2012_201901.sql
SQLServerDiagnosticQueries_2014_201901.sql
SQLServerDiagnosticQueries_2016SP2_201901.sql
SQLServerDiagnosticQueries_2016_201901.sql
SQLServerDiagnosticQueries_2017_201901.sql
SQLServerDiagnosticQueries_2019_201901.sql
SQLServerDiagnosticQueries_AzureSQLDatabase_201901.sql
Once you decide which file to use, you can pass it to the script:
create-diagnostic-notebook.ps1 `
    -diagnosticScriptPath "C:\Program Files\WindowsPowerShell\Modules\dbatools\0.9.777\bin\diagnosticquery\SQLServerDiagnosticQueries_2019_201901.sql" `
    -notebookOutputPath "diagnostic-notebook.ipynb"
What you obtain is a Jupyter Notebook that you can open in Azure Data Studio:
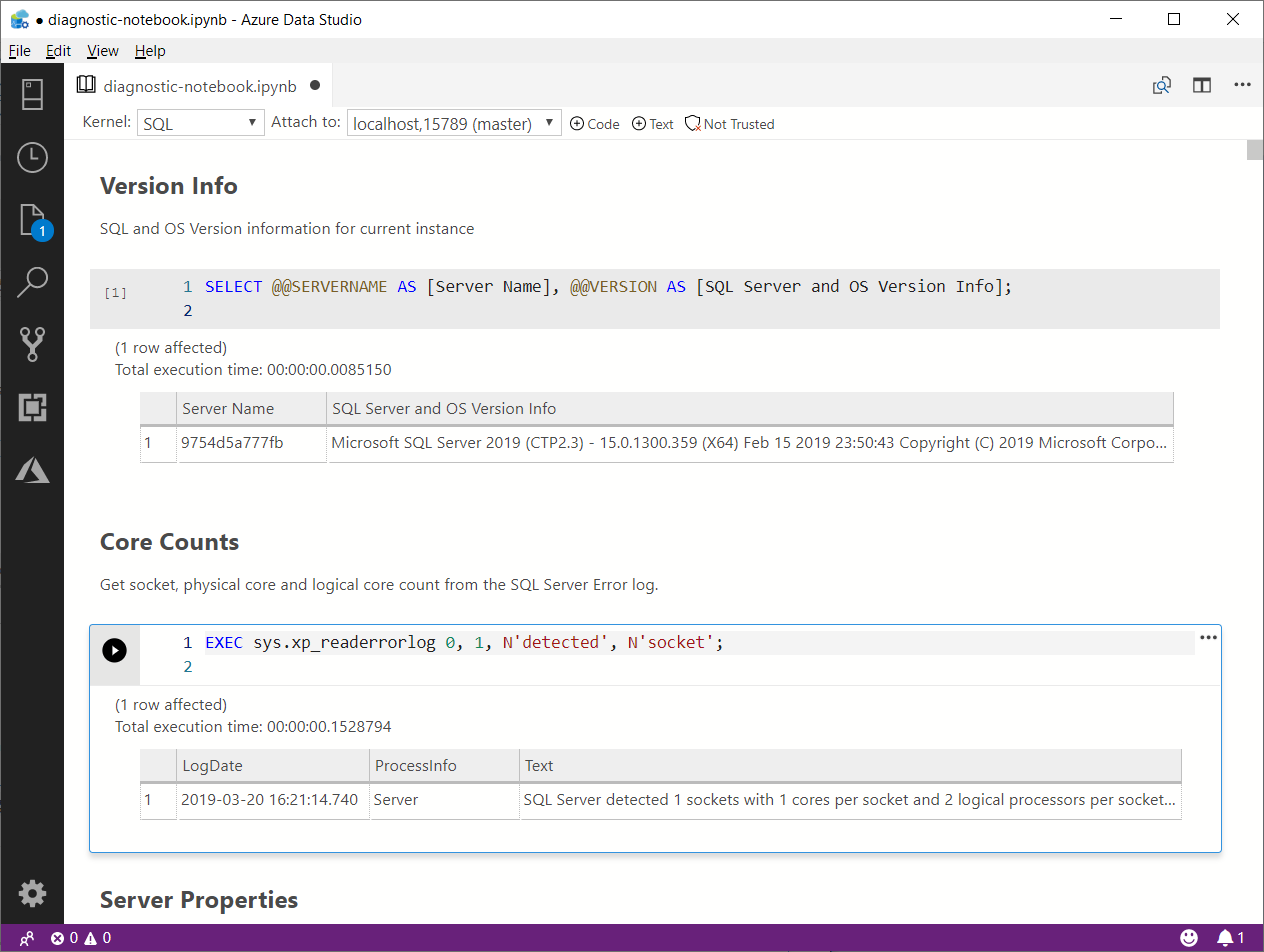
This is nice way to incorporate the code and results in a single file, that you can review offline later. This also allows you to send the empty notebook to a remote client, ask to run one or more queries and send back the notebook including the results for you to review.
Happy Notebooking!
SQL Server Agent in Express Edition
As you probably know, SQL Server Express doesn’t ship with SQL Server Agent.
This is a known limitation and many people offered alternative solutions to schedule jobs, including windows scheduler, free and commercial third-party applications.
My favourite SQL Server Agent replacement to date is Denny Cherry‘s Standalone SQL Agent, for two reasons:
- It uses msdb tables to read job information.
This means that jobs, schedules and the like can be scripted using the same script you would use in the other editions. - It’s open source and it was started by a person I highly respect.
However, while I still find it a great piece of software, there are a couple of downsides to take into account:
- It’s still a beta version and the project hasn’t been very active lately.
- There’s no GUI tool to edit jobs or monitor job progress.
- It fails to install when UAC is turned on
- It’s not 100% compatible with SQL Server 2012
- It doesn’t restart automatically when the SQL Server instance starts
- It requires sysadmin privileges
The UAC problem during installation is easy to solve: open an elevated command prompt and run the installer msi. Easy peasy.
As far as SQL Server 2012 is concerned, the service fails to start when connected to a 2012 instance. In the ERRORLOG file (the one you find in the Standalone SQL Agent directory, not SQL Server’s) you’ll quickly find the reason of the failure: it can’t create the stored procedure sp_help_job_SSA. I don’t know why this happens: I copied the definition of the stored procedure from a 2008 instance and it worked fine.
If you don’t have a SQL Server 2008 instance available, you can extract the definition of the stored procedure from the source code at CodePlex.
Issue 5) is a bit more tricky to tackle. When the service loses the connection to the target SQL Server instance, it won’t restart automatically and it will remain idle until you cycle the service manually. In the ERRORLOG file you’ll find a message that resembles to this:
Error connecting to SQL Instance.
No connection attempt will be made until Sevice is restarted.
You can overcome this limitation using a startup stored procedure that restarts the service:
USE master
GO

EXEC sp_configure 'advanced',1
RECONFIGURE WITH OVERRIDE

EXEC sp_configure 'xp_cmdshell',1
RECONFIGURE WITH OVERRIDE
GO

USE master
GO

CREATE PROCEDURE startStandaloneSQLAgent
AS
BEGIN
    SET NOCOUNT ON;

    EXEC xp_cmdshell 'net stop "Standalone SQL Agent"'
    EXEC xp_cmdshell 'net start "Standalone SQL Agent"'

END
GO

EXEC sp_procoption @ProcName = 'startStandaloneSQLAgent'
      , @OptionName = 'startup'
      , @OptionValue = 'on';
 GO
However, you’ll probably notice that the SQL Server service account does not have sufficient rights to restart the service.
The following PowerShell script grants the SQL Server service account all the rights it needs. In order to run it, you need to download the code available at Rohn Edwards’ blog.
# Change to the display name of your SQL Server Express service
$service = Get-WmiObject win32_service |
	where-object { $_.DisplayName -eq "SQL Server (SQLEXPRESS2008R2)" }

$serviceLogonAccount = $service.StartName

$ServiceAcl = Get-ServiceAcl "Standalone SQL Agent"
$ServiceAcl.Access

# Add an ACE allowing the service user Start and Stop service rights:
$ServiceAcl.AddAccessRule((New-AccessControlEntry -ServiceRights "Start,Stop" -Principal $serviceLogonAccount))

# Apply the modified ACL object to the service:
$ServiceAcl | Set-ServiceAcl

# Confirm the ACE was saved:
Get-ServiceAcl "Standalone SQL Agent" | select -ExpandProperty Access
After running this script from an elevated Powershell instance, you can test whether the startup stored procedure has enough privileges by invoking it manually.
If everything works as expected, you can restart the SQL Server Express instance and the Standalone SQL Agent service will restart as well.
In conclusion, Standalone SQL Agent is a good replacement for SQL Server Agent in Express edition and, while it suffers from some limitations, I still believe it’s the best option available.
Open SSMS Query Results in Excel with a Single Click
The problem
One of the tasks that I often have to complete is manipulate some data in Excel, starting from the query results in SSMS.
Excel is a very convenient tool for one-off reports, quick data manipulation, simple charts.
Unfortunately, SSMS doesn’t ship with a tool to export grid results to Excel quickly.
Excel offers some ways to import data from SQL queries, but none of those offers the rich query tools available in SSMS. A representative example is Microsoft Query: how am I supposed to edit a query in a text editor like this?

Enough said.
Actually, there are many ways to export data from SQL Server to Excel, including SSIS packages and the Import/Export wizard. Again, all those methods require writing your queries in a separate tool, often with very limited editing capabilities.
PowerQuery offers great support for data exploration, but it is a totally different beast and I don’t see it as an alternative to running SQL queries directly.
The solution
How can I edit my queries taking advantage of the query editing features of SSMS, review the results and then format the data directly in Excel?
The answer is SSMS cannot do that, but, fortunately, the good guys at Solutions Crew brought you a great tool that can do that and much more.
SSMSBoost is a free add-in that empowers SSMS with many useful features, among which exporting to Excel is just one. I highly suggest that you check out the feature list, because it’s really impressive.
Once SSMSBoost is installed, every time you right click a results grid, a context menu appears that lets you export the grid data to several formats.
No surprises, one of those formats is indeed Excel.

The feature works great, even with relatively big result sets. However, it requires 5 clicks to create the Spreadsheet file and one more click to open it in Excel:
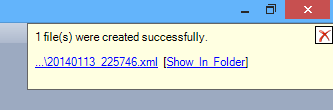
So, where is the single click I promised in the title of this post?
The good news is that SSMSBoost can be automated combining commands in macros to accomplish complex tasks.
Here’s how to create a one-click “open in Excel” command:
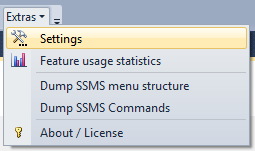
First, open the SSMSBoost settings window clicking the “Extras” button.
In the “Shortcuts & Macros” tab you can edit and add macros to the toolbar or the context menu and even assign a keyboard shortcut.

Clicking the “definitions” field opens the macro editor
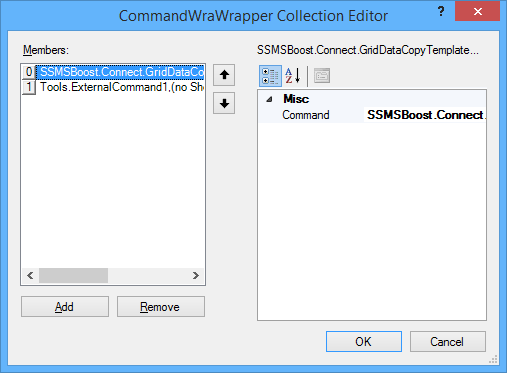
Select “Add” and choose the following command: “SSMSBoost.Connect.GridDataCopyTemplateAllGridsDisk3”. This command corresponds to the “Script all grids as Excel to disk” command in SSMSBoost.
Now save everything with OK and close. You will notice a new button in your toolbar:
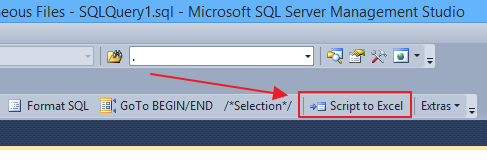
That button allows to export all grids to Excel in a single click.
You’re almost there: now you just need something to open the Excel file automatically, without the need for additional clicks.
To accomplish this task, you can use a Powershell script, bound to a custom External Tool.
Open the External Tools editor (Tools, External Tools), click “Add” and type these parameters:
Title: Open last XML in Excel
Command: C:\Windows\System32\WindowsPowerShell\v1.0\powershell.exe
Arguments: -File %USERPROFILE%\openLastExcel.ps1 -ExecutionPolicy Bypass
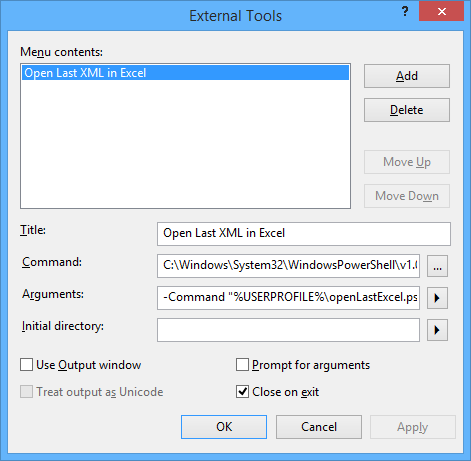
Click OK to close the External Tools editor.
This command lets you open the last XML file created in the SSMSBoost output directory, using a small Powershell script that you have to create in your %USERPROFILE% directory.
The script looks like this:
## =============================================
## Author:      Gianluca Sartori - @spaghettidba
## Create date: 2014-01-15
## Description: Open the last XML file in the SSMSBoost
##              output dicrectory with Excel
## =============================================

sl $env:UserProfile

# This is the SSMSBoost 2012 settings file
# If you have the 2008 version, change this path
# Sorry, I could not find a registry key to automate it.
$settingsFile = "$env:UserProfile\AppData\Local\Solutions Crew\Ssms2012\SSMSBoostSettings.xml"

# Open the settings file to look up the export directory
$xmldata=[xml](get-content $settingsFile)

$xlsTemplate = $xmldata.SSMSBoostSettings.GridDataCopyTemplates.ChildNodes |
    Where-Object { $_.Name -eq "Excel (MS XML Spreadsheet)" }

$SSMSBoostPath = [System.IO.Path]::GetDirectoryName($xlsTemplate.SavePath)

$SSMSBoostPath = [System.Environment]::ExpandEnvironmentVariables($SSMSBoostPath)

# we filter out files created before (now -1 second)
$startTime = (get-date).addSeconds(-1);

$targetFile = $null;

while($targetFile -eq $null){
    $targetFile = Get-ChildItem -Path $SSMSBoostPath |
        Where-Object { $_.extension -eq '.xml' -and $_.lastWriteTime -gt $startTime } |
        Sort-Object -Property LastWriteTime |
        Select-Object -Last 1;

    # file not found? Wait SSMSBoost to finish exporting
    if($targetFile -eq $null) {
        Start-Sleep -Milliseconds 100
    }
};

$fileToOpen = $targetFile.FullName

# enclose the output file path in quotes if needed
if($fileToOpen -like "* *"){
    $fileToOpen = "`"" + $fileToOpen + "`""
}

# open the file in Excel
# ShellExecute is much safer than messing with COM objects...
$sh = new-object -com 'Shell.Application'
$sh.ShellExecute('excel', "/r " + $fileToOpen, '', 'open', 1)
Now you just have to go back to the SSMSBoost settings window and edit the macro you created above.
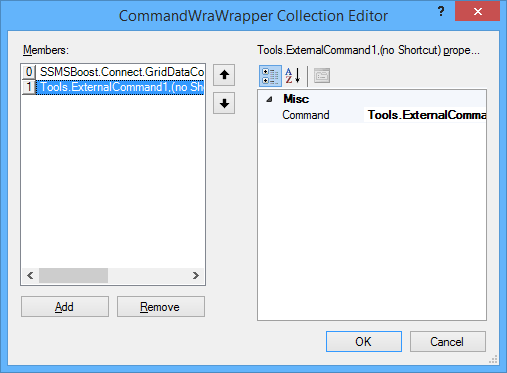
In the definitions field click … to edit the macro and add a second step. The Command to select is “Tools.ExternalCommand1”.
Save and close everything and now your nice toolbar button will be able to open the export file in Excel automagically. Yay!

Troubleshooting
If nothing happens, you might need to change your Powershell Execution Policy. Remember that SSMS is a 32-bit application and you have to set the Execution Policy for the x86 version of Powershell.
Starting Powershell x86 is not easy in Windows 8/8.1, The documentation says to look up “Windows Powershell (x86)” in the start menu, but I could not find it.
The easiest way I have found is through another External Tool in SSMS. Start SSMS as an Administrator (otherwise the UAC will prevent you from changing the Execution Policy) and configure an external tool to run Powershell. Once you’re in, type “Set-ExecutionPolicy Remotesigned” and hit return. The external tool in your macro will now run without issues.
Bottom line
Nothing compares to SSMS when it comes down to writing queries, but Excel is the best place to format and manipulate data.
Now you have a method to take advantage of the best of both worlds. And it only takes one single click.
Enjoy.
Copy user databases to a different server with PowerShell
Sometimes you have to copy all user databases from a source server to a destination server.
Copying from development to test could be one reason, but I’m sure there are others.
Since the question came up on the forums at SQLServerCentral, I decided to modify a script I published some months ago to accomplish this task.
Here is the code:
## =============================================
## Author:      Gianluca Sartori - @spaghettidba
## Create date: 2013-10-07
## Description: Copy user databases to a destination
##              server
## =============================================
cls
sl "c:\"
$ErrorActionPreference = "Stop"

# Input your parameters here
$source = "SourceServer\Instance"
$sourceServerUNC = "SourceServer"
$destination = "DestServer\Instance"

# Shared folder on the destination server
# For instance "\\DestServer\D$"
$sharedFolder = "\\DestServer\sharedfolder"
# Path to the shared folder on the destination server
# For instance "D:"
$remoteSharedFolder = "PathOfSharedFolderOnDestServer"

$ts = Get-Date -Format yyyyMMdd

#
# Read default backup path of the source from the registry
#

$SQL_BackupDirectory = @"
    EXEC master.dbo.xp_instance_regread
        N'HKEY_LOCAL_MACHINE',
        N'Software\Microsoft\MSSQLServer\MSSQLServer',
        N'BackupDirectory'
"@

$info = Invoke-sqlcmd -Query $SQL_BackupDirectory -ServerInstance $source

$BackupDirectory = $info.Data

#
# Read master database files location
#
$SQL_Defaultpaths = "
    SELECT *
    FROM (
        SELECT type_desc,
            SUBSTRING(physical_name,1,LEN(physical_name) - CHARINDEX('\', REVERSE(physical_name)) + 1) AS physical_name
        FROM master.sys.database_files
    ) AS src
    PIVOT( MIN(physical_name) FOR type_desc IN ([ROWS],[LOG])) AS pvt
"

$info = Invoke-sqlcmd -Query $SQL_Defaultpaths -ServerInstance $destination

$DefaultData = $info.ROWS
$DefaultLog = $info.LOG

#
# Process all user databases
#
$SQL_FullRecoveryDatabases = @"
    SELECT name
    FROM master.sys.databases
    WHERE name NOT IN ('master', 'model', 'tempdb', 'msdb', 'distribution')
"@

$info = Invoke-sqlcmd -Query $SQL_FullRecoveryDatabases -ServerInstance $source

$info | ForEach-Object {

    try {

        $DatabaseName = $_.Name

        Write-Output "Processing database $DatabaseName"

        $BackupFile = $DatabaseName + "_" + $ts + ".bak"
        $BackupPath = $BackupDirectory + "\" + $BackupFile
        $RemoteBackupPath = $remoteSharedFolder + "\" + $BackupFile

        $SQL_BackupDatabase = "BACKUP DATABASE $DatabaseName TO DISK='$BackupPath' WITH INIT, COPY_ONLY, COMPRESSION;"

        #
        # Backup database to local path
        #
        Invoke-Sqlcmd -Query $SQL_BackupDatabase -ServerInstance $source -QueryTimeout 65535

        Write-Output "Database backed up to $BackupPath"

        $BackupPath = $BackupPath

        $BackupFile = [System.IO.Path]::GetFileName($BackupPath)

        $SQL_RestoreDatabase = "
            RESTORE DATABASE $DatabaseName
            FROM DISK='$RemoteBackupPath'
            WITH RECOVERY, REPLACE,
        "

        $SQL_RestoreFilelistOnly = "
            RESTORE FILELISTONLY
            FROM DISK='$RemoteBackupPath';
        "

        #
        # Move the backup to the destination
        #

        $remotesourcefile = $BackupPath.Substring(1, 2)
        $remotesourcefile = $BackupPath.Replace($remotesourcefile, $remotesourcefile.replace(":","$"))
        $remotesourcefile = "\\" + $sourceServerUNC + "\" + $remotesourcefile

        Write-Output "Moving $remotesourcefile to $sharedFolder"
        Move-Item $remotesourcefile $sharedFolder -Force

        #
        # Restore the backup on the destination
        #
        $i = 0
        Invoke-Sqlcmd -Query $SQL_RestoreFilelistOnly -ServerInstance $destination -QueryTimeout 65535 | ForEach-Object {
            $currentRow = $_
            $physicalName = [System.IO.Path]::GetFileName($CurrentRow.PhysicalName)
            if($CurrentRow.Type -eq "D") {
                $newName = $DefaultData + $physicalName
            }
            else {
                $newName = $DefaultLog + $physicalName
            }
            if($i -gt 0) {$SQL_RestoreDatabase += ","}
            $SQL_RestoreDatabase += " MOVE '$($CurrentRow.LogicalName)' TO '$NewName'"
            $i += 1
        }

        Write-Output "invoking restore command: $SQL_RestoreDatabase"
        Invoke-Sqlcmd -Query $SQL_RestoreDatabase -ServerInstance $destination -QueryTimeout 65535
        Write-Output "Restored database from $RemoteBackupPath"

        #
        # Delete the backup file
        #
        Write-Output "Deleting $($sharedFolder + "\" + $BackupFile) "
        Remove-Item $($sharedFolder + "\" + $BackupFile) -ErrorAction SilentlyContinue

    }
    catch {
       Write-Error $_
    }

}
It’s a quick’n’dirty script, I’m sure there might be something to fix here and there. Just drop a comment if you find something.
Extracting DACPACs from all databases with Powershell
If you are adopting Sql Server Data Tools as your election tool to maintain database projects under source control and achieve an ALM solution, at some stage you will probably want to import all your databases in SSDT.
Yes, it can be done by hand, one at a time, using either the “import live database” or “schema compare” features, but what I have found to be more convenient is the “import dacpac” feature.
Basically, you can extract a dacpac from a live database and then import it in SSDT, entering some options in the import dialog.
The main reason why I prefer this method is the reduced amount of manual steps involved. Moreover, the dacpac extraction process can be fully automated using sqlpackage.exe.
Recently I had to import a lot of databases in SSDT and found that sqlpackage can be used in a PowerShell script to automate the process even further:
#
# Extract DACPACs from all databases
#
# Author: Gianluca Sartori - @spaghettidba
# Date:   2013/02/13
# Purpose:
# Loop through all user databases and extract
# a DACPAC file in the working directory
#
#

Param(
    [Parameter(Position=0,Mandatory=$true)]
    [string]$ServerName
)

cls

try {
    if((Get-PSSnapin -Name SQlServerCmdletSnapin100 -ErrorAction SilentlyContinue) -eq $null){
        Add-PSSnapin SQlServerCmdletSnapin100
    }
}
catch {
    Write-Error "This script requires the SQLServerCmdletSnapIn100 snapin"
    exit
}

#
# Gather working directory (script path)
#
$script_path = Split-Path -Parent $MyInvocation.MyCommand.Definition

$sql = "
    SELECT name
    FROM sys.databases
    WHERE name NOT IN ('master', 'model', 'msdb', 'tempdb','distribution')
"

$data = Invoke-sqlcmd -Query $sql -ServerInstance $ServerName -Database master

$data | ForEach-Object {

    $DatabaseName = $_.name

    #
    # Run sqlpackage
    #
    &"C:\Program Files (x86)\Microsoft SQL Server\110\DAC\bin\sqlpackage.exe" `
        /Action:extract `
        /SourceServerName:$ServerName `
        /SourceDatabaseName:$DatabaseName `
        /TargetFile:$script_path\DACPACs\$DatabaseName.dacpac `
        /p:ExtractReferencedServerScopedElements=False `
        /p:IgnorePermissions=False

}
It’s a very simple script indeed, but it saved me a lot of time and I wanted to share it with you.
Unfortunately, there is no way to automate the import process in SSDT, but looks like Microsoft is actually looking into making this feature availabe in a future version.
Manual Log Shipping with PowerShell
Recently I had to implement log shipping as a HA strategy for a set of databases which were originally running under the simple recovery model.
Actually, the databases were subscribers for a merge publication, which leaves database mirroring out of the possible HA options. Clustering was not an option either, due to lack of shared storage at the subscribers.
After turning all databases to full recovery model and setting up log shipping, I started to wonder if there was a better way to implement it. Log shipping provides lots of flexibility, which I didn’t need: I just had to ship the transaction log from the primary to a single secondary and have transaction logs restored immediately. Preserving transaction log backups was not needed, because the secondary database was considered a sufficient backup in this case.
Another thing that I observed was the insane amount of memory consumed by SQLLogShip.exe (over 300 MB), which ended up even failing due to OutOfMemoryException at times.
After reading Edwin Sarmiento‘s fine chapter on SQL Server MVP Deep Dives “The poor man’s SQL Server log shipping”, some ideas started to flow.
First of all I needed a table to hold the configuration for my manual log shipping:
-- =============================================
-- Author:      Gianluca Sartori - @spaghettidba
-- Create date: 2013-02-07
-- Description: Creates a table to hold manual
--              log shipping configuration
-- =============================================

CREATE TABLE msdb.dbo.ManualLogShippingConfig (
    secondary sysname PRIMARY KEY CLUSTERED, -- Name of the secondary SQL Server instance
    sharedBackupFolder varchar(255),         -- UNC path to the backup path on the secondary
    remoteBackupFolder varchar(255)          -- Path to the backup folder on the secondary
                                             -- It's the same path as sharedBackupFolder,
                                             -- as seen from the secondary server
)
GO

INSERT INTO msdb.dbo.ManualLogShippingConfig (
    secondary,
    sharedBackupFolder,
    remoteBackupFolder
)
VALUES (
    'SomeServer',
    '\\SomeShare',
    'Local path of SomeShare on secondary'
)
GO
And then I just needed a PowerShell script to do the heavy lifting.
I think the code is commented and readable enough to show what happens behind the scenes.
## =============================================
## Author:      Gianluca Sartori - @spaghettidba
## Create date: 2013-02-07
## Description: Ships the log to a secondary server
## =============================================
sl c:\
$ErrorActionPreference = "Stop"

$primary = "$(ESCAPE_DQUOTE(SRVR))"

#
# Read Configuration from the table in msdb
#

$SQL_Config = @"
    SELECT * FROM msdb.dbo.ManualLogShippingConfig
"@

$info = Invoke-sqlcmd -Query $SQL_Config -ServerInstance $primary

$secondary = $info.secondary
$sharedFolder = $info.sharedBackupFolder
$remoteSharedFolder = $info.remoteBackupFolder

$ts = Get-Date -Format yyyyMMddHHmmss

#
# Read default backup path of the primary from the registry
#

$SQL_BackupDirectory = @"
    EXEC master.dbo.xp_instance_regread
        N'HKEY_LOCAL_MACHINE',
        N'Software\Microsoft\MSSQLServer\MSSQLServer',
        N'BackupDirectory'
"@

$info = Invoke-sqlcmd -Query $SQL_BackupDirectory -ServerInstance $primary

$BackupDirectory = $info.Data

#
# Ship the log of all databases in FULL recovery model
# You can change this to ship a single database's log
#

$SQL_FullRecoveryDatabases = @"
    SELECT name
    FROM master.sys.databases
    WHERE recovery_model_desc = 'FULL'
        AND name NOT IN ('master', 'model', 'msdb', 'tempdb')
"@

$info = Invoke-sqlcmd -Query $SQL_FullRecoveryDatabases -ServerInstance $primary

$info | ForEach-Object {

    $DatabaseName = $_.Name

    Write-Output "Processing database $DatabaseName"

    $BackupFile = $DatabaseName + "_" + $ts + ".trn"
    $BackupPath = Join-Path $BackupDirectory $BackupFile
    $RemoteBackupPath = Join-Path $remoteSharedFolder $BackupFile

    $SQL_BackupDatabase = "BACKUP LOG $DatabaseName TO DISK='$BackupPath' WITH INIT;"

    $SQL_NonCopiedBackups = "
        SELECT physical_device_name
        FROM msdb.dbo.backupset AS BS
        INNER JOIN msdb.dbo.backupmediaset AS BMS
            ON BS.media_set_id = BMS.media_set_id
        INNER JOIN msdb.dbo.backupmediafamily AS BMF
            ON BMS.media_set_id = BMF.media_set_id
        WHERE BS.database_name = '$DatabaseName'
            AND BS.type = 'L'
            AND expiration_date IS NULL
        ORDER BY BS.backup_start_date
    "

    #
    # Backup log to local path
    #
    Invoke-Sqlcmd -Query $SQL_BackupDatabase -ServerInstance $primary -QueryTimeout 65535

    Write-Output "LOG backed up to $BackupPath"

    #
    # Query noncopied backups...
    #
    $nonCopiedBackups = Invoke-Sqlcmd -Query $SQL_NonCopiedBackups -ServerInstance $primary

    $nonCopiedBackups | ForEach-Object {

        $BackupPath = $_.physical_device_name

        $BackupFile = Split-Path $BackupPath -Leaf

        $RemoteBackupPath = Join-Path $remoteSharedFolder $BackupFile

        $SQL_RestoreDatabase = "
            RESTORE LOG $DatabaseName
            FROM DISK='$RemoteBackupPath'
            WITH NORECOVERY;
        "

        $SQL_ExpireBackupSet = "
            UPDATE BS
            SET expiration_date = GETDATE()
            FROM msdb.dbo.backupset AS BS
            INNER JOIN msdb.dbo.backupmediaset AS BMS
                ON BS.media_set_id = BMS.media_set_id
            INNER JOIN msdb.dbo.backupmediafamily AS BMF
                ON BMS.media_set_id = BMF.media_set_id
            WHERE BS.database_name = '$DatabaseName'
                AND BS.type = 'L'
                AND physical_device_name = '$BackupPath'
        "

        #
        # Move the transaction log backup to the secondary
        #
        if (Test-Path $BackupPath) {
            Write-Output "Moving $BackupPath to $sharedFolder"
            Move-Item -Path ("Microsoft.PowerShell.Core\FileSystem::" + $BackupPath) -Destination ("Microsoft.PowerShell.Core\FileSystem::" + $sharedFolder) -Force
        }

        #
        # Restore the backup on the secondary
        #
        Invoke-Sqlcmd -Query $SQL_RestoreDatabase -ServerInstance $secondary -QueryTimeout 65535
        Write-Output "Restored LOG from $RemoteBackupPath"

        #
        # Delete the backup file
        #
        Write-Output "Deleting $RemoteBackupPath"
        Remove-Item $RemoteBackupPath -ErrorAction SilentlyContinue

        #
        # Mark the backup as expired
        #
        Write-Output "Expiring backup set $BackupPath"
        Invoke-Sqlcmd -Query $SQL_ExpireBackupSet -ServerInstance $primary

    }
}
The script can be used in a SQLAgent PowerShell job step and it’s all you need to start shipping your transaction logs.
Obviously, you need to take a full backup on the primary server and restore it to the secondary WITH NORECOVERY.
Once you’re ready, you can schedule the job to ship the transaction logs.
Typing the Backtick key on non-US Keyboards
You may be surprised to know that not all keyboard layouts include the backtick key, and if you happen to live in a country with such a layout and want to do some PowerShell coding, you’re in big trouble.
For many years all major programming languages took this layout mismatch into consideration and avoided the use of US-only keys in the language definition. Now, with PowerShell, serious issues arise for those that want to wrap their code on multiple lines and reach for the backtick key, staring hopelessly at an Italian keyboard.
See? No backtick.

The only way to type a key not present in your keyboard layout is using the numeric pad with the ALT key, so that, for instance, backtick becomes ALT+Numpad9+Numpad6.
This method is painful enough itself, but quickly becomes a nightmare when working on a laptop, where probably there’s no hardware numeric pad. This way, backtick becomes NumLock+ALT+Numpad9+Numpad6+NumLock.
OMG! 5 keys instead of 1! No way: we need to find a workaround!
If I can’t type the backtick directly, I can always build a small application that types that key for me. Even better, I could unleash my google-fu and find a ready-made one, such as Independent SendKeys.
This small application is able to send keystrokes to any application running on Windows, found by window title. When a blank window title is specified, the SendKeys interacts with the current active window and can send the backtick keystroke. When invoked with no arguments, it displays a help window, which allowed me to come out with this syntax:
sendkeys.exe 0 2 “” “`”
Now I just need to associate this command with one of the keys on my keyboard.
Some fancy keyboards come with special keys to open the web browser or the e-mail client, such as this one:

I have always found those keys nearly useless and I would happily barter one for the backtick key. The good news is that it can be done, even without one of those special keys on the keyboard
To change the behaviour of one of those keys, you just have to open the registry and navigate to HKEY_LOCAL_MACHINE\SOFTWARE\Microsoft\Windows\CurrentVersion\Explorer\AppKey. Typically, you should find 4 or 5 subkeys, that identify what Windows will do when one of those keys gets pressed.

In this case, I chose to replace the e-mail key with backtick, using the SendKeys application. It’s very easy: you just have to rename the “Association” REG_SZ into “_Association” (you can leave it there in case you decide to restore the original behaviour) and add a new string value ShellExecute = 0 2 “” “`”
With this registry hack in place, whenever you press the e-mail key, SendKeys types a backtick on the active window. Mission accomplished? Not completely: the e-mail key is not easy to use, because it was not meant for typing and you will probably find it slightly out of reach.
To type the backtick more easily, you need to immolate one of the other keys and make it act as if it was the e-mail key. In my case, the perfect candidate for the sacrifice is the ScrollLock key, which I don’t remember having used in 20 years. I’m sure I won’t miss it.
To teach Windows to swap the keys I would need to apply another registry hack, but it’s too complicated to use and explain, especially because there’s a nice little application that can do that for me.
SharpKeys is an application that can remap the keyboard and make a key act as if another key was pressed instead. It does not need to run in background or start with windows, because it’s just a user friendly interface for a registry hack. Once the hack is active, you can even uninstall it if you like.

In this screen capture, I set the ScrollLock key to act as the e-mail key. As you can see, SharpKeys always assumes you are using the US layout and displays the key accordingly, but the important thing is that it can recognize the correct scancode and remap it to the e-mail key.
The nice thing about this hack is that you can use it even if you don’t have the mapped key in your keyboard. In fact, on my laptop there’s no e-mail key at all.
After rempapping the keys, Windows will start typing backticks whenever you press the ScrollLock key.
Now you can focus on Powershell itself, not on memorizing ASCII codes!
EDIT 20/09/2011: In the first version of this post I suggested remapping the e-mail key to the § symbol (which is probably the most useless key on my keyboard), but, actually that would have mapped the WHOLE key, thus loosing the ability to type the “ù” char. That’s why I changed this post and decided to remap the ScrollLock key instead. My apologies to those who followed my advice and lost their “ù”.
EDIT 21/03/2019: The Microsoft Keyboard Layout Creator can help you create a custom keyboard layout that contains the backtick character mapped to any key combination you find appropriate. Go give it a try.
