Blog Archives
Life behind a proxy server: downloading content for SSMS Help Viewer
Life behind a proxy server can be problematic. Not every software out there is tested correctly for proxy interaction and oftentimes the experience for the corporate user is a bit frustrating.
I blogged about this before, regarding Powershell Gallery and regarding how to download and install content for the SSMS Help Viewer in SQL Server 2014 and SQL Server 2016.
When I tried to update my post for SQL Server 2017, I got stuck, because my “hack” stopped working with Help Viewer 2.3 and none of the things I tried was working. Bummer.
The problem:
Microsoft Help Viewer is unable to dowload the help content from the Microsoft website and if you click the error message on the bottom left of the status bar, it shows an error similar to this: “The web server has reported an error for https://services.mtps.microsoft.com/ServiceAPI/catalogs/Dev15/en-US: ProtocolIError/ProxyAuthenticationRequired“
How to fix it:
But there had to be a better way to do this and, I fiddled with it until I got it to work. Basically, all you have to do is instruct your applications to use a proxy server, with default authentication.
Discover what proxy server you are using: sometimes the proxy configuration only contains the URL of the autoconfiguration script (the pac file), but you don’t know what proxy is effectively in use. To display this information, open a cmd prompt and run this:netsh winhttp show proxy
You should see an output similar to this:
Current WinHTTP proxy settings:

    Proxy Server(s) :  http=proxy.mycompany.lan:8090
    Bypass List     :  (none)
Add the proxy information to the following text fragment and copy it to the clipboard:
<system.net>
    <settings>
        <ipv6 enabled="true" />
    </settings>
    <defaultProxy enabled="true" useDefaultCredentials="true">
        <proxy bypassonlocal="True" proxyaddress="http://MyProxyServer:MyProxyPort"/>
    </defaultProxy>
</system.net>
Run your favourite text editor as Administrator and open the following files in the Help Viewer installation folder (on my computer it’s "C:\Program Files (x86)\Microsoft Help Viewer\v2.3"):
HlpCtntMgr.exe.configHlpViewer.exe.config
Add the text fragment to both files, inside the <configuration> tag.
This is enough to let the the Help Viewer UI download and display the list of available content from the Microsoft website. Unfortunately, the actual transfer operation is performed by the BITS service, which has to be intructed to use a proxy server and complains with the following error message: “an error occurred while the bits service was transferring“.
This is done by changing a registry value. The key is the following:HKEY_LOCAL_MACHINE\SOFTWARE\Microsoft\Windows\CurrentVersion\BITS
And the value is UseLmCompat, which has to be set to 0.
You can do this easily by saving the following lines to a text file, save it with the .reg extension and merge it to you registry by double clicking.
Windows Registry Editor Version 5.00

[HKEY_LOCAL_MACHINE\SOFTWARE\Microsoft\Windows\CurrentVersion\BITS]
"UseLmCompat"=dword:00000000
Restart the BITS service (Background Intelligent Transfer Service).
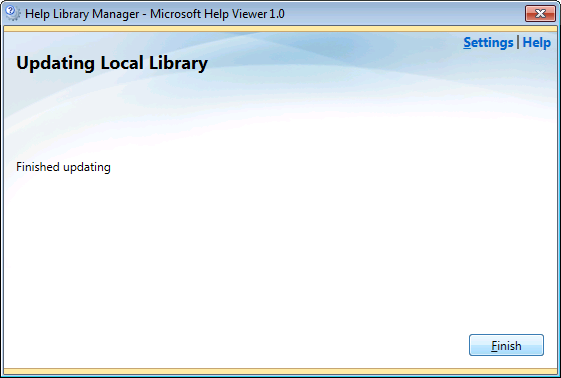
Now you can go ahead and update you help library. Enjoy!
Installing SQL Server 2016 Language Reference Help from disk
A couple of years ago I blogged about Installing the SQL Server 2014 Language Reference Help from disk.
With SQL Server 2016 things changed significantly: we have the new Help Viewer 2.2, which is shipped with the Management Studio setup kit.
However, despite all the changes in the way help works and is shipped, I am still unable to download and install help content from the web, so I resorted to using the same trick that I used for SQL Server 2014.
This time the URLs and the files to download are different:
- Point your browser to http://services.mtps.microsoft.com/ServiceAPI/catalogs/sql2016/en-us
- Download the Language Reference Files:
If you’re a PowerShell person, these three lines will do:
Invoke-WebRequest -Uri "http://packages.mtps.microsoft.com/sql_2016_branding_en-us(1bd6e667-f159-ac3b-f0a5-964c04ca5a13).cab" `
	-OutFile "sql_2016_branding_en-us(1bd6e667-f159-ac3b-f0a5-964c04ca5a13).cab"
Invoke-WebRequest -Uri "http://packages.mtps.microsoft.com/v2sql_shared_language_reference_b4621_sql_130_en-us_1(83748a56-8810-751f-d453-00c5accc862d).cab" `
	-OutFile "v2sql_shared_language_reference_b4621_sql_130_en-us_1(83748a56-8810-751f-d453-00c5accc862d).cab"
Invoke-WebRequest -Uri "http://packages.mtps.microsoft.com/v2sql_shared_language_reference_b4621_sql_130_en-us_2(ccc38276-b744-93bd-9008-fe79b294ff41).cab" `
	-OutFile "v2sql_shared_language_reference_b4621_sql_130_en-us_2(ccc38276-b744-93bd-9008-fe79b294ff41).cab"
- Create a text file name HelpContentSetup.msha in the same folder as the .cab files and paste the following html:
<html xmlns="http://www.w3.org/1999/xhtml">
<head />
<body class="vendor-book">
    <div class="details">
        <span class="vendor">Microsoft</span>
        <span class="locale">en-us</span>
        <span class="product">SQL Server 2016</span>
        <span class="name">Microsoft SQL Server Language Reference</span>
    </div>
    <div class="package-list">
        <div class="package">
            <span class="name">SQL_2016_Branding_en-US</span>
            <span class="deployed">False</span>
            <a class="current-link" href="sql_2016_branding_en-us(1bd6e667-f159-ac3b-f0a5-964c04ca5a13).cab">sql_2016_branding_en-us(1bd6e667-f159-ac3b-f0a5-964c04ca5a13).cab</a>
        </div>
        <div class="package">
            <span class="name">v2SQL_Shared_Language_Reference_B4621_SQL_130_en-us_1</span>
            <span class="deployed">False</span>
            <a class="current-link" href="v2sql_shared_language_reference_b4621_sql_130_en-us_1(83748a56-8810-751f-d453-00c5accc862d).cab">v2sql_shared_language_reference_b4621_sql_130_en-us_1(83748a56-8810-751f-d453-00c5accc862d).cab</a>
        </div>
        <div class="package">
            <span class="name">v2SQL_Shared_Language_Reference_B4621_SQL_130_en-us_2</span>
            <span class="deployed">False</span>
            <a class="current-link" href="v2sql_shared_language_reference_b4621_sql_130_en-us_2(ccc38276-b744-93bd-9008-fe79b294ff41).cab">v2sql_shared_language_reference_b4621_sql_130_en-us_2(ccc38276-b744-93bd-9008-fe79b294ff41).cab</a>
        </div>
    </div>
</body>
</html>
- First, set the Help Viewer to open help from the local sources:
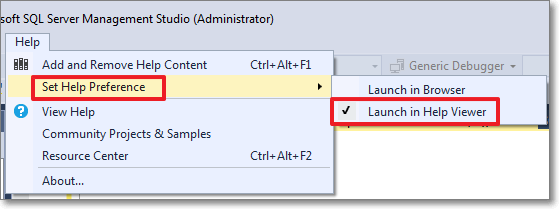
- Then select the “Add and Remove Help Content” command:

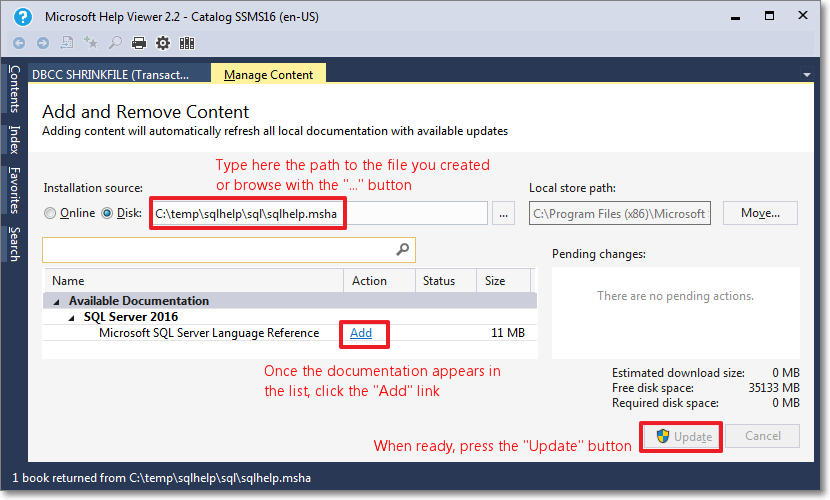
- This command opens the Help Viewer and asks for the content to add.
Browse to the file you created in step 3.
Click “Add” on all the items you wish to add to the library. In this case you will have only 1 item.
When done, click the “Update” button.
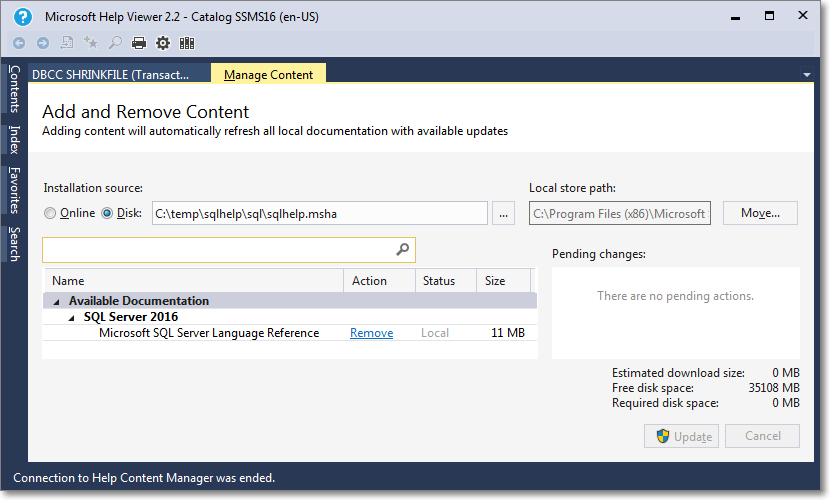
- Unfortunately, during the installation phase of the library item, something crashes and the installation won’t proceed until you tell it to ignore or report the error.

- Despite the crash, everything works as expected and you will find the topic installed in your help library:
Here it is, nice and easy. Hope it works for you too.
Installing SQL Server 2014 Language Reference Help from disk
Some weeks ago I had to wipe my machine and reinstall everything from scratch, SQL Server included.
For some reason that I still don’t understand, SQL Server Management Studio installed fine, but I couldn’t install Books Online from the online help repository. Unfortunately, installing from offline is not an option with SQL Server 2014, because the installation media doesn’t include the Language Reference documentation.
The issue is well known: Aaron Bertrand blogged about it back in april when SQL Server 2014 came out and he updated his post in august when the documentation was finally completely published. He also blogged about it at SQLSentry.
However, I couldn’t get that method to work: the Help Library Manager kept firing errors as soon as I clicked the “Install from Online” link. The error message was “An exception has occurred. See the event log for details.”
Needless to say that the event log had no interesting information to add.
If you are experiencing the same issue, here is a method to install the language reference from disk without downloading the help content from the Help Library Manager:
1 . Open a web browser and point it to the following url: http://services.mtps.microsoft.com/ServiceAPI/products/dd433097/dn632688/books/dn754848/en-us
2. Download the individual .cab files listed in that page to a location in your disk (e.g. c:\temp\langref\)
3. Create a text file name HelpContentSetup.msha in the same folder as the .cab files and paste the following html:
<html xmlns="http://www.w3.org/1999/xhtml">
<head />
<body class="vendor-book">
    <div class="details">
        <span class="vendor">Microsoft</span>
        <span class="locale">en-us</span>
        <span class="product">SQL Server 2014</span>
        <span class="name">Microsoft SQL Server Language Reference</span>
    </div>
    <div class="package-list">
        <div class="package">
            <span class="name">SQL_Server_2014_Books_Online_B4164_SQL_120_en-us_1</span>
            <span class="deployed">False</span>
            <a class="current-link" href="sql_server_2014_books_online_b4164_sql_120_en-us_1(0b10b277-ad40-ef9d-0d66-22173fb3e568).cab">sql_server_2014_books_online_b4164_sql_120_en-us_1(0b10b277-ad40-ef9d-0d66-22173fb3e568).cab</a>
        </div>
        <div class="package">
            <span class="name">SQL_Server_2014_Microsoft_SQL_Server_Language_Reference_B4246_SQL_120_en-us_1</span>
            <span class="deployed">False</span>
            <a class="current-link" href="sql_server_2014_microsoft_sql_server_language_reference_b4246_sql_120_en-us_1(5c1ad741-d0e3-a4a8-d9c0-057e2ddfa6e1).cab">sql_server_2014_microsoft_sql_server_language_reference_b4246_sql_120_en-us_1(5c1ad741-d0e3-a4a8-d9c0-057e2ddfa6e1).cab</a>
        </div>
        <div class="package">
            <span class="name">SQL_Server_2014_Microsoft_SQL_Server_Language_Reference_B4246_SQL_120_en-us_2</span>
            <span class="deployed">False</span>
            <a class="current-link" href="sql_server_2014_microsoft_sql_server_language_reference_b4246_sql_120_en-us_2(24815f90-9e36-db87-887b-cf20727e5e73).cab">sql_server_2014_microsoft_sql_server_language_reference_b4246_sql_120_en-us_2(24815f90-9e36-db87-887b-cf20727e5e73).cab</a>
        </div>
    </div>
</body>
</html>
4 . Open the Help Library Manager and select “Install content from disk”
5. Browse to the .msha you just created and click Next

6. The SQL Server 2014 node will appear. Click the Add link
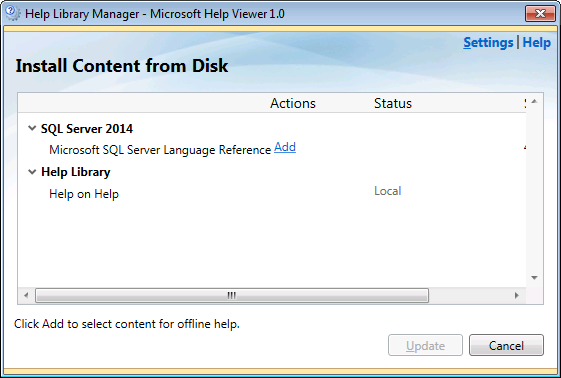
7. Click the Update button and let the installation start

8. Installation will start and process the cab files

9. Installation finished!
9. To check whether everything is fine, click on the “remove content” link and you should see the documentation.

Done! It was easy after all, wasn’t it?
