Blog Archives
Life behind a proxy server: downloading content for SSMS Help Viewer
Life behind a proxy server can be problematic. Not every software out there is tested correctly for proxy interaction and oftentimes the experience for the corporate user is a bit frustrating.
I blogged about this before, regarding Powershell Gallery and regarding how to download and install content for the SSMS Help Viewer in SQL Server 2014 and SQL Server 2016.
When I tried to update my post for SQL Server 2017, I got stuck, because my “hack” stopped working with Help Viewer 2.3 and none of the things I tried was working. Bummer.
The problem:
Microsoft Help Viewer is unable to dowload the help content from the Microsoft website and if you click the error message on the bottom left of the status bar, it shows an error similar to this: “The web server has reported an error for https://services.mtps.microsoft.com/ServiceAPI/catalogs/Dev15/en-US: ProtocolIError/ProxyAuthenticationRequired“
How to fix it:
But there had to be a better way to do this and, I fiddled with it until I got it to work. Basically, all you have to do is instruct your applications to use a proxy server, with default authentication.
Discover what proxy server you are using: sometimes the proxy configuration only contains the URL of the autoconfiguration script (the pac file), but you don’t know what proxy is effectively in use. To display this information, open a cmd prompt and run this:netsh winhttp show proxy
You should see an output similar to this:
Current WinHTTP proxy settings:

    Proxy Server(s) :  http=proxy.mycompany.lan:8090
    Bypass List     :  (none)
Add the proxy information to the following text fragment and copy it to the clipboard:
<system.net>
    <settings>
        <ipv6 enabled="true" />
    </settings>
    <defaultProxy enabled="true" useDefaultCredentials="true">
        <proxy bypassonlocal="True" proxyaddress="http://MyProxyServer:MyProxyPort"/>
    </defaultProxy>
</system.net>
Run your favourite text editor as Administrator and open the following files in the Help Viewer installation folder (on my computer it’s "C:\Program Files (x86)\Microsoft Help Viewer\v2.3"):
HlpCtntMgr.exe.configHlpViewer.exe.config
Add the text fragment to both files, inside the <configuration> tag.
This is enough to let the the Help Viewer UI download and display the list of available content from the Microsoft website. Unfortunately, the actual transfer operation is performed by the BITS service, which has to be intructed to use a proxy server and complains with the following error message: “an error occurred while the bits service was transferring“.
This is done by changing a registry value. The key is the following:HKEY_LOCAL_MACHINE\SOFTWARE\Microsoft\Windows\CurrentVersion\BITS
And the value is UseLmCompat, which has to be set to 0.
You can do this easily by saving the following lines to a text file, save it with the .reg extension and merge it to you registry by double clicking.
Windows Registry Editor Version 5.00

[HKEY_LOCAL_MACHINE\SOFTWARE\Microsoft\Windows\CurrentVersion\BITS]
"UseLmCompat"=dword:00000000
Restart the BITS service (Background Intelligent Transfer Service).
Now you can go ahead and update you help library. Enjoy!
Installing SQL Server 2016 Language Reference Help from disk
A couple of years ago I blogged about Installing the SQL Server 2014 Language Reference Help from disk.
With SQL Server 2016 things changed significantly: we have the new Help Viewer 2.2, which is shipped with the Management Studio setup kit.
However, despite all the changes in the way help works and is shipped, I am still unable to download and install help content from the web, so I resorted to using the same trick that I used for SQL Server 2014.
This time the URLs and the files to download are different:
- Point your browser to http://services.mtps.microsoft.com/ServiceAPI/catalogs/sql2016/en-us
- Download the Language Reference Files:
If you’re a PowerShell person, these three lines will do:
Invoke-WebRequest -Uri "http://packages.mtps.microsoft.com/sql_2016_branding_en-us(1bd6e667-f159-ac3b-f0a5-964c04ca5a13).cab" `
	-OutFile "sql_2016_branding_en-us(1bd6e667-f159-ac3b-f0a5-964c04ca5a13).cab"
Invoke-WebRequest -Uri "http://packages.mtps.microsoft.com/v2sql_shared_language_reference_b4621_sql_130_en-us_1(83748a56-8810-751f-d453-00c5accc862d).cab" `
	-OutFile "v2sql_shared_language_reference_b4621_sql_130_en-us_1(83748a56-8810-751f-d453-00c5accc862d).cab"
Invoke-WebRequest -Uri "http://packages.mtps.microsoft.com/v2sql_shared_language_reference_b4621_sql_130_en-us_2(ccc38276-b744-93bd-9008-fe79b294ff41).cab" `
	-OutFile "v2sql_shared_language_reference_b4621_sql_130_en-us_2(ccc38276-b744-93bd-9008-fe79b294ff41).cab"
- Create a text file name HelpContentSetup.msha in the same folder as the .cab files and paste the following html:
<html xmlns="http://www.w3.org/1999/xhtml">
<head />
<body class="vendor-book">
    <div class="details">
        <span class="vendor">Microsoft</span>
        <span class="locale">en-us</span>
        <span class="product">SQL Server 2016</span>
        <span class="name">Microsoft SQL Server Language Reference</span>
    </div>
    <div class="package-list">
        <div class="package">
            <span class="name">SQL_2016_Branding_en-US</span>
            <span class="deployed">False</span>
            <a class="current-link" href="sql_2016_branding_en-us(1bd6e667-f159-ac3b-f0a5-964c04ca5a13).cab">sql_2016_branding_en-us(1bd6e667-f159-ac3b-f0a5-964c04ca5a13).cab</a>
        </div>
        <div class="package">
            <span class="name">v2SQL_Shared_Language_Reference_B4621_SQL_130_en-us_1</span>
            <span class="deployed">False</span>
            <a class="current-link" href="v2sql_shared_language_reference_b4621_sql_130_en-us_1(83748a56-8810-751f-d453-00c5accc862d).cab">v2sql_shared_language_reference_b4621_sql_130_en-us_1(83748a56-8810-751f-d453-00c5accc862d).cab</a>
        </div>
        <div class="package">
            <span class="name">v2SQL_Shared_Language_Reference_B4621_SQL_130_en-us_2</span>
            <span class="deployed">False</span>
            <a class="current-link" href="v2sql_shared_language_reference_b4621_sql_130_en-us_2(ccc38276-b744-93bd-9008-fe79b294ff41).cab">v2sql_shared_language_reference_b4621_sql_130_en-us_2(ccc38276-b744-93bd-9008-fe79b294ff41).cab</a>
        </div>
    </div>
</body>
</html>
- First, set the Help Viewer to open help from the local sources:
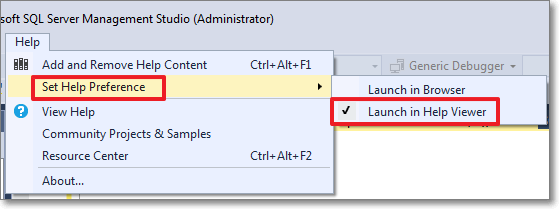
- Then select the “Add and Remove Help Content” command:

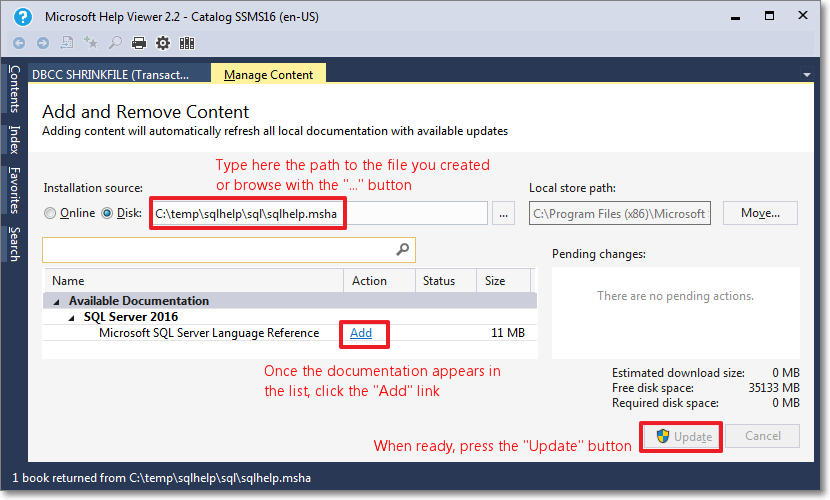
- This command opens the Help Viewer and asks for the content to add.
Browse to the file you created in step 3.
Click “Add” on all the items you wish to add to the library. In this case you will have only 1 item.
When done, click the “Update” button.
- Unfortunately, during the installation phase of the library item, something crashes and the installation won’t proceed until you tell it to ignore or report the error.

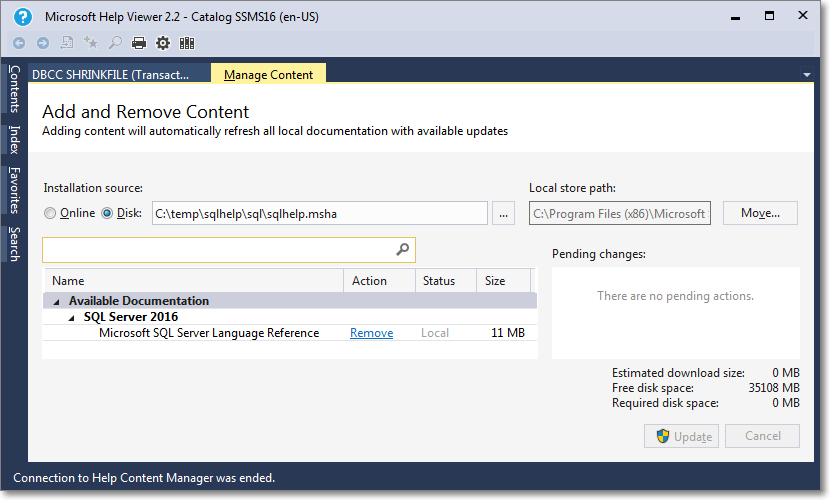
- Despite the crash, everything works as expected and you will find the topic installed in your help library:
Here it is, nice and easy. Hope it works for you too.
SSMS is now High-DPI ready
One of the most popular posts on this bog describes how to enable bitmap scaling is SSMS on high DPI displays, which is a sign that more and more people are starting to use 4K displays and are unhappy with SSMS’s behaviour at high DPI. The solution described in that post is to enable bitmap scaling, which renders graphic objects correctly, at the price of some blurriness.
The good news is that starting with SSMS 16.3 high DPI displays are finally first class citizens and SSMS does its best to scale objects properly. By default, SSMS will keep using bitmap scaling: in order to enable DPI scaling you will have to use a manifest file.
- Merge this key to your registry:
Windows Registry Editor Version 5.00[HKEY_LOCAL_MACHINE\SOFTWARE\Microsoft\Windows\CurrentVersion\SideBySide]
"PreferExternalManifest"=dword:00000001
- Save this manifest file to “C:\Program Files (x86)\Microsoft SQL Server\130\Tools\Binn\ManagementStudio\Ssms.exe.manifest” using UTF-8 format:
<?xml version="1.0" encoding="UTF-8" standalone="yes"?>
<assembly xmlns="urn:schemas-microsoft-com:asm.v1" manifestVersion="1.0" xmlns:asmv3="urn:schemas-microsoft-com:asm.v3">
    <asmv3:application>
        <asmv3:windowsSettings xmlns="http://schemas.microsoft.com/SMI/2005/WindowsSettings">
            <dpiAware>True</dpiAware>
        </asmv3:windowsSettings>
    </asmv3:application>
    <dependency>
        <dependentAssembly>
            <assemblyIdentity type="win32" name="Microsoft.Windows.Common-Controls" version="6.0.0.0" processorArchitecture="X86" publicKeyToken="6595b64144ccf1df" language="*" />
        </dependentAssembly>
    </dependency>
    <dependency>
        <dependentAssembly>
            <assemblyIdentity type="win32" name="debuggerproxy.dll" processorArchitecture="X86" version="1.0.0.0"></assemblyIdentity>
        </dependentAssembly>
    </dependency>
</assembly>
This is a huge improvement over the bitmap scaling solution we had to use up to now: no more blurriness and proper fonts are used in SSMS.
For comparison, this is how bitmap scaling renders in SSMS 2014:

And this is how DPI scaling renders is SSMS 16.3, with scaling set to 200%:

As you can see, it’s not perfect yet (for instance, I had to change the grid font size to 9pt. in order to have readable fonts).
However, the GUI is much more readable now. For instance, look at the difference in object explorer: (click on the image to open fullsize and see the difference)
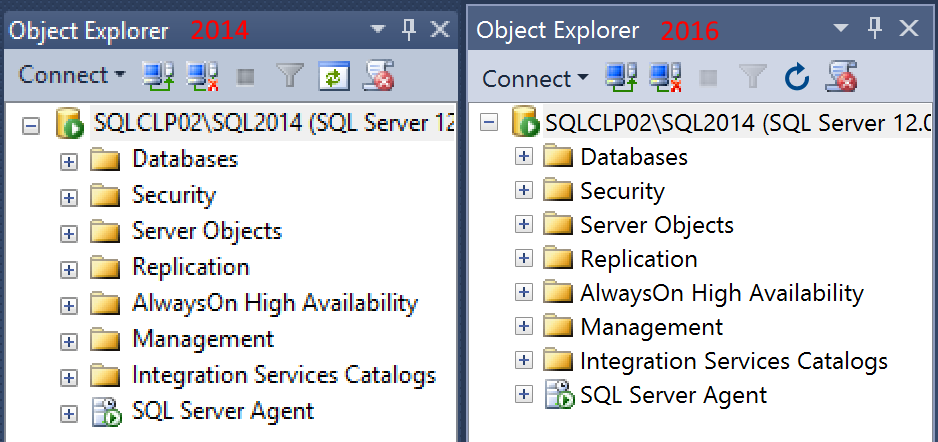
Now that your favourite tool is working in high DPI displays, nothing is holding you back from buying one of those fancy 4K laptops!
An annoying Bug in the Restore Dialog
Today, thanks to a customer, I discovered one of those annoying little things that can really drive you nuts.
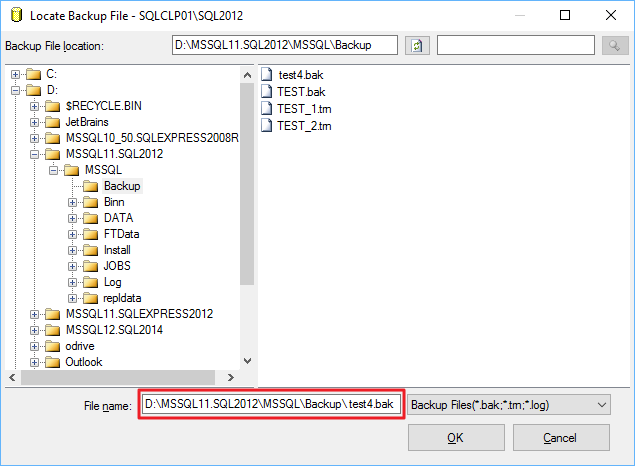
Basically, they were trying to restore a backup using the SSMS Restore Database window and they kept getting “No backupset selected to be restored” whenever a backup file was selected.
You just had to select a file for restore and click OK…

… to be met with an error message in the Restore Database window:

The weird thing about it is that the backup file restored perfectly fine from a T-SQL script:
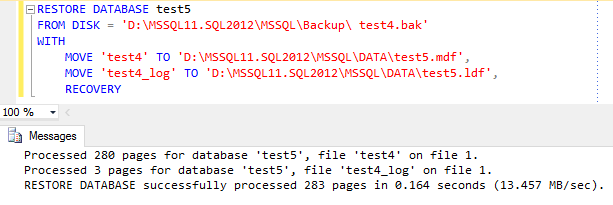
So it had to be something wrong with SSMS, but what?
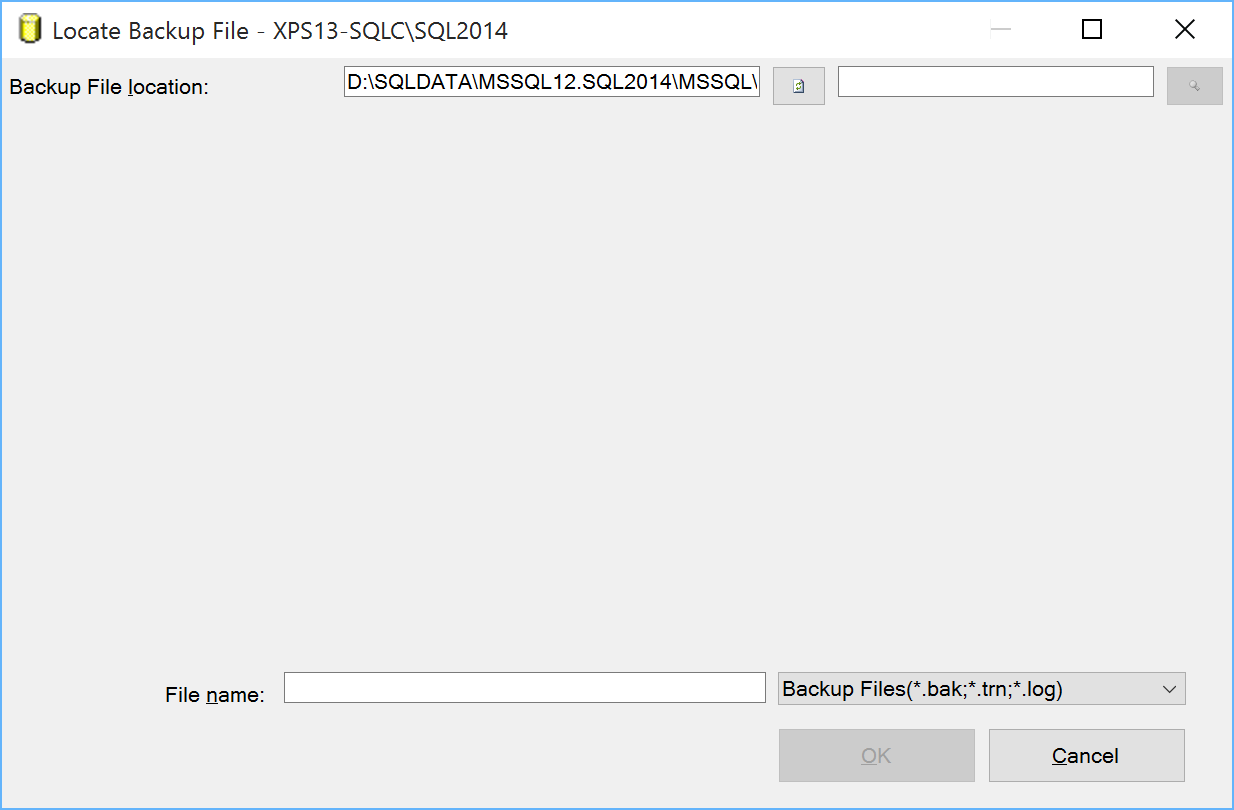
Looking closer at the restore script, one thing stands out. Look at the file name:

Yep, there’s a leading whitespace in the file name. Could that be the source of the problem?
Let’s try again with the GUI in a slightly different way. This time I will copy the folder path from the “Backup File Location” textbox…

… and paste it directly in the “File name” textbox, right before the file name:
This time everything works as expected.
Bottom line:
- This is a bug in SSMS: go on and vote this Connect item to have it fixed in a future version.
- Don’t use the GUI to restore a database.
- Don’t use the GUI at all.
SSMS in High-DPI Displays: How to Stop the Madness
I spent the last few weeks travelling a lot compared to my usual routine and I got quickly fed up with bringing my mobile workstation with me. My Dell precision M4600 is a powerhouse, but it’s definitely too big and too heavy for travelling, so I decided it was time to buy a small laptop just for travelling and presenting at SQL Saturdays and events around Europe.
After lots of research, I pulled the trigger on a new XPS13. It’s a very nice, tiny and light machine, beefy enough to run my virtual machines and slim enough to fit in a small bag.
So, everything fine? Not quite. The XPS13 2015 sports a stunning QHD touch display, with almost no bezel: a small wonder. The only complaint with it is windows and its (in)ability to scale applications when running at High DPI.
Windows got better at scaling applications on HiDPI displays and Windows 10 is doing a remarkably good job at scaling applications that can actually scale. I am running at maximum resolution (3200 x 1800) with 200% scale factor and, for instance, Visual Studio 2015 renders perfectly:

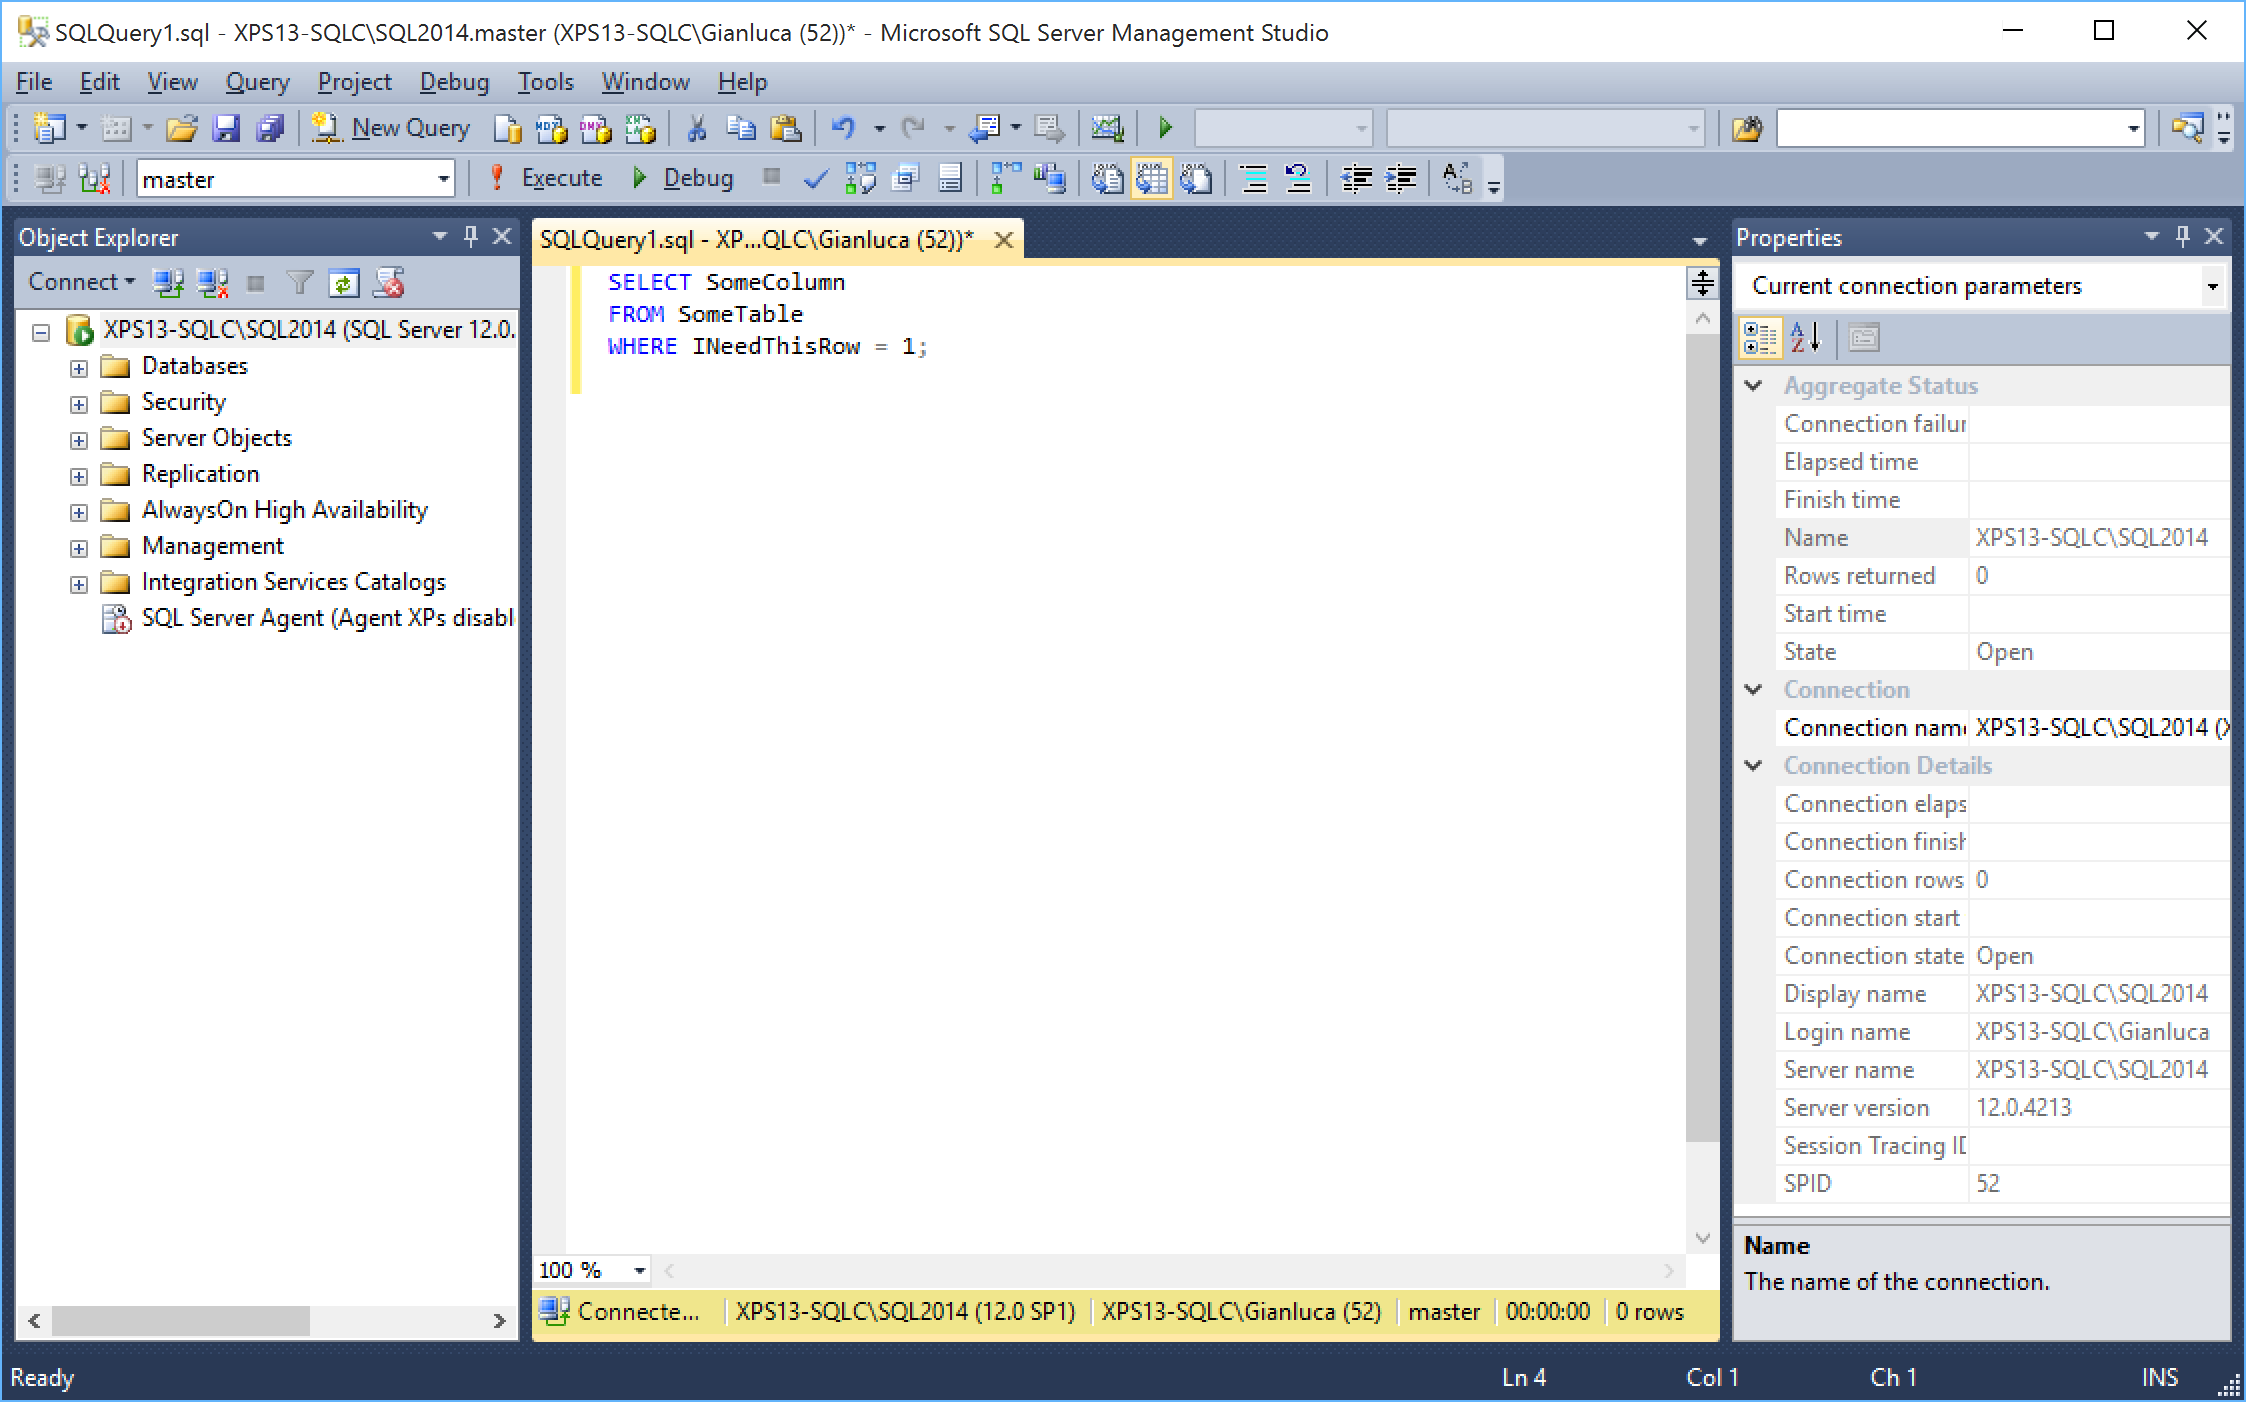
Other applications scale horribly. For instance, SSMS (SQL Server Management Studio) 2014 is a complete disaster:
At a first glance, it looks ok, but look at those icons on the Object Explorer tree: aren’t they a little bit too small compared to the labels next to them?
I can live with small icons, but you just need to open some dialog windows to understand how bad things really are:
As you can see, text gets scaled correctly, but the size of the window and some controls are completely wrong.
While some dialog windows are easily fixed by resizing them, some other are completely unusable. For instance, the restore database dialog, when locating a backup file, looks like this:
I’m not the first one to discover this kind of issues: Scott Hanselman posted his impressions quite a long time ago, but he offered no solution.
There’s also a Connect item that describes this issue, but… ok, you know what I’m about to say.
A new hope from an old technique
In Windows Vista, you had two possible ways of scaling applications: with the first one (the default) applications were instructed to scale their objects using the scaling factor imposed by the operating system. The results, depending on the quality of the application and the Windows version, could vary a lot. Some scaled correctly, some other look very similar to what we are seeing in SSMS, with some weird-looking GUIs. In Vista, this option was called “XP style DPI scaling”.
The second option, which you could activate by unchecking the “XP style” checkbox, involved drawing the graphical components of the GUI to an off-screen buffer and then drawing them back to the display, scaling the whole thing up to the screen resolution. This option is called “bitmap scaling” and the result is a perfectly laid out GUI:
In order to enable this option in Windows 10, you need to merge this key to your registry:
Windows Registry Editor Version 5.00

[HKEY_LOCAL_MACHINE\SOFTWARE\Microsoft\Windows\CurrentVersion\SideBySide]
"PreferExternalManifest"=dword:00000001
Then, the application has to be decorated with a manifest file that instructs Windows to disable DPI scaling and enable bitmap scaling, by declaring the application as DPI unaware. The manifest file has to be saved in the same folder as the executable (ssms.exe) and its name must be ssms.exe.manifest. In this case, for SSMS 2014, the file path is “C:\Program Files (x86)\Microsoft SQL Server\120\Tools\Binn\ManagementStudio\Ssms.exe.manifest”.
Paste this text inside the manifest file and save it in UTF8 encoding:
<?xml version="1.0" encoding="UTF-8" standalone="yes"?>

<assembly xmlns="urn:schemas-microsoft-com:asm.v1" manifestVersion="1.0" xmlns:asmv3="urn:schemas-microsoft-com:asm.v3">

<dependency>
  <dependentAssembly>
    <assemblyIdentity type="win32" name="Microsoft.Windows.Common-Controls" version="6.0.0.0" processorArchitecture="*" publicKeyToken="6595b64144ccf1df" language="*">
    </assemblyIdentity>
  </dependentAssembly>
</dependency>

<dependency>
  <dependentAssembly>
    <assemblyIdentity type="win32" name="Microsoft.VC90.CRT" version="9.0.21022.8" processorArchitecture="amd64" publicKeyToken="1fc8b3b9a1e18e3b">
    </assemblyIdentity>
  </dependentAssembly>
</dependency>

<trustInfo xmlns="urn:schemas-microsoft-com:asm.v3">
  <security>
    <requestedPrivileges>
      <requestedExecutionLevel level="asInvoker" uiAccess="false"/>
    </requestedPrivileges>
  </security>
</trustInfo>

<asmv3:application>
  <asmv3:windowsSettings xmlns="http://schemas.microsoft.com/SMI/2005/WindowsSettings">
    <ms_windowsSettings:dpiAware xmlns:ms_windowsSettings="http://schemas.microsoft.com/SMI/2005/WindowsSettings">false</ms_windowsSettings:dpiAware>
  </asmv3:windowsSettings>
</asmv3:application>

</assembly>
This “Vista style” bitmap scaling is very similar to what Apple is doing on his Retina displays, except that Apple uses a different font rendering algorithm that looks better when scaled up. If you use this technique in Windows, ClearType rendering is performed on the off-screen buffer before upscaling, so the final result might look a bit blurry.
The amount of blurriness you will see depends on the scale factor you set in the control panel or in the settings app in Windows 10. Needless to say that exact pixel scaling looks better, so prefer 200% over 225% or 250% scale factors, because there is no such thing as “half pixel”.
Seeing is believing:

Bitmap scaling at 200%

Bitmap scaling at 225%

Bitmap scaling at 250%
That’s it: nice and easy. Enjoy your High DPI lifestyle, until Microsoft comes up with a better solution (or a better SSMS).
Installing SQL Server 2014 Language Reference Help from disk
Some weeks ago I had to wipe my machine and reinstall everything from scratch, SQL Server included.
For some reason that I still don’t understand, SQL Server Management Studio installed fine, but I couldn’t install Books Online from the online help repository. Unfortunately, installing from offline is not an option with SQL Server 2014, because the installation media doesn’t include the Language Reference documentation.
The issue is well known: Aaron Bertrand blogged about it back in april when SQL Server 2014 came out and he updated his post in august when the documentation was finally completely published. He also blogged about it at SQLSentry.
However, I couldn’t get that method to work: the Help Library Manager kept firing errors as soon as I clicked the “Install from Online” link. The error message was “An exception has occurred. See the event log for details.”
Needless to say that the event log had no interesting information to add.
If you are experiencing the same issue, here is a method to install the language reference from disk without downloading the help content from the Help Library Manager:
1 . Open a web browser and point it to the following url: http://services.mtps.microsoft.com/ServiceAPI/products/dd433097/dn632688/books/dn754848/en-us
2. Download the individual .cab files listed in that page to a location in your disk (e.g. c:\temp\langref\)
3. Create a text file name HelpContentSetup.msha in the same folder as the .cab files and paste the following html:
<html xmlns="http://www.w3.org/1999/xhtml">
<head />
<body class="vendor-book">
    <div class="details">
        <span class="vendor">Microsoft</span>
        <span class="locale">en-us</span>
        <span class="product">SQL Server 2014</span>
        <span class="name">Microsoft SQL Server Language Reference</span>
    </div>
    <div class="package-list">
        <div class="package">
            <span class="name">SQL_Server_2014_Books_Online_B4164_SQL_120_en-us_1</span>
            <span class="deployed">False</span>
            <a class="current-link" href="sql_server_2014_books_online_b4164_sql_120_en-us_1(0b10b277-ad40-ef9d-0d66-22173fb3e568).cab">sql_server_2014_books_online_b4164_sql_120_en-us_1(0b10b277-ad40-ef9d-0d66-22173fb3e568).cab</a>
        </div>
        <div class="package">
            <span class="name">SQL_Server_2014_Microsoft_SQL_Server_Language_Reference_B4246_SQL_120_en-us_1</span>
            <span class="deployed">False</span>
            <a class="current-link" href="sql_server_2014_microsoft_sql_server_language_reference_b4246_sql_120_en-us_1(5c1ad741-d0e3-a4a8-d9c0-057e2ddfa6e1).cab">sql_server_2014_microsoft_sql_server_language_reference_b4246_sql_120_en-us_1(5c1ad741-d0e3-a4a8-d9c0-057e2ddfa6e1).cab</a>
        </div>
        <div class="package">
            <span class="name">SQL_Server_2014_Microsoft_SQL_Server_Language_Reference_B4246_SQL_120_en-us_2</span>
            <span class="deployed">False</span>
            <a class="current-link" href="sql_server_2014_microsoft_sql_server_language_reference_b4246_sql_120_en-us_2(24815f90-9e36-db87-887b-cf20727e5e73).cab">sql_server_2014_microsoft_sql_server_language_reference_b4246_sql_120_en-us_2(24815f90-9e36-db87-887b-cf20727e5e73).cab</a>
        </div>
    </div>
</body>
</html>
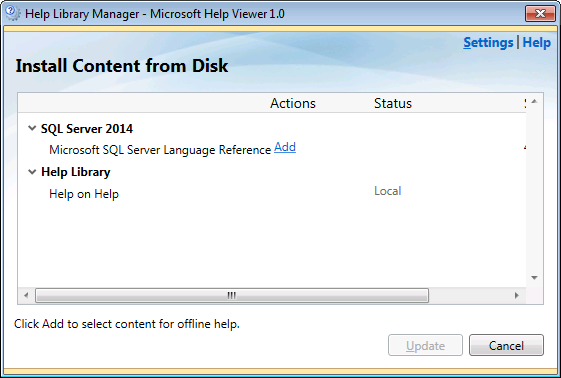
4 . Open the Help Library Manager and select “Install content from disk”
5. Browse to the .msha you just created and click Next

6. The SQL Server 2014 node will appear. Click the Add link
7. Click the Update button and let the installation start

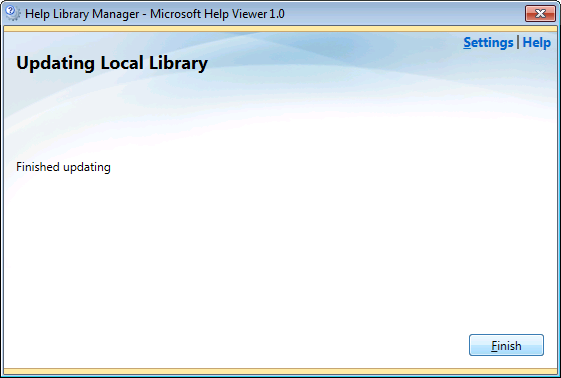
8. Installation will start and process the cab files

9. Installation finished!
9. To check whether everything is fine, click on the “remove content” link and you should see the documentation.

Done! It was easy after all, wasn’t it?
Open SSMS Query Results in Excel with a Single Click
The problem
One of the tasks that I often have to complete is manipulate some data in Excel, starting from the query results in SSMS.
Excel is a very convenient tool for one-off reports, quick data manipulation, simple charts.
Unfortunately, SSMS doesn’t ship with a tool to export grid results to Excel quickly.
Excel offers some ways to import data from SQL queries, but none of those offers the rich query tools available in SSMS. A representative example is Microsoft Query: how am I supposed to edit a query in a text editor like this?

Enough said.
Actually, there are many ways to export data from SQL Server to Excel, including SSIS packages and the Import/Export wizard. Again, all those methods require writing your queries in a separate tool, often with very limited editing capabilities.
PowerQuery offers great support for data exploration, but it is a totally different beast and I don’t see it as an alternative to running SQL queries directly.
The solution
How can I edit my queries taking advantage of the query editing features of SSMS, review the results and then format the data directly in Excel?
The answer is SSMS cannot do that, but, fortunately, the good guys at Solutions Crew brought you a great tool that can do that and much more.
SSMSBoost is a free add-in that empowers SSMS with many useful features, among which exporting to Excel is just one. I highly suggest that you check out the feature list, because it’s really impressive.
Once SSMSBoost is installed, every time you right click a results grid, a context menu appears that lets you export the grid data to several formats.
No surprises, one of those formats is indeed Excel.

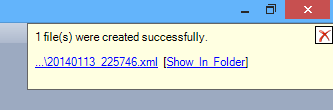
The feature works great, even with relatively big result sets. However, it requires 5 clicks to create the Spreadsheet file and one more click to open it in Excel:
So, where is the single click I promised in the title of this post?
The good news is that SSMSBoost can be automated combining commands in macros to accomplish complex tasks.
Here’s how to create a one-click “open in Excel” command:
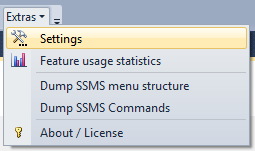
First, open the SSMSBoost settings window clicking the “Extras” button.
In the “Shortcuts & Macros” tab you can edit and add macros to the toolbar or the context menu and even assign a keyboard shortcut.

Clicking the “definitions” field opens the macro editor
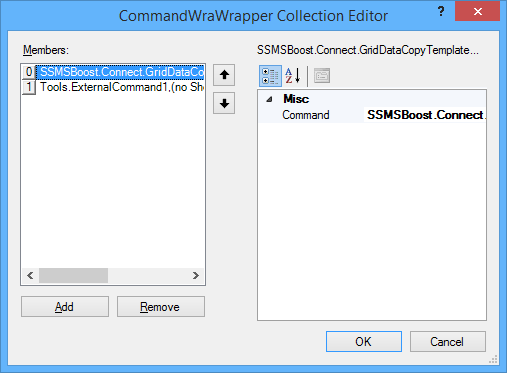
Select “Add” and choose the following command: “SSMSBoost.Connect.GridDataCopyTemplateAllGridsDisk3”. This command corresponds to the “Script all grids as Excel to disk” command in SSMSBoost.
Now save everything with OK and close. You will notice a new button in your toolbar:
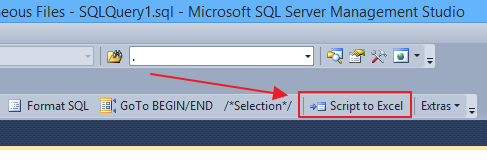
That button allows to export all grids to Excel in a single click.
You’re almost there: now you just need something to open the Excel file automatically, without the need for additional clicks.
To accomplish this task, you can use a Powershell script, bound to a custom External Tool.
Open the External Tools editor (Tools, External Tools), click “Add” and type these parameters:
Title: Open last XML in Excel
Command: C:\Windows\System32\WindowsPowerShell\v1.0\powershell.exe
Arguments: -File %USERPROFILE%\openLastExcel.ps1 -ExecutionPolicy Bypass
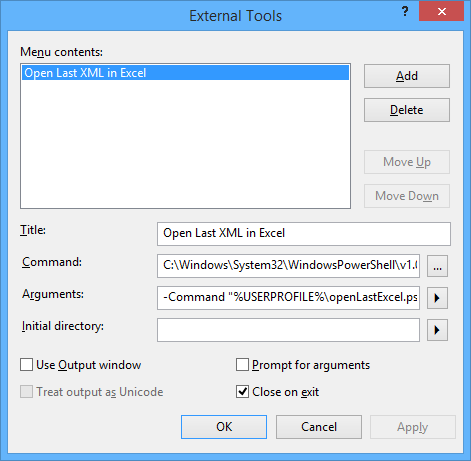
Click OK to close the External Tools editor.
This command lets you open the last XML file created in the SSMSBoost output directory, using a small Powershell script that you have to create in your %USERPROFILE% directory.
The script looks like this:
## =============================================
## Author:      Gianluca Sartori - @spaghettidba
## Create date: 2014-01-15
## Description: Open the last XML file in the SSMSBoost
##              output dicrectory with Excel
## =============================================

sl $env:UserProfile

# This is the SSMSBoost 2012 settings file
# If you have the 2008 version, change this path
# Sorry, I could not find a registry key to automate it.
$settingsFile = "$env:UserProfile\AppData\Local\Solutions Crew\Ssms2012\SSMSBoostSettings.xml"

# Open the settings file to look up the export directory
$xmldata=[xml](get-content $settingsFile)

$xlsTemplate = $xmldata.SSMSBoostSettings.GridDataCopyTemplates.ChildNodes |
    Where-Object { $_.Name -eq "Excel (MS XML Spreadsheet)" }

$SSMSBoostPath = [System.IO.Path]::GetDirectoryName($xlsTemplate.SavePath)

$SSMSBoostPath = [System.Environment]::ExpandEnvironmentVariables($SSMSBoostPath)

# we filter out files created before (now -1 second)
$startTime = (get-date).addSeconds(-1);

$targetFile = $null;

while($targetFile -eq $null){
    $targetFile = Get-ChildItem -Path $SSMSBoostPath |
        Where-Object { $_.extension -eq '.xml' -and $_.lastWriteTime -gt $startTime } |
        Sort-Object -Property LastWriteTime |
        Select-Object -Last 1;

    # file not found? Wait SSMSBoost to finish exporting
    if($targetFile -eq $null) {
        Start-Sleep -Milliseconds 100
    }
};

$fileToOpen = $targetFile.FullName

# enclose the output file path in quotes if needed
if($fileToOpen -like "* *"){
    $fileToOpen = "`"" + $fileToOpen + "`""
}

# open the file in Excel
# ShellExecute is much safer than messing with COM objects...
$sh = new-object -com 'Shell.Application'
$sh.ShellExecute('excel', "/r " + $fileToOpen, '', 'open', 1)
Now you just have to go back to the SSMSBoost settings window and edit the macro you created above.
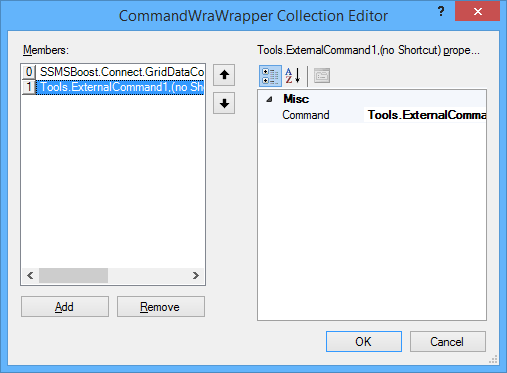
In the definitions field click … to edit the macro and add a second step. The Command to select is “Tools.ExternalCommand1”.
Save and close everything and now your nice toolbar button will be able to open the export file in Excel automagically. Yay!

Troubleshooting
If nothing happens, you might need to change your Powershell Execution Policy. Remember that SSMS is a 32-bit application and you have to set the Execution Policy for the x86 version of Powershell.
Starting Powershell x86 is not easy in Windows 8/8.1, The documentation says to look up “Windows Powershell (x86)” in the start menu, but I could not find it.
The easiest way I have found is through another External Tool in SSMS. Start SSMS as an Administrator (otherwise the UAC will prevent you from changing the Execution Policy) and configure an external tool to run Powershell. Once you’re in, type “Set-ExecutionPolicy Remotesigned” and hit return. The external tool in your macro will now run without issues.
Bottom line
Nothing compares to SSMS when it comes down to writing queries, but Excel is the best place to format and manipulate data.
Now you have a method to take advantage of the best of both worlds. And it only takes one single click.
Enjoy.
My stored procedure code template
Do you use code templates in SSMS? I am sure that at least once you happened to click “New stored procedure” in the object explorer context menu.
The default template for this action is a bit disappointing and the only valuable line is “SET NOCOUNT ON”. The rest of the code has to be heavily rewritten or deleted. Even if you use the handy keyboard shortcut for “Specify values for template parameters” (CTRL+SHIFT+M), you end up entering a lot of useless values. For instance, I find it very annoying having to enter stored procedure parameters definitions separately for name, type and default value.
Moreover, one of the questions I see asked over and over in the forums at SqlServerCentral is how to handle transactions and errors in a stored procedure, something that the default template does not.
Long story short, I’m not very happy with the built-in template, so I decided to code my own:
-- =============================================
-- Author:      <Author,,Name>
-- Create date: <Create Date,,>
-- Description: <Description,,>
-- =============================================
CREATE PROCEDURE <ProcedureName, sysname, >
AS
BEGIN
    SET NOCOUNT ON;
    SET XACT_ABORT,
        QUOTED_IDENTIFIER,
        ANSI_NULLS,
        ANSI_PADDING,
        ANSI_WARNINGS,
        ARITHABORT,
        CONCAT_NULL_YIELDS_NULL ON;
    SET NUMERIC_ROUNDABORT OFF;

    DECLARE @localTran bit
    IF @@TRANCOUNT = 0
    BEGIN
        SET @localTran = 1
        BEGIN TRANSACTION LocalTran
    END

    BEGIN TRY

        --Insert code here

        IF @localTran = 1 AND XACT_STATE() = 1
            COMMIT TRAN LocalTran

    END TRY
    BEGIN CATCH

        DECLARE @ErrorMessage NVARCHAR(4000)
        DECLARE @ErrorSeverity INT
        DECLARE @ErrorState INT

        SELECT  @ErrorMessage = ERROR_MESSAGE(),
                @ErrorSeverity = ERROR_SEVERITY(),
                @ErrorState = ERROR_STATE()

        IF @localTran = 1 AND XACT_STATE() <> 0
            ROLLBACK TRAN

        RAISERROR ( @ErrorMessage, @ErrorSeverity, @ErrorState)

    END CATCH

END
This template can be saved in the default path and overwrite the kludgy “New Stored Procedure” built-in template.
Some things to keep in mind:
- I don’t use nested transactions (they’re totally pointless IMHO) and I check for an existing transaction instead.
- The stored procedure will commit/rollback the transaction only if it was started inside the procedure.
- I want every stored procedure to throw the errors it catches. If there’s another calling procedure, it will take care of the errors in the same way.
- This is your computer: you can safely replace <Author, ,Name> with your real name.
- It would really be nice if there was some kind of way to make SSMS fill <Create Date, ,> with the current date. Unfortunately there’s no way. If you are using CVS or some other kind of version control system, this is a nice place for an RCS string such as $Date$
- If you like templates parameters and you heard bad news regarding this feature in the next version of SQL Server (codename Denali), don’t worry: MS fixed it.
Windows authenticated sysadmin, the painless way
Personally, I hate having a dedicated administrative account, different from the one I normally use to log on to my laptop, read my email, write code and perform all the tasks that do not involve administering a server. A dedicated account means another password to remember, renew periodically and reset whenever I insist typing it wrong (happens quite frequently).
I hate it, but I know I cannot avoid having it. Each user should be granted just the bare minimum privileges he needs, without creating dangerous overlaps, which end up avoiding small annoyances at the price of huge security breaches.
When I was working as a developer only, I was used to having my windows account registered as sysadmin on my dev box and, when I switched to a full time DBA role, it took me a while to understand how important it was to have a different sysadmin user for the production servers.
That said, one of the things that makes the use of dedicated administrative accounts awkward and frustrating is windows authentication in SSMS. While extremely handy when the user that has to log on to the database is the same logged on to windows, integrated security becomes pesky and uncomfortable when the database user is a different one.
No big deal, but launching SSMS as different user brings in some small annoying issues:
- SSMS must be opened choosing “Run as…” from the context menu.
It’s the most common way to run a program as a different user, but I would happily live without this additional step. - The user’s credentials have to be typed in.
OK, seems trivial, but I find it annoying. Typically, users with elevated privileges are subject to more stringent password policies, that means longer passwords, no dictionary words, symbols. Having to type such a password once a day is enough for me. - No drag & drop from other windows: neither files, nor text
This limit is imposed by windows, that filters the messages between processes in different security contexts. - Whenever there is more than one instance of SSMS running, it’s impossible to predict which one will open a file on double click
It’s like russian roulette. Want to play? - Settings are stored separately. Each modification to program settings has to be made on both profiles.
Application settings are stored somewhere under the user profile folder, or in the registry. In both cases, each user has different settings, stored in different locations. - Save and load dialogs point to different folders
By default, SSMS points to the user’s documents folder.
How to overcome these annoyances? A simple solution comes from a small tool released from Sysinternals in January 2010.
Desktops
There are dozens, maybe hundreds of applications that allow windows users to create virtual desktops, similar to those found in Linux, but Desktops is different. To say it by Mark Russinvich’s (blog|twitter) words:
Unlike other virtual desktop utilities that implement their desktops by showing the windows that are active on a desktop and hiding the rest, Sysinternals Desktops uses a Windows desktop object for each desktop. Application windows are bound to a desktop object when they are created, so Windows maintains the connection between windows and desktops and knows which ones to show when you switch a desktop.
In other words, Desktops is able to create a whole desktop process and then run new windows bound to that process. This also means that the main desktop process (explorer.exe) can be started in a different security context, simply terminating and restarting it. All the windows started from that moment on will be bound to their originating desktop process, hence to the same security context.
Let’s see how this can be achieved:
- Download and install Sysinternals Desktops
- Open task manager, find the process named “explorer.exe” and note down its PID
- Create a new desktop and activate it
- Open task manager, find and kill the explorer process that has a PID different from the one you noted down
- From task manager, start a new process: “runas /user:somedomain\someuser explorer.exe”
Done! A new explorer process will be started with the credentials you supplied.
Smooth, isn’t it? Well, not much, still too complex for me:
- The PID from the original explorer process has to be noted down before creating the new desktop: thereafter it will be impossible to determine which desktop belongs to a process
- By default, windows restarts automatically explorer whenever it is killed, making our efforts in vain.
In order to work around these problems, I coded a small C# application called RestartExplorer that identifies the explorer process bound to the current desktop and restarts it as a different user.
The code is straightforward and you will find it attached to this post. For those not so comfortable with Visual Studio, I also attached a compiled version.
The core functionality consists of just a few rows of code:
// Create a ProcessStartInfo object to pass credentials
System.Diagnostics.ProcessStartInfo psi = new System.Diagnostics.ProcessStartInfo();
if (!username.Equals(""))
{
    fixed (char* pChars = password.ToCharArray())
    {
        pass = new System.Security.SecureString(pChars, password.Length);
    }
    psi.UserName = user;
    psi.Password = pass;
    if(!domain.Equals(System.Environment.MachineName))
        psi.Domain = domain;
}

//Runs the Explorer process
psi.FileName = Path.Combine(Environment.GetFolderPath(Environment.SpecialFolder.Windows), "explorer.exe"); // c:\windows\explorer.exe

//This has to be set to false when running as a different user
psi.UseShellExecute = false;
psi.ErrorDialog = true;
psi.LoadUserProfile = true;
psi.WorkingDirectory = "c:\\";

try
{
    //kill current explorer process
    IntPtr hWnd = FindWindow("Progman", null);
    PostMessage(hWnd, /*WM_QUIT*/ 0x12, 0, 0);
    //start a new explorer with the credentials supplied by the user
    System.Diagnostics.Process.Start(psi);
}
catch (Exception e)
{
    throw e;
}
Once run, the application simply asks for the credentials of the users that will run explorer.exe bound to the current desktop:

By clicking OK, the explorer process gets terminated and immediately restarted under the specified security context. This creates a brand new desktop process, entirely dedicated to our administrative account.
To switch back to the regular users’ desktop, you just have to press the hotkey combination you set up in Desktops’ control panel or click on the tray icon, thus implementing something very similar to windows’ “quick user switch”, but quicker and more versatile.

Desktops tray panel

Desktops control panel
So far we have solved our main issues:
- SSMS can be started normally, by double clicking its icon
- No credentials to type
- Drag & drop allowed from any window in this desktop
- SSMS opens the .sql files double clicked in this desktop
Sharing settings
We still have to find a way to share application settings between different windows accounts.
We spent hours and hours configuring SSMS with our favourite keyboard settings, templates and all the other things that make our lives easier: we don’t want to set up everything from scratch for our administrator user. Is there a way to share the same settings we set up for the regular user?
Of course there is, and, again, it comes from Sysinternals and it is named Junction.
Junction is a tool that allows creating symbolic links on the NTFS file system. The concept of symbolic links has been present for many years in UNIX operating systems: symlinks are anchors to files or folders residing on different paths in the file system, that are treated as if they were physical files or folders in the path they are linked in.
In order to share settings between two users, we could create a symbolic link from the administrator user’s profile folder to the regular user’s profile folder, as represented in this picture:

Unfortunately, the profile folder contains a special file, named NTUSER.dat (the user’s registry keys), that cannot be opened concurrently on a desktop operating system.
The only possible solution is linking each subfolder in the profile path:

A quick and easy way to accomplish this task is running this script:
Set fs = createObject(“Scripting.FileSystemObject”)
Set ws = createObject(“WScript.Shell”)

JunctionPath = “d:\Downloads\Junction\Junction.exe”

For each dir in fs.getFolder(“.”).subFolders
	DestPath = “..\AdminUser”
	If NOT Fs.folderExists(DestPath) Then
		Fs.createFolder(DestPath)
	End if
	If NOT Fs.folderExists(DestPath & “\” & dir.name) Then
		call ws.run(JunctionPath & “ “”” & DestPath & “\” & dir.name & “”” “”” & dir.path & “”””, 0, true)
	End if
Next
MsgBox “Profile linked successfully!”, vbInformation
Instructions:
- Copy the script code and save it as createJunction.vbs in the profile folder the links will point to (For instance, “c:\documents and settings\RegularUser”)
- Update “DestPath“ with the name of the user that will link the profile (For instance, “AdminUser”)
- Update “JunctionPath” with the path to Junction.exe
- Create a backup copy of the profile we will substitute with the links
- Delete all the folders in the admin profile, but keep all the files (especially NTUSER.dat)
- Go back to the folder where you saved the script and run it
For each subfolder in the regular user’s profile, the script will create a junction in the administrator user’s profile folder. This will not be directly visible from explorer: junctions are not different from real folders. Running DIR from the command prompt, instead, will reveal that we are dealing with something completely different:

WARNING!! Symbolic links act exactly as normal folders: this means that deleting a folder that is instead a symbolic link, will delete the link’s target folder. In other words, deleting a file from AdminUser’s profile folder, will delete the file from RegularUser’s profile! Be careful!
What we achieved is a complete sharing of settings between our users. Going back to our original issue list:
- Settings are saved in the same path. Every change in the program settings will be automatically saved in the original profile.
- Open and save dialogs point to the same documents folder.
Mission accomplished!
However, registry settings will not be shared. There is a tool (RegLN) that allows creating symbolic links in the registry, but, personally, I don’t feel like exploring this possibility, that I find a bit dangerous.
In the end, SSMS settings are saved in the profile folder, which we already have shared. This is enough for me.
RESOURCES:
